Friday, December 29, 2023

The Loyalty of Hanuman: A Mini-Essay

     In the Hindu faith, the monkey god Hanuman represents courage and loyalty.[1] The child of Vayu – the god of wind – and a monkey named Anjana, Hanuman possesses the ability to fly and is known for his insatiable appetite. In fact, believing the sun was a golden fruit, Hanuman chased the glowing orb throughout the sky until Indra struck him down with a thunderbolt and his father, angered by the event, tortured all of the gods with indigestion.[2] Hanuman, though, is most noted for his devotion to Prince Rama, who may have been based on an actual prince named Ramacandra who reigned sometime between 1000 B.C.E. and 700 B.C.E.[3] According to legend, Princess Sita was kidnapped from Prince Rama by the demon king Ravana. In an effort to save his beloved, Rama asked his lieutenant Hanuman to use his power of flight to scour the land between India and Sri Lanka in search of Sita. Finding her in the clutches of Ravana, Hanuman decided to enact revenge on Ravana’s city before returning to Rama with Sita’s location; however, he was captured in the process and tortured by Ravana’s soldiers, who tied oil-soaked cloths to his tail and lit them on fire. Feeling from the city, Hanuman’s burning tail set much of the town ablaze and, after returning to Rama, the prince’s forces descended on the city and rescued Sita.[4] Because of his efforts, Hanuman has become an emblem of loyalty in Hinduism and is often depicted protectively holding a representation of Rama and Sita near his heart.[5]

Works Referenced

Littleton, C. Scott, ed. Mythology: The Illustrated Anthology of World Myth and Storytelling. London: Duncan Baird, 2002.

O’Connell, Mark, and Raje Airey. The Complete Encyclopedia of Signs and Symbols: Identification and Analysis of the Visual Vocabulary that Formulates Our Thoughts and Dictates Our Reactions to the World Around Us. London: Hermes House, 2005.

Woolf, Greg, ed. Ancient Civilizations: The Illustrated Guide to Belief, Mythology and Art. London: Duncan Baird, 2005.
____________________
[1] O’Connell and Raje, 40.
[2] Littleton, 358.
[3] Woolf, 175.
[4] Littleton, 357.
[5] Woolf, 152.

Friday, December 22, 2023

Framed Fingers and Teeth

$10 - $15 (based on 2020 prices)
Makes two frames

I wanted to accent 2020’s mad scientist theme with a collection of smaller framed body parts to accompany larger props like the framed torso and skinned lab monster. For this, I used a handful of the rotten teeth and severed fingers created en mass for the haunt. I also wanted to include a subtle nod to Edgar Allan Poe, with the teeth labeled Berenice as a reference to his short story of the same name (I’ll let you read the tell to determine what it references).
  • Two 5” x 7” picture frames
  • One 10 oz. can of interior/exterior, fast-drying spray paint in flat black*
  • One 2 oz. bottle of acrylic paint in metallic copper*
  • One 2 oz. bottle of acrylic paint in flat olive*
  • One blank sheet of white copy paper
  • At least four tablespoons of black tea (e.g. Darjeeling, Earl Gary, English Breakfast, etc.)
  • One pan large enough to soak the paper
  • One 4 oz. bottle of all-purpose tacky glue*
  • Twelve rotten teeth (learn how to make them here)
  • Five severed fingers (learn how to make them here)
  • One 0.3 fluid ounce bottle of red food coloring*
  • One 4 oz. bottle of clear, all-purpose tacky glue gel*
1. Remove the backings and glass from the frames and, on a newspaper-lined surface in a well-ventilated area, give them an even coat of black spray paint. Although I only used one coat, you may want more depending on your desired coverage. Keep in mind, though, this is the base coat and much of the paint will be covered up by other colors.
2. Once the paint dries, apply a layer of metallic copper. You want to give the illusion of worn metal, so gently brush the paint along the raised surfaces. It may work best to experiment with a scrap of cardboard first. To enhance the patina, you can also randomly smudge olive paint with either a paper towel or sponge.
3. Boil enough water to completely submerge the paper and pour it into the pan. Add the tea. The longer you allow the tea to brew, the darker the stain will become. Likewise, greater amounts of tea will produce a richer stain. I found that a combination of English and Irish Breakfast brewed for over ten minutes produces a nice, deep brown. Submerge the paper into the tea mixture and soak it until it reaches the color you desire. I soaked mine for eight hours and scattered the loose-leaf tea over the top of the paper to add spots. Remove the paper from the water and allow it to dry.
4. Coat the backings with a light layer of glue and adhere the paper, pressing it down as smooth as possible to prevent bubbles and wrinkles. Once the glue dries, trim the excess. You can also use olive or vegetable oil to add further stains, applying a small amount of oil to your finger and patting it on the paper.
5. Position the fingers and teeth onto the backings, arrange them so they are visually appealing, and then glue them in place. You may need to replace the frames before doing so to ensure the items are perfectly centered once the props are assembled.
6. In a plastic container (because the food coloring will stain, use something disposable or that you won’t mind dying), pour in your desired amount of clear glue gel and slowly add red food coloring to the solution until it achieves the sanguine hue you desire. To give the blood further density, add blue food coloring and mix well.
7. Use an old spoon or plastic utensil to create pools of blood around the severed ends of the finger, spreading the blood slightly upward along their surfaces to blend the painted blood with the blood glue.
8. As the blood glue dries on the fingers, use black paint or a black pen to write Berenice or a name of your choosing below the teeth. You could also print identifying labels and use them instead.
9. Reattach the backings to the frames. If you plan to display the prop outside in windy conditions, consider gluing the backings in place for additional support. You can also fabricate a loop with steel wire or utilize a store-bought version to hang the props on a wall.
*You will not use the entire bottle’s content for this project.

Friday, December 15, 2023

Cross Wreath

$10 - $15 (based on 2017 prices)
Makes one wreath

The Dia de Los Muertos portion of 2017’s haunted house required dozens of wreaths and flowers for an intricate funeral scene. For this version, I used the same decorative paper from the sugar skull wreath to cover an extra cross left over from the demonic monks. I also created a second version (seen in the final picture) with the small assortment of random flowers left over after completing all of the wreaths for the display.
  • One twelve-inch grapevine wreath
  • Artificial roses in multiple colors (pink, purple, red, white, yellow)
  • Two sprigs of artificial baby’s breath
  • Hot glue gun and glue sticks
  • One seven-inch wooden cross
  • One sheet of decorative paper (8 ½” x 11”)
  • One 4 oz. bottle of all-purpose tacky glue*
1. Cover a large portion of the wreath in a dense arrangement of the artificial roses. To enhance the appearance of the prop, ensure you create contrast by using different hues in various positions. You may want to play with the arrangement first before gluing it in place. Once this is done, accent both ends with a sprig of baby’s breath to frame the cross.
2. Coat one side of the wooden cross with a light layer of glue and then adhere the decorative paper, pressing it down as smooth as possible to prevent bubbles and wrinkles. Once the glue dries, trim the excess paper, position the cross in the open portion of the wreath, and glue it in place. Although I used hot glue, you can utilize superglue for a sturdier hold, especially if you plan to display this item in windy outdoor conditions for an extended period of time.
3. If the wreath did not come with a hanging loop, you can fashion one with a strip of ribbon or steel wire.
4. For an alternate look, you can change the type of flowers or use decorative elements rather than the paper to accent the cross.
*You will not use the entire bottle’s content for this project.

Friday, December 8, 2023

"A Lamentation" (A Poem)

The details of James Clarence Mangan’s poem “A Lamentation for Sir Maurice Fitzgerald” are contestable: Maurice Fitzgerald was killed in the battle of Rathmines in 1649, not Flanders in 1642 (Edmund Fitzgerald, who was a captain in the Irish army, was killed in battle in 1642).[1] Likewise, the poem, which Mangan claims is an Irish ballad translated from Irish, is actually an imitation translated from German.[2] Despite its inaccuracies, Mangan’s work offers a bevy of haunting imagery, from phantom women to wind-swept screams in the night.

There was lifted up one voice of woe,
One lament of more than mortal grief,
Through the wide South to and fro,
For a fallen Chief.
In the dead of night that cry thrilled through me,
I looked out upon the midnight air?
My own soul was all as gloomy,
As I knelt in prayer.

O’er Loch Gur, that night, once – twice-yea, thrice –
Passed a wail of anguish for the Brave
That half curled into ice
Its moon-mirroring wave.
Then uprose a many-toned wild hymn in
Choral swell from Ogra’s dark ravine,
And Mogeely’s Phantom Women
Mourned the Geraldine!

Far on Carah Mona’s emerald plains
Shrieks and sighs were blended many hours,
And Fermoy in fitful strains
Answered from her towers.
Youghal, Keenalmeaky, Eemokilly,
Mourned in concert, and their piercing keen
Woke wondering life the stilly
Glens of Inchiqueen.

From Loughmoe to yellow Dunanore
There was fear; the traders of Tralee
Gathered up their golden store,
And prepared to flee;
For, in ship and hall from night till morning,
Showed the first faint beamings of the sun,
All the foreigners heard the warning
Of the Dreaded One!

“This,” they spake, “portendeth death to us,
If we fly not swiftly from our fate!
Self-conceited idiots! thus
Ravingly to prate!
Not for base-born higgling Saxon trucksters
Ring laments like those by shore and sea!
Not for churls with souls like hucksters
Waileth our Banshee!

For the high Milesian race alone
Ever flows the music of her woe!
For slain heir to bygone throne,
And for Chief laid low!
Hark! ... Again, methinks, I hear her weeping
Yonder! is she near me now, as then?
Or was but the night-wind sweeping
Down the hollow glen?[3]

Works Referenced

Duffy, Charles Gavan. The Ballad Poetry of Ireland. 5th ed. Dublin: James Duffy, 1845.

Hickson, Mary Agnes. Selections from Old Kerry Records, Historical and Genealogical with Introductory Memoir, Notes, and Appendix. London: Watson and Hazell, 1872.

Mangan, James Clarence. “A Lamentation for Sir Maurice Fitzgerald.” Poems of James Clarence Mangan. Ed. D.J. O’Donoghue. Dublin: M.H. Gill and Son, 1910. 11-13.
_______________
[1] Hickson, 295.
[2] Duffy, 138.
[3] Mangan, 11-13.

Friday, December 1, 2023

Christmas Lanterns

$10 - $15 (based on 2022 prices)
Makes one lantern

At the end of 2022, I was asked to make a set of props for a local theater’s production of Christmas Belles. Being unable to make many props for the Halloween season, I jumped at the opportunity to do something creative. For this prop, I used the six lanterns I purchased on clearance in August (they were originally meant to be distressed and used to line the haunt’s walkway, but these plans never transpired). I transformed them into wintery displays and they were scattered throughout the lobby to set the tone before the audience entered the theater.
  • One fifteen-inch LED lantern
  • One sheet of white glittery drape (roughly 32” x 40”)
  • One 4 oz. bottle of clear, all-purpose tacky glue gel*
  • A random assortment of Christmas ornaments in varying colors and sizes
  • One 1.48 oz. bag of large, white glittery snow
  • One 2 oz. bottle of acrylic paint in flat white*
  • One yard of plaid ribbon
  • One yard of faux evergreen garland
  • A random assortment of bells, artificial berries, and pinecones
1. If the lantern was not already white, remove its glass panels and, on a newspaper-lined surface in a well-ventilated area, give it one or two even coats of white spray paint. For an alternate look, consider using red.
2. Unscrew the lantern’s base, measure its surface, and cut a swatch of white glittery drape large enough to cover the area (mine was 5” by 6”). You want to make the square an inch or two larger than the base, since you will need extra fabric to create billows. Once this is done, glue the drape to the base, bunching it up in parts to fashion folds.
3. Position the ornaments on the base and glue them in place. Depending on the size of the ornaments and how low the LED light hangs in the lantern, you may need to play with their arrangement to prevent them from striking.
4. Lightly brush a coat of glue over the tops of the ornaments and the surface of the drape and then sprinkle the large, white glitter snow over them. Do not cover them too much, though, since they still need to be visible.
5. Using a brush with splayed bristles, stipple white paint along the edges of the glass panels to create the look of frost. As with step four, you do not want to overdo this process, since it will make the contents of the lantern indiscernible.
6. Gently reattached the base to the lantern. Although you can glue the two together, I would not recommend this, since you may need to access the content later. If any of the drape sticks out through the juncture (as seen in this image), use a pair of scissors to trim it.
7. Cut a twelve-inch section of plaid ribbon, wrap it around the top of the lantern, and glue it in place. Depending on the size of the lantern, you may need to decrease or increase this length.
8. Starting with the handle, wrap the evergreen garland around the lantern, gluing it in spots to hold it in place. Akin to step seven, you might need to adjust the measurements to fit the length of your lantern.
9. Accent the top of the lantern with bells, berries, and pinecones (or any other holiday-themed items like candy canes, holly, or poinsettias).
10. The lantern can be further detailed by gently brushing a coat of glue on its edges and sprinkling the large, white glittery snow over it; however, since this can be messy and continue to flake off throughout the season, I would only recommend it if you plan to display the lantern outdoors.
*You will not use the entire bottle’s content for this project.

Friday, November 24, 2023

Bakunawa and the Seven Moons

     Philippine mythology maintains Bathala, the supreme being, created seven moons – each to illuminate one night of the week. However, Bakunawa, the dragon ruler of the seas, became envious of the moons and proceeded to ingest them one-by-one over the course of a week. During the final night, humanity banged drums and pots in an effort to stop Bakunawa from consuming the final moon. The noise, in turn, awakened Bathala who, seeing six of his seven creations gone, forced Bakunawa to retreat to his cave and, to save the final moon, planted patches of bamboo on its surface to make it look spotted and unappetizing to Bakunawa.[1] Prior to the Spanish conquest of the Philippine islands during the sixteenth century, the Ifugao in the Cordilleras region of northern Luzon specialized in hand-carved wood masks which represented Bakunawa and were used in festivities celebrating his retreat and the last moon’s salvation.[2] In contemporary society, though, the Ifugao create these masks as souvenirs for tourists and, for many Igorot Filipino Americans, household decorations to showcase their heritage.[3]

Works Referenced

Deere, Kiki. Journey through the Philippines: An Unforgettable Journey from Manila to Mindanao and Beyond. Clarendon, VT: Tuttle, 2017.

Leo, Mark Sabas. “Igorot Home Decoration.” Encyclopedia of Asian American Folklore and Folklife. Eds. Jonathan H. X. Lee and Kathleen M. Nadeau. Westport, CT: Greenwood Publishing Group, 2010. 379-380.

Yoshitani, Yoshi. Beneath the Moon: Fairy Tales, Myths, and Divine Stories from Around the World. New York: Ten Speed Press, 2020.
____________________
[1] Yoshitani, 127.
[2] Deere, 22.
[3] Leo, 380.

Friday, November 17, 2023

Dismembered Patient

$60 - $70 (based on 2020 prices)
Makes one patient

The crowning glory of 2020’s haunt was this dismembered patient. To help reduce the prop’s cost, I purchased the hanging figure during the after-Halloween sales and used the left-over tubing from the mind control device and organ harvesting device. Since I aimed for a violent theme, I made the patient extremely bloody; however, how gory you decide to make the proper is entirely up to you and your haunt’s aesthetic.
  • One life-size hanging prop with arms, head, and shoulders
  • One 2 oz. bottle of acrylic paint in flat beige*
  • One 2 oz. bottle of acrylic paint in flat black*
  • One 2 oz. bottle of acrylic paint in flat brown*
  • One 2 oz. bottle of acrylic paint in flat cream*
  • One 2 oz. bottle of acrylic paint in flat coral*
  • One 2 oz. bottle of acrylic paint in flat white*
  • One 2 oz. bottle of acrylic paint in glossy maroon*
  • One 2 oz. bottle of acrylic paint in glossy red*
  • One 2 oz. bottle of acrylic paint in metallic silver*
  • One 0.44 oz. bottle of clear nail polish*
  • One 10 oz. can of interior/exterior, fast-drying spray paint in flat black
  • One 10 oz. can of interior/exterior, fast-drying spray paint in flat brown
  • One 10 oz. can of interior/exterior, fast-drying spray paint in flat olive
  • One 10 oz. can of interior/exterior, fast-drying spray paint in glossy red
  • One 10 oz. can of interior/exterior, fast-drying spray paint in metallic silver
  • One 20” x 30” foam board
  • One 12 oz. can of insulating foam
  • One plastic ribcage
  • One human-sized plastic heart
  • One 8 oz. can of oil-based interior wood stain in Jacobean*
  • One 8 oz. can of oil-based interior wood stain in red chestnut*
  • Two feet of 1/4” clear plastic tubing
  • Four feet of 1/2” clear plastic tubing
  • Five feet of plastic chains
  • Three plastic syringes
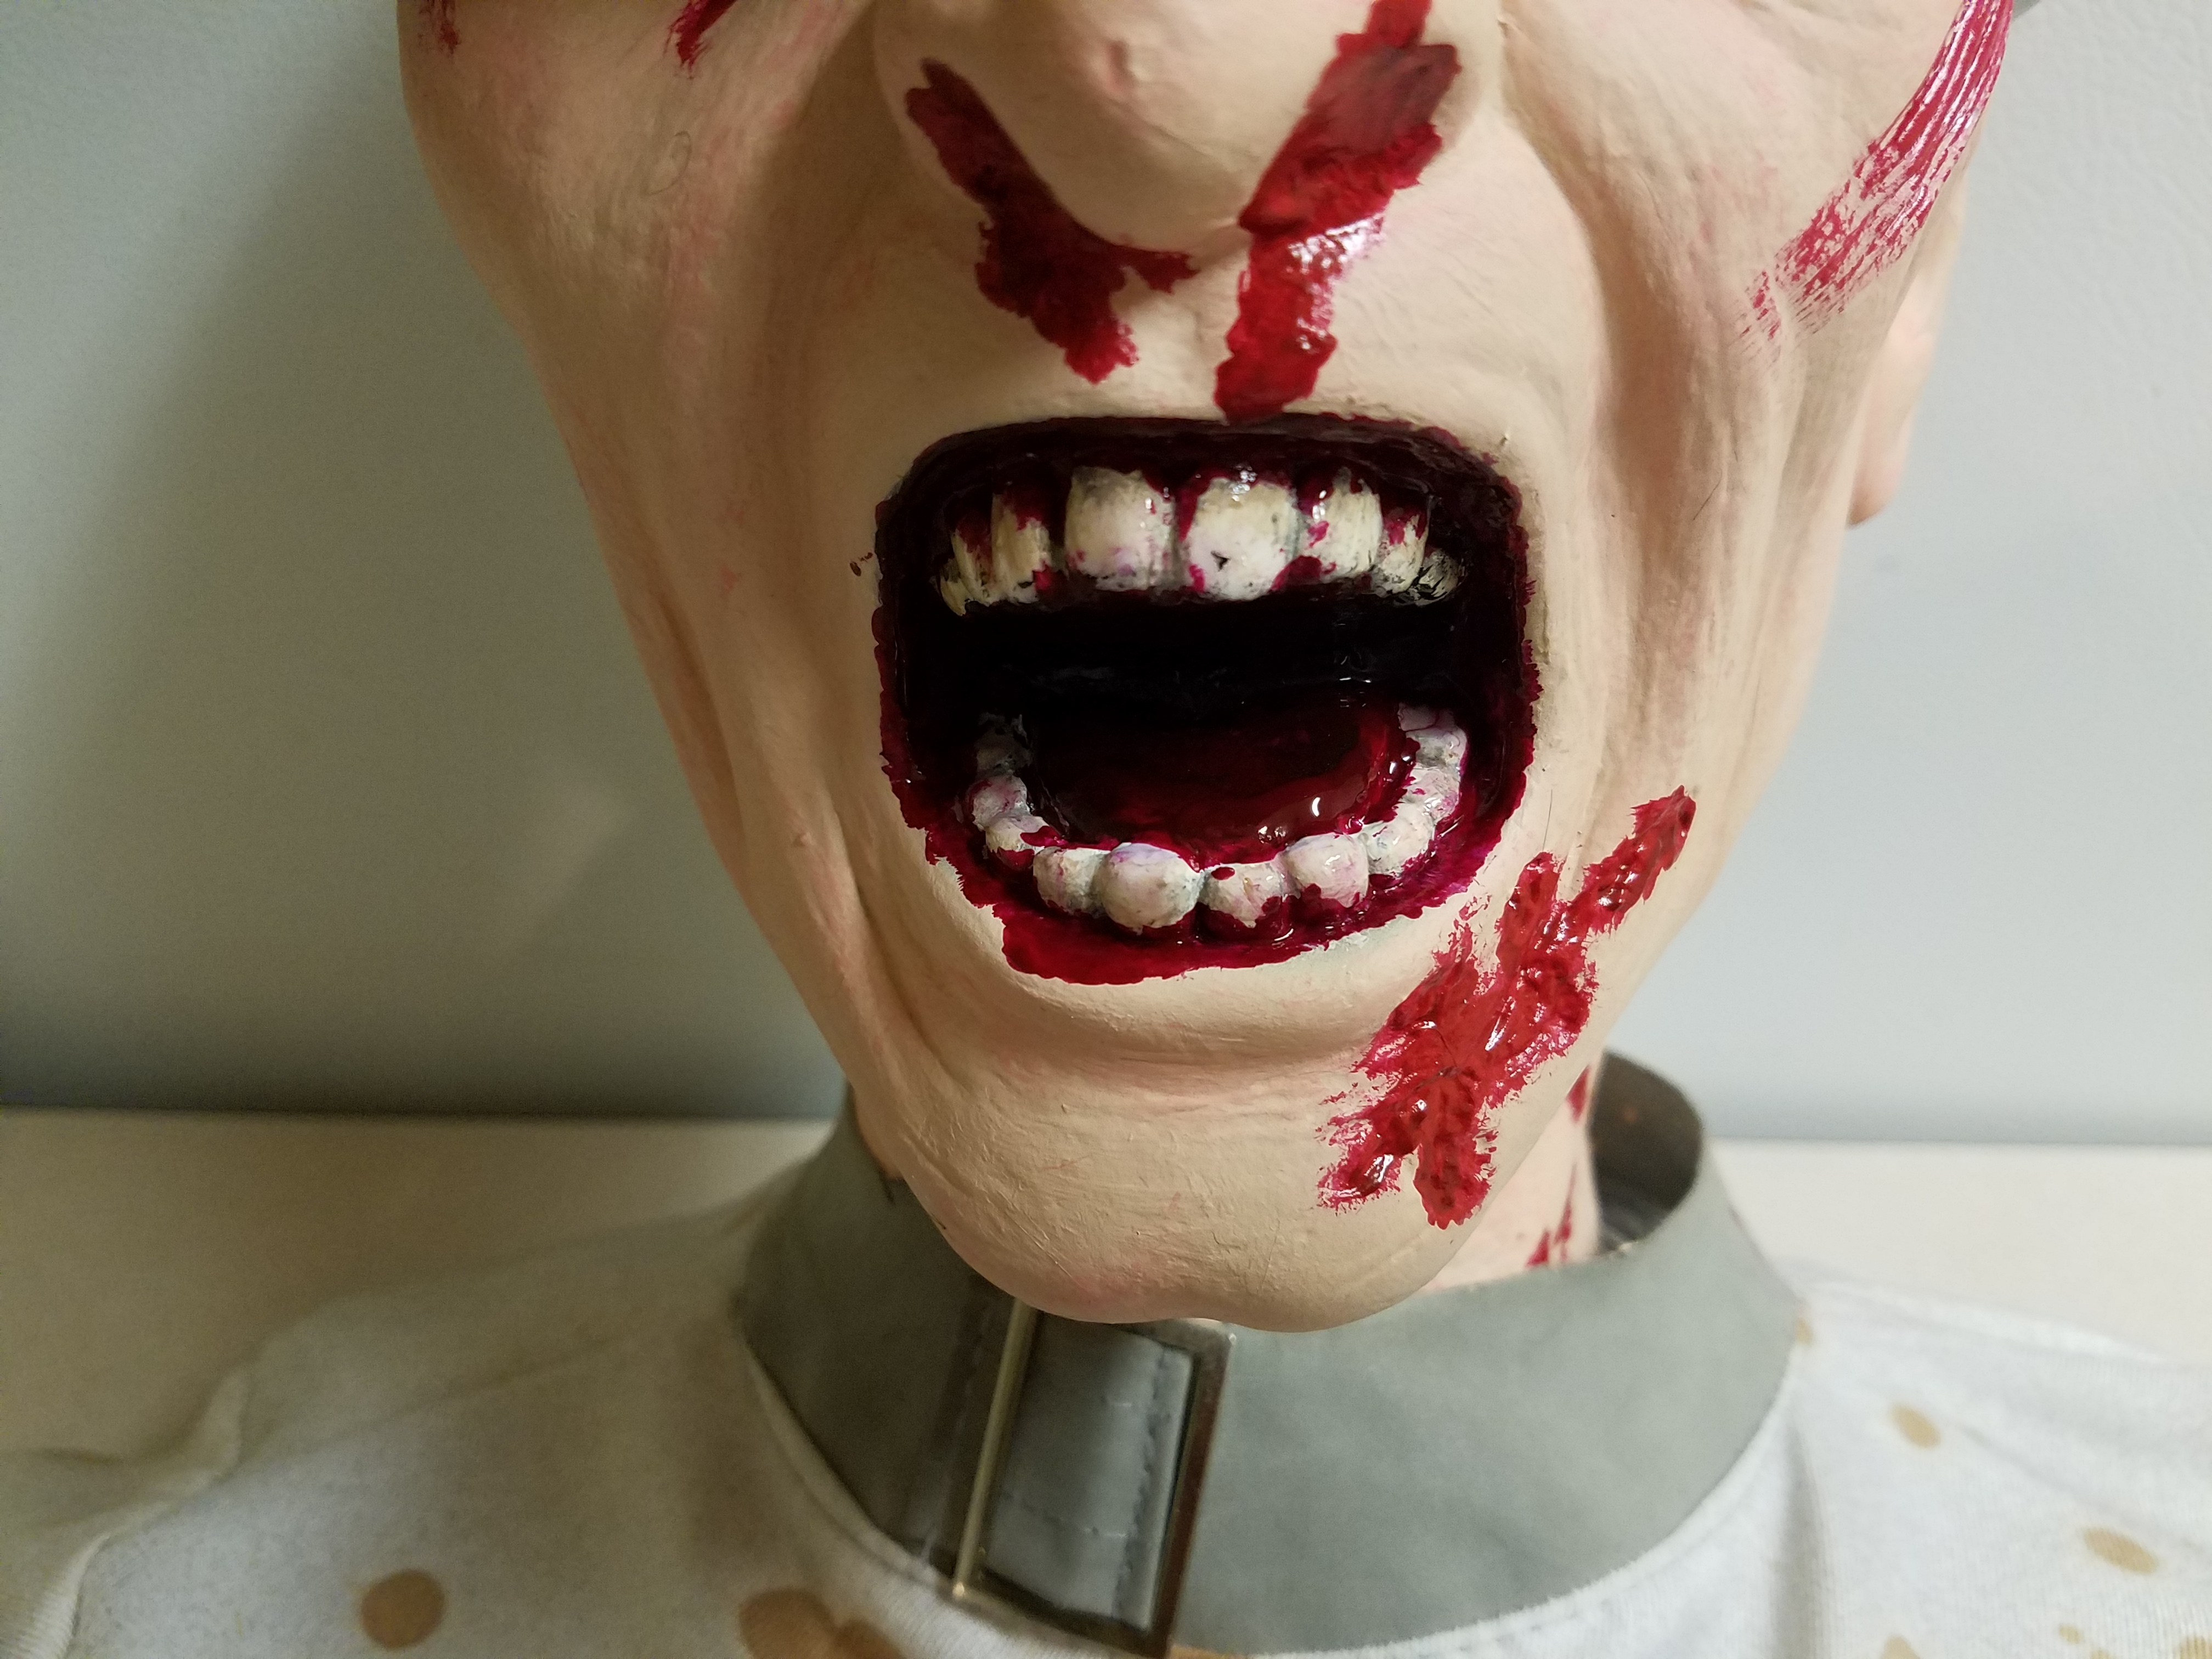
1. Apply three even coats of beige paint to the head. Although I used three, you may want more or less based on your desired coverage. Then, give the face a smudging of coral paint, focusing primarily on the creases. Use your own skin patterns or those found in a medical textbook for reference.
2. Detail the wounds with glossy red paint and use a stippling brush or a brush with splayed bristles to smatter it along the edges. To give further depth, deepen the blood with a glossy burgundy or maroon.
3. Color the band and staples with metallic silver paint. Then, drip streams of glossy red paint down the sides of the band. How much you apply depends on your chosen aesthetic: you could have just a few to serve as a slight accent or dozens for a gorier mess.
4. Give the teeth a base coat of white paint. Once it dries, apply light layers of cream, brown, and black to make them appear rotten. For further detail, darken the inside of the mouth with glossy red paint.
5. To make the mouth appear wet, coat the inside and teeth with one or two coats of clear nail polish.
6. Wrap the head in plastic to protect it from the paint and, on a newspaper-lined surface in a well-ventilated area, distress the figure’s clothing with a light dusting of black, brown, and olive spray paint. You do not want to make the coverage too thick, so hold the can roughly twelve inches away from the clothing’s surface and make quick passes.
7. On a newspaper-lined surface in a well-ventilated area, build up layers of black and metallic silver spray paint to give the foam board the look of steel. I found it works best to apply a base coat of black to the entire prop and then add the sliver, working in quick bursts to allow parts of the black to remain visible. You can also touch up portions with additional blasts of black if the silver becomes too heavy.
8. On a newspaper-lined surface in a well-ventilated area, give the board a light dusting of brown spray paint to simulate dirt. As with steps six and seven, hold the can over twelve inches away from the surface and make quick flicking motions. Once the paint has dried, run watered-down brown paint along the upper edge, allowing the liquid to naturally run downward.
9. Once the figure’s clothing has dried, cut open the back of his outfit, clip the wire attaching his left arm, and remove the appendage. Then, use the padding from the severed limb to give the right arm extra bulk. If you want the patient to possess both arms, this stage can be ignored; merely use extra padding to give both arms added mass.
10. Position the patient on the board and glue him in place. You want to allow plenty of room for the intestines, so situate his head and shoulders toward the upper portion of the board.
11. Spray the insulating foam into the opening of the patient’s chest to create his intestines. Try not to overthink your application. A random pattern produces the best results. Also, keep in mind that the foam will expand as it dries, so do not apply excessive amounts which will overtake the prop.
12. Beginning with a base coat of black spray paint, build up layers of glossy red paint to give the guts depth (the black base coat will help give the red a deeper tone to mimic blood). Akin to step seven, you can always apply bursts of black to the prop if the red becomes overpowering.
13. On a newspaper-lined surface in a well-ventilated area, stain the ribcage. I began by giving it a light, even coat. After that, I applied heavy amounts of stain and patted away the excess with paper towels. You want the color to build up in the cracks and fissures. Although you may use whatever color of stain you desire, I chose red chestnut because it gives the bones a fresh, meaty appearance. Once you have achieved your intended look, allow the bones to completely dry. Then, randomly drip globs of hot glue along the surfaces of the bones. This will give the appearance of dripping tissue once the paint is applied.
14. Repeat the processes in step twelve with the ribcage. For the time-pressed haunter, you can skip the wood stain and just paint the bones; however, I found the stain gave the prop an additional level of detail which enhanced the gore.
15. Repeat the methods in step twelve with the plastic heart and, after it dries, position it in the chest where it would anatomically sit, gluing it in place.
16. Nestle the ribcage into the opening, ensuring the clavicle bones align with where they would anatomically rest on the figure. It might prove helpful to consult a medical textbook for this step as well as the placement of the heart in step fifteen.
17. Glue the straight jacket down, conforming it to the outline of the body. After this, cut off the left arm, rip open the jacket to expose the innards, and glue the fabric in place. For visual interest, tatter the edges.
18. Smear glossy red paint along the edges of the jacket’s openings and randomly across the fabric’s surface. How much you apply depends on how bloody you want the prop to appear.
19. Cut the 1/2” tubing into two twenty-four-inch sections and run them, along with the two-foot section of 1/4” tubing, from three of the heart’s valves to the board, gluing them in place and using silver paint to make them look welded to the board. For further detail, smear glossy red paint across the tubes.
20. If the chains were not already black, give them an even coat of black spray paint and then build up layers of brown and red paint for a rusted patina.
21. Remove the plastic wrapping from the head and string the chains between the board and the headband. You can also wrap the chains around the figure’s arms, neck, and shoulders to give the illusion he is lashed down.
22. On a newspaper-lined surface in a well-ventilated area, paint the syringes with the Jacobean wood stain. I discovered that applying a thin coat and patting it with paper towels produces a hazed appearance. Then, dab the surfaces with the red chestnut wood stain to create spots of dried blood.
23. Determine where you would like the syringes and, using a 5/32 bit, drill holes into the patient’s head and neck, inserting the syringes and gluing them in place. Following this, paint the junctures where the syringes meet the prop with glossy red paint.
24. Use the remaining chain to create a hanging loop for the prop. If you plan to use the chain itself to suspend the item, I recommend replacing the plastic version with a heavy-duty metal. I added a hanging hook to the back of the foam board which affixed the prop to the wall and used the plastic chain to give the illusion it was suspending the item.
25. Depending on your haunt’s theme, you can enhance the prop with additional details, like a biohazard label or a mortuary tag.
*You will not use the entire bottle’s content for this project.