Friday, June 24, 2022

Ghostly Inspirations and Lamb House: A Mini-Essay

     Artists have always drawn on unconventional sources for inspiration, from painter Vincent van Gogh’s homeopathic physician Dr. Paul Gachet to author Samuel Taylor Coleridge’s opium-induced trances. For novelist Joan Aiken, the Lamb House in Rye, England, and its long history of supernatural occurrences spurred the ghostly narrative of her 1991 novel The Haunting of Lamb House.[1] Built in 1722 by the prosperous wine merchant and politician James Lamb, the homestead served as a haven for writers at the end of the nineteenth century and much of the twentieth century, with Henry James residing there between 1898 and 1916, Edward Frederic Benson occupying it from 1918 until 1940, and Rumer Godden dwelling there between 1968 and 1973.[2] The home is also inhabited by the spectral presence of an elderly woman wearing a mantilla, who came to torment Benson, Godden, and James during their stays and prompted Godden to seek priestly intervention and bless the house.[3] Although it is contestable whether or not the paranormal activities had any influence over the authors’ tales, particularly James’ famed The Turn of the Screw published the same year he moved into Lamb House, Aiken openly admits the spirit’s pestering of these notorious writers was pure fodder for her own book.

Works Referenced

Biggers, Sherley Hoover. British Author House Museums and Other Memorials: A Guide to Sites in England, Ireland, Scotland and Wales. Jefferson, NC: McFarland and Company, 2002.

Carpenter, Lynette and Wendy Kolmar. Ghost Stories by British and American Women: A Selected, Annotated Bibliography. London: Routledge, 1998.

Jones, Richard. Haunted Britain and Ireland. New York: Barnes and Noble, 2002.
____________________
[1] Carpenter, xxxv-xxxvi.
[2] Biggers, 192-198.
[3] Jones, 65.

Friday, June 17, 2022

Jarred Skinned Head

$25 - $30 (based on 2020 prices)
Makes one jarred head
 
A mad scientist needs lots of hapless victims for experiments and I was eager to fill the laboratory for 2020’s haunt with as many human specimens as the doctor required. For this version, I fashioned a skinned face contained within a bloody jar to nestle among the towers of equipment and stacks of medical textbooks.
  • One human-size plastic skull
  • One 8 oz. can of oil-based interior wood stain in red chestnut*
  • One latex mask
  • One 0.14 oz. bottle of superglue gel
  • One 0.3 fluid ounce bottle of red food coloring*
  • One 4 oz. bottle of clear, all-purpose tacky glue gel*
  • One sheet of white creepy cloth
  • One eight-inch glass jar 
  • One 8 oz. can of oil-based interior wood stain in Jacobean*
1. On a newspaper-lined surface in a well-ventilated area, stain the skull. I began by giving it a light, even coat. After that, I applied heavy amounts of stain and patted away the excess with paper towels. You want the color to build up in the cracks and fissures. Although you may use whatever color of stain you desire, I chose red chestnut because it gives the skull a meaty appearance. Once you have achieved your intended look, allow the skull to completely dry. I let mine sit outside in the sun for three days.
2. Cut the elastic band off the mask and, for visual interest, trim the edges to give it an uneven look (as though it had been haphazardly cut off).
3. Starting from the chin and working upward, glue the mask to the skull. I found this step works best if you move in stages: apply a layer of glue to one section, hold the latex down until it sticks, and then repeat the process. For a sturdier hold, use superglue.
4. In a plastic container (because the food coloring will stain, use something disposable or that you won’t mind dying), pour in your desired amount of clear glue gel and slowly add red food coloring to the solution until it achieves the sanguine hue you desire. To give the blood further density, add blue food coloring and mix well.
5. On a newspaper-lined surface, apply the blood glue to the skull. You can use an old spoon or plastic utensil to dribble the liquid or haphazardly pour it for a gory mess. Try to cover as much of the skull’s surface with the glue to make the item appear more lifelike.
6. For additional detail, cut a small swatch from the creepy cloth, soak it in the blood glue, and then spread it across the skull’s exposed bone to create veins, separating the strands for a more realistic appearance.
7. On a newspaper-lined surface in a well-ventilated area, paint the jar with the Jacobean stain. I discovered that applying a thin coat and patting it with paper towels produces a hazed appearance. Likewise, brushing the rims and base with a swift downward motion creates the illusion of grime.
8. Ball up the creepy cloth, place it inside the jar’s base, and drizzle its with the remaining blood glue. You may have to play with its arrangement before placing the skull on top.
9. After the cloth is situated, add the specimen, positioning it so that it is prominently displayed. You can enhance the prop further with additional elements like a specimen tag or biohazard labels.
*You will not use the entire bottle’s content for this project.

Friday, June 10, 2022

"Garden Under Lightning" (A Poem)

First published in 1921, Leonora Speyer’s poem “Garden Under Lightening” was among the many verses written by the violinist, who won the 1927 Pulitzer Prize for Poetry with her book Fiddler’s Farewell (1926).[1] In this poem, the author presents a short ghost story about the dead narrator seeing the garden she once tilled during her life.
 
Out of the storm that muffles shining night
Flash roses ghastly-sweet,
And lilies far too pale.
There is a pang of livid light,
A terror of familiarity,
I see a dripping swirl of leaves and petals
That I once tended happily,
Borders of flattened, frightened little things
And writhing paths I surely walked in that other life—
Day?
 
My specter-garden beckons to me,
Gibbers horribly—
And vanishes![2]
 
Works Referenced
 
Benet, William Rose, ed. Poems for Youth: An American Anthology. New York: E.P. Dutton and Company, 1925.
 
Speyer. Leonora. “Garden Under Lightning.” Poems for Youth: An American Anthology. Ed. William Rose Benet. New York: E.P. Dutton and Company, 1925. 321.
____________________
[1] Benet, 320.
[2] Speyer, 321.

Friday, June 3, 2022

Patches the Clown

$15 - $20 (based on 2019 prices)
Makes one mask
 
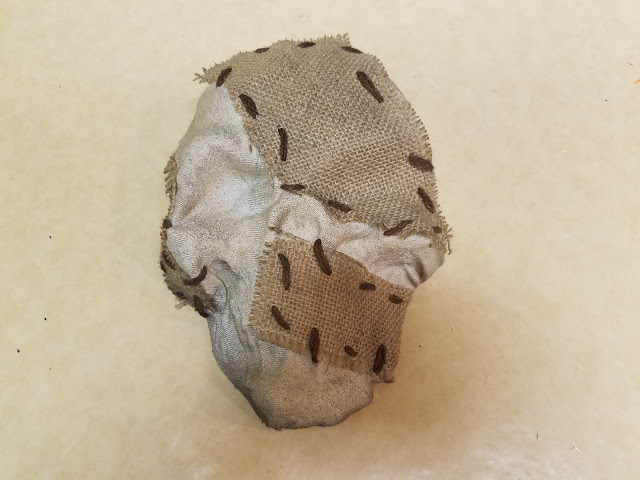
I normally craft my own mask and costume for each haunt to correspond with the theme; however, working on a haunted house in 2017 presented me with the chance to not only costume myself but also a collection of scare-actors with a series of doll masks. 2019’s haunt, in turn, provided me with the same opportunity and I fabricated this clown mask for the scare-actor at the end of the haunt to wear.
  • One plastic skull mask
  • One 10 oz. can of interior/exterior, fast-drying spray paint in flat black
  • One 10 oz. can of interior/exterior, fast-drying spray paint in flat brown
  • One 10 oz. can of interior/exterior, fast-drying spray paint in flat white
  • One yard of white fabric
  • At least four tablespoons of dark roasted coffee grounds
  • One pan large enough to soak the fabric
  • A random assortment of patches in varying colors and sizes
  • One yard of brown twine
  • One 4 oz. bottle of all-purpose tacky glue*
  • One 2 oz. bottle of acrylic paint in flat black*
  • One 2 oz. bottle of acrylic paint in flat brown*
  • One 2 oz. bottle of acrylic paint in flat red*
  • One 2 oz. bottle of acrylic paint in flat tan*
  • One 0.44 oz. bottle of clear nail polish*
  • One button (about one inch in diameter)
  • One clear plastic Christmas ornament (two inches in diameter)
1. Remove the elastic band and any other accessories from the mask and, on a newspaper-lined surface in a well-ventilated area, give it two even coats of white spray paint. Although this step is optional, it gives the mask a uniform base in case portions of it show through the cloth.
2. Boil enough water to completely submerge the fabric and pour it into the pan. Add the coffee. The longer you allow the coffee to brew, the darker the stain will become. Likewise, greater amounts of coffee will produce a richer stain. Submerge the cloth in the coffee mixture and soak it until it reaches the color you desire. I soaked mine for eight hours and scattered the coffee grounds over the top of the fabric to add spots. Remove the fabric from the water and allow it to dry.
3. Cut the fabric into a square large enough to cover the masks (mine was 15” x 15”) and haphazardly sew patches to its surface. You want the needlework to look messy and uneven.
4. Starting at the front of the skull, glue the cloth to the mask. I found that this process works best if you move in stages: apply a layer of glue to one section, hold the fabric down until it sticks, and then repeat the process.
5. Once the glue has dried, trim the excess fabric from the edges to give the prop a cleaner appearance. Alternatively, you could leave the extra cloth, fraying and tattering it for a more unkempt look.
6. Add a level of age and distress by dusting the cloth with a light coat of black and brown spray paint. To give the appearance of dirt, hold the can over twelve inches away from the mask’s surface and make quick flicking motions. You can also apply a flecking of black paint and smears of brown to enhance the weathered appearance.
7. Detail the eyes with black and red paint. For the black eye, smudge paint around its edges to give a smoky appearance. For the red eye, give the illusion of blood seeping from the opening. It works best to fill in the deepest recesses first and then spread the paint outward, following the course that the flow would naturally take as it drips downward. After the paint dries, give it a coat or two of clear nail polish to make it appear wet.
8. Beginning with a base coat of black, build up layers of brown and tan paint on the button to make it look like an old, wooden piece and then sew it into the opening of the blackened eye.
9. Remove the hanging hoop from the back of the ornament and, on a newspaper-lined surface in a well-ventilated area, give it two even coats of black spray paint. Once the paint has dried, glue a couple patches to its surface and repeat the process on step six to give it an aged appearance.
10. After the paint dries, glue the portion of the ornament where the hanging hoop once was to the mask to fashion a nose. For a sturdier hold, especially if the scare-actor plans to be highly active, use superglue.
*You will not use the entire bottle’s content for this project.