Friday, December 30, 2016

The Modern Re-Imagining of Krampus: A Mini-Essay

     Although anthropologists and folklorists continue to debate his origins – some argue he is a product of Germanic paganism while others claim he is an element of seventeenth-century legend – Krampus has become a concrete fixture of Austro-Bavarian Alpine mythology. Akin to the Norwegian utbrud, Krampus serves as a boogeyman that terrorizes individuals, particularly children, who breach customary manners and morals. A horned creature with a forked tongue and pointed fangs, Krampus accompanies Saint Nicholas during the winter season. While his benevolent companion rewards selfless souls for their kindness, Krampus punishes others for this misbehavior, rattling his chains and whipping them with a ruten (a bundle of birch branches). The event, known as Krampusnacht, occurs the evening before the Feast of Saint Nicholas and, as Delbert Gietzen highlights, the celebration varies slightly in each region (in Styria, for example, each home possesses a ruten which hangs throughout the year and is surrendered to Krampus on Krampusnacht to administer any possible punishment on the household, namely its children). Despite these minor differences, the legend is rather universal throughout the Austro-Bavarian expanse; however, as Al Ridenour emphasizes, growing popularity of the Krampus mythology, particularity within the United States, has transformed it into an unrecognizable folklore. 
     The largest perpetrator of this re-imaging, according to Ridenour, is Gerald Brom's novel Krampus. Published in 2012, the fictional tale removes the legend from its Austro-Bavarian homeland and transplants it in the Nordic countries, claiming the figure is the son of Loki and transforming his relationship with Saint Nicholas into a vicious rivalry. In fact, much of Brom's alterations resurface in a 2013 article in National Geographic, Brian Joines and Dean Kotz' graphic novel Krampus!, and the 2015 film Krampus by Legendary Entertainment. In each subsequent retelling, the misconceptions presented by Brom are elaborated upon, particularly the invented feud between Krampus and Saint Nicholas. As Ridenour highlights, the interaction between the two individuals has always been depicted as a mutual companionship; however, Brom's rendition and those which have followed dismantle this affiliation and established a bitter conflict. Similarly, Joines and Kotz' comic erroneously mistakes Saint Nicholas with Santa Claus shifting Krampusnacht from December 5 (the eve of Saint Nicholas' Feast) to December 25 (Christmas Day) – and the film removes both Saint Nicholas and Santa Claus entirely from the legend, fashioning Krampus into a demonic version of the two who brings global death and destruction at Christmastide.
  
Works Referenced 

Basu, Tonya. "Who is Krampus? Explaining the Horrific Christmas Devil." National Geographic. December 2013.

Brom, Gerald.  Krampus: The Yule Lord. New York: Harper Voyager, 2012.

Gietzen, Delbert. The Esoteric Codex: German Folklore. Raleigh, NC: Lulu Press, Inc., 2016.


Joines, Brian and Dean Kotz. Krampus! Berkley, CA: Image Comics, Inc. 2014. 

Krampus. Dir. Michael Dougherty. Perf. Toni Collette and Adam Scott. Legendary Entertainment. 2015.

Ridenour, Al. The Krampus and the Old, Dark Christmas: Roots and Rebirth of the Folkloric Devil. Port Townsend, WA: Feral House, 2016.

Thursday, December 22, 2016

Specimen Jars (Version One - Alternate)

$20 - $30 (based on 2015 prices) 
Makes three jars

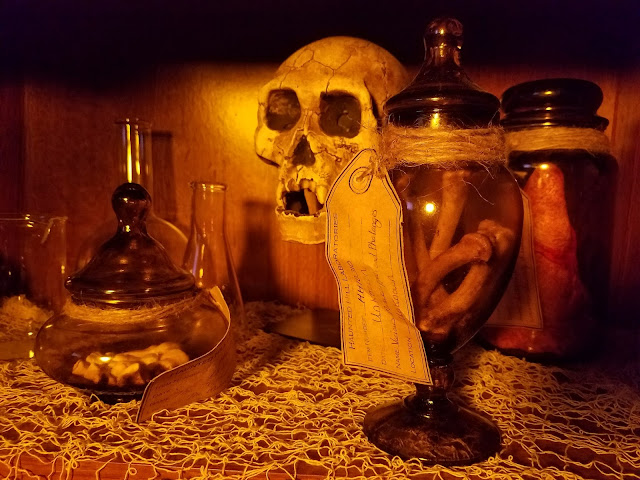
I wanted to do something with an assortment of body parts which rarely fit into my haunt’s themes. I finally settled on the idea of transforming them into jarred specimens. For the majority of the project, I used larger jars and glued the labels to their surfaces (see that version here). For the smaller items, I decided to attach the labels with twine. Although the decision was primarily out of necessity (the labels were too large to adhere to the jars and hid most of the specimens), the variation added an interesting aesthetic to the entire collection.
  • Three glass jars of varying sizes (you can decrease or increase this number)
  • One 8 oz. can of oil-based interior wood stain in Jacobean*
  • At least four tablespoons of black tea (e.g. Darjeeling, Earl Gary, English Breakfast, etc.)
  • One piece of 8” x 11.5” cardstock with specimen labels printed on it
  • One pan large enough to soak the cardstock
  • Two to three yards of light-brown twine
  • One 4 oz. bottle of all-purpose tacky glue*
  • Three various body parts and/or severed limbs
1. On a newspaper-lined surface in a well-ventilated area, paint the jars with the stain. I discovered that applying a thin coat and patting it with paper towels produces a hazed appearance. Likewise, brushing the rims and base with a swift downward motion creates the illusion of grime buildup.
2. Boil enough water to completely submerge the cardstock and pour it into the pan. Add the tea. The longer you allow the tea to brew, the darker the stain will become. Likewise, greater amounts of tea will produce a richer stain. I found that a combination of English and Irish Breakfast brewed for over ten minutes produces a nice, deep brown. Submerge the cardstock into the tea mixture and soak it until it reaches the color you desire. I soaked mine for eight hours and scattered the loose-leaf tea over the top to add spots. Remove the cardstock from the water and allow it to dry.
3. Wrap the necks of the jars with twine and knot the ends, trimming one and leaving the other with a two- or three-inch excess. To reinforce it, glue the knot.
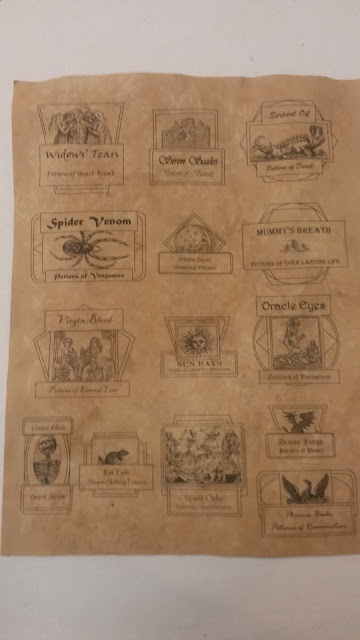
4. After the cardstock has dried, cut out the labels, leaving a small boarder around their edges, and give your specimens names. To roughen the labels’ appearance, use sandpaper to fray their sides and create holes. Once you have achieved your desired level of distress, punch a hole into the top of the label and thread the twine through it, knotting the ends and trimming the excess.
5. You can use olive or vegetable oil to add further stains to the label. I discovered that applying a small amount of oil to your index finger and patting it on the paper works well.
6. Add the specimens to their corresponding jars, positioning them so they are prominently displayed. For this version, I elected not to use the bloodied cheesecloth; however, you may incorporate it.
*You will not use the entire bottle’s content for this project.

Thursday, December 15, 2016

Creepy Doll Talismans

$35 - $40 (based on 2015 prices) 
Makes three talismans

These quickly became my favorite build for 2015’s haunt and the props which garnered the most reactions (both disgust and praise). I originally intended to use grapevine stars to fashion Blair-Witch-like figures for the voodoo alters. Creativity quickly took charge and the project headed in an unexpected – but welcomed – direction. If you cannot find stars, wreaths will work just as well. 
  • Three twelve-inch vinyl dolls
  • Three grapevine stars
  • One 2 oz. bottle of acrylic paint in flat black*
  • One 2 oz. bottle of acrylic paint in flat brown*
  • One 2 oz. bottle of acrylic paint in flesh tone*
  • One 8 oz. bottle of wood glue*
  • Two to three yards of light-brown twine
  • One 4 oz. bottle of all-purpose tacky glue*
  • One 8 oz. can of oil-based interior wood stain in Golden Pecan
  • One aluminum foil tray (length: 12 3/4"; width: 10 3/8"; depth: 2 9/16")
  • Bones from one roasted chicken
  • One ½ oz. bag of feathers
1. Dismember the dolls and remove their clothing. On a newspaper-lined surface, paint their limbs and heads black. Although I only used one coat, you may want more depending on your desired coverage. Keep in mind, though, that this is the base coat for the crackle paint and much of it will be covered up by the second layer. While I chose black, you can use a different color to tailor the props for your specific needs.
2. Once the paint has dried, use a thick brush to apply a smattering of wood glue to the props. Try not to over think your application (a random pattern produces the best results). Also, it may be easier to work with one limb at a time rather than attempting to glue and paint the entire lot at once.
3. Let the glue sit for a minute to become tacky and then cover the limbs with the flesh-tone paint. Here, too, I only used one coat; however, you may want more. As the glue and paint dry, they will form cracks, making the base coat visible.
4. Once the glue and paint have fully dried, brush a light coat of brown paint onto the props to simulate dirt. During this process, try to focus on areas where dust and grime would normally accumulate: in the lines between fingers and toes, along the creases of elbows and knees, and inside the ears and mouths. If you want to give the props a creepier appearance, cut out the eyes and darken the holes with black paint.
5. Arrange the limbs onto the stars and glue them into place. You will use the shape of the stars to form the main structure of the body, adding the heads and limbs as accentuations. To give the props further detail, mix and match the pieces, taking parts from each doll and using them to assemble a whole figure.
6. Wrap twine around the limbs and grapevines to make it appear as though the dolls have been lashed to the stars (the glue will hold them in place). Trim the excess and glue the knots to reinforce them.
7. In a well-ventilated area, pour the wood stain into the aluminum pan and submerge the chicken bones, allowing them to soak for at least twenty-four hours. You want to give the bones enough time to absorb the satin and achieve an aged and rotten appearance. Once they have reached the look you desire, remove them from the tray and allow them to fully dry (I left mine outside in the sun for two days). Helpful hint: you may want to perform this process at the beginning of the project so the bones are ready once you reach the assembly stage.
8. Glue feathers to one end of the bones and wrap twine around them, leaving enough excess to tie around the stars. Find places along the props to dangle the bones. Think of a twisted dreamcatcher or windchime.
9. To give the props additional character, glue clusters of feathers to various portions of the stars. Finish the process by wrapping twine around the base of the clusters to give the appearance that they have been lashed to the figure.
10. If the stars did not come with hanging loops, you can create your own with the extra twine, knotting the ends and gluing them for reinforcement.

*You will not use the entire bottle’s content for this project.

Wednesday, December 7, 2016

“Vintern var Hård” (A Song)

As Tim Howell emphasizes, Finnish composer Aulis Sallinen has achieved an international reputation for his “neo-romantic” compositions. A student of the illustrious Sibelius Academy, Sallinen studied under such respected composers as Joonas Kokkonen and Aarre Merikanto. Since then, he has written six operas, eight symphonies, and numerous concertos and chamber works. Blending traditional melodies with modern aesthetics, Sallinen, as Howell argues, has fashioned a unique form of music which pays homage to the past through contemporary tones. “Vintern var Hård,” composed in 1969, is a testament to this innovative style. Its gloomy vocals and somber strings, coupled with the bleak lyrics recounting a bitter winter, make for a haunting piece of music.

Det fanns inte mycket att ge åt änderna.

Mor vände upp och ner på brödlådan.
Änderna kväkte och föreföll missnöjda.
Vattnet var svart och snart frös det till.

Vintern var hård, vintern var hård.

Också pengarna frös inne på banken.
Lördagskvällen kunde firas
bara varannan lördag.

There wasn’t much for the ducks. 

Mother turned the breadbin upside down. 
The ducks quacked and seemed dissatisfied 
The water was black and it soon froze.

Winter was hard, winter was hard.

Even money was frozen in the bank. 
Saturday evening could only be celebrated
every other Saturday.  

Works Referenced 

Howell, Tim. After Sibelius: Studies in Finnish Music. Burlington, VT: Ashgate Publishing Company, 2006.

Thursday, December 1, 2016

Specimen Jars (Version One)

$80 - $90 (based on 2015 prices) 
Makes six jars 

I wanted to do something with an assortment of body parts which rarely fit into my haunt’s themes. I finally settled on the idea of transforming them into jarred specimens. I used wood stain to age the glass and make the props look old and discarded. If you want a cleaner appearance, skip this step. Also, you can dramatically reduce the project’s cost by buying the jars at a second-hand store.
  • Six glass jars of varying sizes (you can decrease or increase this number)
  • One 8 oz. can of oil-based interior wood stain in Jacobean*
  • At least four tablespoons of black tea (e.g. Darjeeling, Earl Gary, English Breakfast, etc.)
  • One piece of 8” x 11.5” copy paper with specimen labels printed on it
  • One pan large enough to soak the copy paper
  • One 4 oz. bottle of all-purpose tacky glue*
  • One 1 oz. bottle of fake blood (learn how to make your own here)
  • Nine yards of white cheese cloth (if you are using fewer jars, decrease this amount; if you are using more, increase)
  • Six various body parts and/or severed limbs
1. On a newspaper-lined surface in a well-ventilated area, paint the jars with the stain. I discovered that applying a thin coat and patting it with paper towels produces a hazed appearance. Likewise, brushing the rims and base with a swift downward motion creates the illusion of grime buildup. 
2. Boil enough water to completely submerge the copy paper and pour it into the pan. Add the tea. The longer you allow the tea to brew, the darker the stain will become. Likewise, greater amounts of tea will produce a richer stain. I found that a combination of English and Irish Breakfast brewed for over ten minutes produces a nice, deep brown. Submerge the paper into the tea mixture and soak it until it reaches the color you desire. I soaked mine for eight hours and scattered the loose-leaf tea over the top of the paper to add spots. Remove the paper from the water and allow it to dry.
3. After the paper has dried, cut out the labels, leaving a small boarder around their edges, and give your specimens names. To roughen the labels’ appearance, use sandpaper to fray their sides and create holes. You can also crumple the paper to produce creases. Once you have achieved your desired level of distress, glue the labels to the sides of the jars. You can use olive or vegetable oil to add further stains. I discovered that applying a small amount of oil to your index finger and patting it on the paper works well. 
4. On a newspaper-line surface, cut the cheese cloth into sections large enough fit crumbled at the bottom of the jars. You want the cloth to be noticeable after the specimens have been placed on top of it, so do not be conservative with the sizes of your sections. Once cut, splatter the cloth with blood, creating drops and smudges.
5. Ball up the bloodied cloth and place it inside the jar’s base. You may have to play with its arrangement before placing the specimen on top. After the cloth is situated, add the specimen, positioning it so that it is prominently displayed. 

*You will not use the entire bottle’s content for this project.

Wednesday, November 23, 2016

Madame Tussaud and the Return of the Dead: A Mini-Essay

      In 1802, the French artist Anna Maria Tussaud was invited to join Paul de Philipsthal’s phantasmagoric show at the Lyceum Theatre in London. Although Tussaud did not benefit financially from the endeavor (Paul de Philipsthal collected half of her profits), the popularity of her wax figures quickly propelled her to stardom, allowing Tussaud to tour the British Isles for over three decades and eventually establish a permanent exhibit on Baker Street in 1835. The exhibition’s most popular attraction was a separate room – subsequently named the Chamber of Horrors – which featured effigies of executed criminals and guillotined aristocrats from the French Revolution. The public was mesmerized by this graphic depiction of the dead and flocked to its macabre presentation in droves. For some, as Pamela Pilbeam expresses, the exhibition “provided a safe environment in which customers could face their fears.” For others, it proved a frightening display of nightmarish atrocity and, as Lavinia Russ highlights, a reward of £100 was issued in 1909 “to any person, male or female, who [would] pass the night alone in the Chamber of Horrors…the only condition made [was] that the daring one [would] not smoke or drink or read during the twelve hours he pass[ed] with the wax figures of the world's noted criminals.” Given the show’s sadistic nature (especially for its time), the crowd’s reaction is understandable; however, as Linda Badley argues, the dismay invoked by Tussaud’s Chamber of Horrors may have extended beyond the shock of gore and violence.
     Badley builds on the notions presented in Roland Barthes’ Camera Lucida, particularly his concept of eidolon. As Barthes explains, photography has the ability to capture fleeting moments in time, preserving people and events far beyond their passing. For example, a photograph taken of Abraham Lincoln in the summer of 1861 encapsulates that lone instance and allows viewers from future generations to return briefly to it. In doing so, according to Barthes, the photograph becomes a means of time travel and allows for “a return of the dead.” This transcendence of space and time holds a romantic connotation, but, as Badley stresses, it also possesses an unsavory implication. Just as the photograph of Abraham Lincoln can transport viewers to another time, the photograph of a beheading or mass genocide can yield the same results, freezing an instance of brutality forever. In the case of Madame Tussaud’s Chamber of Horrors, the lifelike depictions of criminals and guillotined victims – many molded directly from death masks – presented a
graphic three-dimensional representation of incidents. Akin to photographs, the displays captured a moment of unspeakable atrocity and forced visitors to uncomfortably relive it in stunning realism. In doing so, Tussaud's chamber, according to Badley, “gave supernatural life” to the dead, allowing them to return and reenact their final carnage. Hence, it was not the gore and violence itself, Badley argues, which invoked so much fear, but the photo-realistic presentations which preserved some of humanity's more heinous barbarities. 

Works Referenced

Badley, Linda. Film, Horror, and the Body Fantastic. Westport, CT: Greenwood Press, 1995.

Barthes, Roland. Camera Lucida. Trans. Richard Howard. New York: Hill and Wang, 1980.

Lavinia Russ. Forever England: Poetry and Prose about England and the English. New York: Harcourt, Brace, and World, Inc., 1969.

Pilbeam, Pamela. Madame Tussaud and the History of Waxworks. London: Hambledon and London, 2003.

Friday, November 18, 2016

Fingers in a Box

$10 - $15 (based on 2015 prices)
Makes one box 

The finger-in-a-box trick has been around for decades and reached a level of triteness long before I was born. For my adaptation, I decided to remove the trick element entirely and, utilizing the same basic elements, transform it into a static specimen prop for a mad scientist’s laboratory. You can use a smaller box for a lone finger or a larger version to house more substantial organs (think of the fun you could have on Valentine’s Day).
  • One black cardboard gift box (5" x 5")
  • One piece of 8” x 11.5” cardstock with specimen labels printed on it
  • At least four tablespoons of black tea (e.g. Darjeeling, Earl Gary, English Breakfast, etc.)
  • One pan large enough to soak the cardstock
  • One 4 oz. bottle of all-purpose tacky glue*
  • One 1 oz. bottle of fake blood (learn how to make your own here)
  • One yard of white cheese cloth
  • Five fake fingers (learn how to make these here)
1. Boil enough water to completely submerge the cardstock and pour it into the pan. Add the tea. The longer you allow the tea to brew, the darker the stain will become. Likewise, greater amounts of tea will produce a richer stain. I found that a combination of English and Irish Breakfast brewed for over ten minutes produces a nice, deep brown. Submerge the cardstock into the tea mixture and soak it until it reaches the color you desire. I soaked mine for eight hours and scattered the loose-leaf tea over the top to add spots. Remove the cardstock from the water and allow it to dry.
2. Transform the box into a display by connecting the base and lid together in an L shape and gluing the joint for reinforcement.
3. On a newspaper-line surface, cut the cheese cloth into a section large enough fit crumbled at the bottom of the box. You want the cloth to be noticeable after the fingers have been placed on top of it, so do not be conservative with the size of your section. Once cut, splatter the cloth with blood, creating drops and smudges.
4. After the cardstock has dried, cut out one of the labels, leaving a small boarder around its edges. Use sandpaper to fray its sides and create holes. Once you have achieved your desired level of distress, glue the label to the inside of the lid. You can use olive or vegetable oil to add further stains. I discovered that applying a small amount of oil to your index finger and patting it on the label works well.
5. Ball up the bloodied cloth and place it inside the box’s base. You may have to play with its positioning before placing the specimen on top. After the cloth is situated, add the fingers. To add drama, refrain from lining them in a straight row. Rather, cluster them in the center at odd angles.


*You will not use the entire bottle’s content for this project.

Thursday, November 10, 2016

"The Phantom Mail Coach" (A Poem)

Very little is known about L.O. Welcome (the name is most likely a pseudonym). The author published two poems in the Saturday Evening Post: "The Phantom Mail Coach" on December 7, 1929, and "Transport" less than a year later on July 26, 1930. Since then, the writer has slipped into obscurity, with his/her poems being rarely republished. In fact, "The Phantom Mail Coach" appears in only two anthologies: William Cole's Poems of Magic and Spells (1960) and Lavinia Russ' Forever England (1969). Despite its scarcity, the tale is a witty account of slain coachmen who perpetually return to haunt the highway where they met their demise.

Gather up the ribbons, give the 'orn a toot!
The fares is in their places, the treasure's in the boot,
Letters for the garrison, an' all the soldiers' pay;
An' we set out from Bedford on the King's 'Ighway.

     A lead team
     A wheel team,
     A good, red bay;
     A-takin' George's letters
     Down the King's 'Ighway

My! But we was jolly! Lord! But we was fine!
Pretty Mistress Polly an' 'er sister Caroline,
With orficers in uniform  - red coats gay -
A-wooin' an' a-cooin' on the King's 'Ighway.

     A short life!
     A short life!
     And youth won't stay!
     A-flyin' like dust
     Upon the King's 'Ighway!

A little 'alt for dinner, and a little pause to sup;
"Service of 'Is Majesty!" and now the time is up!
Out upon the meadows in the duskin' o' the day
A-takin' George's treasure down the King's 'Ighway!

     A sea mist,
     A salt mist,
     A dank mist an' gray,
     An' I'd like to see it fairer
     On the King's 'Ighway!

Now, who is that! An' who is there! An' wot's wrong below?
'Ands upon the bridle bits, an' won't let go!
Time enough to scream a bit, not enough to pray,
An' so we all was murdered on the King's 'Ighway!

     For stilled tongues
     Is safe tongues -
     The dead they can't away,
     To bring King George's troopers
     Down the King's 'Ighway!

So, once in ev'ry hundred years, my lot is to ride,
With treasure and the letters and the fares inside:
An' we be only phantoms in the sea mist gray,
A-'untin' of our slayers down the King's 'Ighway.

     A lead team,
     A wheel team,
     A ghost-team gray,
     Wot can't get used to autos
     On the King's 'Ighway!

Works Referenced

Cole, William, ed. Poems of Magic and Spells. New York: World Publishing Company, 1960.

Russ, Lavinia, ed. Forever England: Poetry and Prose about England and the English. New York: Harcourt, Brace, and World, Inc., 1969. 82-84.

Friday, November 4, 2016

Potion Bottles (Version One)

$10 - $15 (based on 2016 prices) 
Makes four bottles

No witch’s apothecary is complete without an assortment of well-used potion bottles. For this version, I utilized colored bottles and bright beads to give the collection a touch of vibrancy. The bottles are rectangular Roma, which are cheap and can be easily found in most craft stores.
  • Four Roma colored-glass rectangle bottles with corks (4 oz. or larger)
  • Eight small, multicolored stone beads
  • Two yards of light-brown twine
  • One piece of 8”x 11.5” copy paper with potion labels printed on it
  • One 4 oz. bottle of all-purpose tacky glue*
  • At least four tablespoons of black tea (e.g. Darjeeling, Earl Gary, English Breakfast, etc.)
  • One pan large enough to soak the copy paper
1. Wrap the necks of the bottles with twine and knot the ends, trimming one and leaving the other with a two- or three-inch excess. To reinforce it, glue the knot.
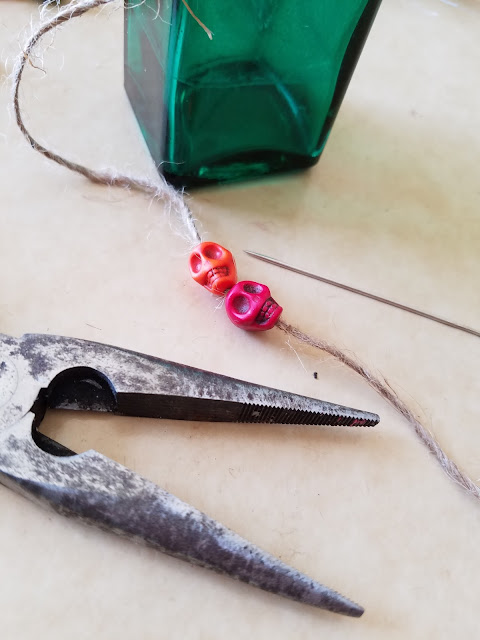
2. Thread the beads onto the twine. It may help to use a needle and pliers during this process, utilizing the needle to guide the twine through the beads’ holes and the pliers to pull the twine through.
3. Separate the beads and knot the twine below each one to keep them in place. Following this, trim the excess twine from the final knot and glue it for reinforcement. 
4. Boil enough water to completely submerge the copy paper and pour it into the pan. Add the tea. The longer you allow the tea to brew, the darker the stain will become. Likewise, greater amounts of tea will produce a richer stain. I found that a combination of English and Irish Breakfast brewed for over ten minutes produces a nice, deep brown. Submerge the paper into the tea mixture and soak it until it reaches the color you desire. I soaked mine for eight hours and scattered the loose-leaf tea over the top of the paper to add spots. Remove the paper from the water and allow it to dry. It may help to perform this step a day or two before the others so the labels are dry once you enter the assembly process.
5. After the paper has dried, cut out the labels, leaving a small boarder around their edges. To roughen the labels’ appearance, use sandpaper to fray their sides and create holes. You can also crumple the paper to produce creases. Once you have achieved your desired level of distress, glue the labels to the sides of the bottles. You can use olive or vegetable oil to add further stains. I discovered that applying a small amount of oil to your index finger and patting it on the paper works well.
6. Return the corks to the bottles and use a pair of scissors to trim the twine’s frayed strands. If you want to add additional detail, fill the bottles with colored sand, dried herbs, or plastic critters. 

*You will not use the entire bottle’s content for this project.