Friday, March 25, 2016

Decoupage Mask

$15 - $20 (based on 2014 prices) 
Makes one mask 

I made this mask a few years ago for Fasching (see the costume that accompanied it). The idea was to create a ghostly figure that embodied elements of an abandoned house: moth-eaten textiles, tattered curtains, and peeling wallpaper. The latter component worked its way into the mask, where I used layers of tea-stained paper to replicate the look of old, withered wall treatments and crumbling plaster. Although a tedious process, the final effect was well worth all of the effort and time.

  • One Venetian carnival mask
  • One 10 oz. can of interior/exterior, fast-drying spray paint in flat tan
  • At least six pieces of 8” x 11.5” copy paper
  • At least four tablespoons of black tea (e.g. Darjeeling, Earl Gary, English Breakfast, etc.)
  • One pan large enough to soak the copy paper
  • One 4 oz. bottle of all-purpose tacky glue*
  • One 2 oz. bottle of acrylic paint in flat brown*
1. In a well-ventilated area, hold the spray paint can roughly twelve inches away from the mask and spray it with several even coats of tan paint. I used two coats; however, you may want more or less depending on your desired coverage. If you accidentally miss a spot or two, don’t worry too much. This is the base coat and much of the paint will be covered up by the paper. 
2. Boil enough water to completely submerge the copy paper and pour it into the pan. Add the tea. The longer you allow the tea to brew, the darker the stain will become. Likewise, greater amounts of tea will produce a richer stain. I found that a combination of English and Irish Breakfast brewed for over ten minutes produces a nice, deep brown. Submerge the paper into the tea mixture and soak it until it reaches the color you desire. I soaked mine for eight hours and scattered the loose-leaf tea over the top of the paper to add spots. Remove the paper from the water and allow it to dry. Although it can be time consuming, this process works best if you stain each sheet of paper individually. Additionally, this method gives you the chance to vary the degree of stain for each piece of paper, which adds further depth to the texture of the final mask.
3. Tear apart the paper and, using the tacky glue, adhere it to the mask. To enhance the visual impact, alternate the stains – adding plain white paper into the mixture – and build up layers with folds, holes, and shreds. This process is painfully lengthy and a major labor of love; however, the more time you spend on it and the more detail you apply, the greater the final product will appear.
4. Using a brush with splayed bristles, pat the brown acrylic paint onto the mask. Try to concentrate on spots where dirt would naturally accumulate: along the base of folds, around the edges of tears, and deep inside cracks. It might take a few coats and some modifications to the paint’s shade to achieve your preferred appearance.

*You will not use the entire bottle’s content for this project.

Friday, March 18, 2016

Candle Pillars

$10 - $15 (based on 2014 prices) 
Makes three pillars roughly 24” in height  

I’ve seen this project done with PVC pipes. In an effort to save both money and time, though, I created mine using paper towels and toilet paper rolls. It achieves the same effect without the hassle of cutting piping. Plus, the low cost offsets any disappointment if the props are damaged or stolen. As always, you can modify the color to fit your haunt’s needs.
  • Twenty paper towel/toilet paper rolls
  • One 4 oz. bottle of all-purpose tacky glue*
  • One hot glue gun and glue sticks
  • One 8 oz. can of interior/exterior, fast-drying latex paint in flat white
  • One package of battery-operated LED tea lights (sixteen total)
1. Arrange the rolls in varying heights and, using the tacky glue, paste them together. To give the candles more of a melted appearance, cut their tops to form dips. You can also fashion a base by placing the bottom of the pillar onto a sheet of cardboard, tracing its outline, cutting out the pattern slightly larger than its actual size, and gluing it to the prop. Since the tubes are hollow, you can pour sand into the base to give the pillar added weight in windy displays.
2. Using the hot glue gun, pipe drips of wax onto the tubes. You may want to play with the design on scraps of cardboard first, toying with the pattern before applying the final version. I found that pumping the glue along the tops of the rolls and allowing it to naturally run down their sides creates the best results.
3. In a well-ventilated area, apply the white paint to the pillars. I used three coats; however, you may want more or less depending on your desired coverage. After allowing the paint to dry, you can keep the tea lights in place by forming holders with toothpicks. Simply drive them into the tops of the pillars to form an X and reinforce them with tacky glue.

*You will not use the entire bottle’s content for this project.

Friday, March 11, 2016

The Utbrud: A Mini-Essay

     Robert Adams, folklorist at Indiana University, emphasizes that folklore functions to reinforce and validate the specific customs and rituals of a cultural institution. Through creation myths, these legends can serve as educational material for a society’s origins and history. Through epics, they can accentuate the importance of cohesion in building strong communal ties. And, through didactics, they can stand as a warning for the consequences of violating accepted practices. Not surprising, tales of the boogeyman fall within the later category. From the Yara-ma-yha-who of Australia’s Aborigine tribes and the Kappa of Japan to the Baba Yaga of Slavic lore and the Abu Rigl Maslukha of Egypt, stories abound about restless beings who mentally and physically punish individuals - particularly rebellious children - for straying from customary manners and morals. One such figure is the Norwegian utbrud.
     In previous centuries, unwanted children or those born during times of famine were carried out into the darkened forests surrounding the small agricultural communities of Norway and abandoned. Left to fend for themselves in the frigid woods, these hapless younglings were eventually overcome by the elements and perished. As Brian Righi explains, many Norwegians believed these utbrud returned as vengeful spirits who enacted their wrath on lonesome travellers or, as recounted in many bedtime stories, ill-behaved youths. Thus, by serving to castigate unruly kids, the utbrud function like many other boogeymen; however, they hold one distinct feature which separates them from their slew of ghastly brethren. While the Yara-ma-yha-who, Abu Rigl Maslukha, and their kin are demonic creatures or the souls of tortured adults, the utbrud themselves are children, making these menacing forces peers to the individuals they are meant to threaten.

Works Referenced

Adams, Robert. Introduction to Folklore. Columbus, OH: Collegiate Publishers Inc., 1973. 

Righi, Brian. Ghosts, Apparitions, and Poltergeists: An Exploration of the Supernatural through History. Woodbury, MN: Llewellyn Publications, 2008.

Friday, March 4, 2016

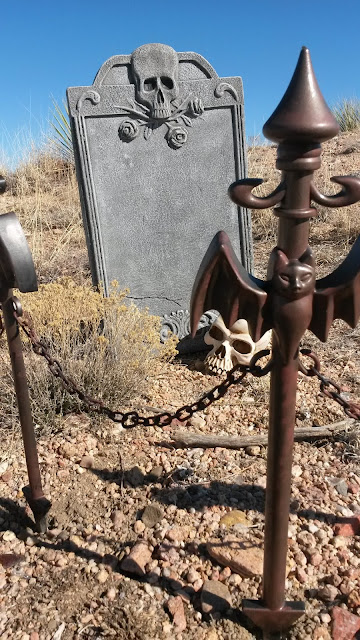
Rusted Fence Stakes

$10 - $15 (based on 2015 prices)
Makes ten stakes with accompanying chains

Themed fence stakes are fairly easy to find during the Halloween season and they range in both price and quality. Although splurging on nicer versions may be more convenient, there is greater artistic gratification in buying cheaper pieces and altering them. Plus, the entire process allows you to adjust their appearance to fit your haunt’s theme.

  • Ten Halloween-themed decorative fence stakes with chains 
  • One 10 oz. can of interior/exterior, fast-drying spray paint in metallic brown 
  • One 2 oz. bottle of acrylic paint in flat brown* 
  • One 2 oz. bottle of acrylic paint in flat red*
1. In a well-ventilated area, lay the stakes out and, holding the spray paint can roughly twelve inches away, spray them with several even coats of metallic paint. I used two coats; however, you may want more or less depending on your desired coverage. If you accidentally miss a spot or two, don’t worry too much. You can always use the rust-colored paint to hide any imperfections.
2. Mix together the brown and red acrylic paint to form a rust color. You may want more of a reddish hue so that it contrasts with the darker metallic brown. Once the spray paint has dried, use a brush with splayed bristles to pat the rust-colored paint onto the stakes. Try to concentrate on spots where rust would naturally form: areas repeatedly exposed to the elements and moisture. It might take a few coats and some modifications to the paint’s shade to achieve your preferred appearance.
3. On a newspaper-lined surface, lay the chains out and repeat the paint pattern, focusing on regions where rust would typically occur.
4. You can add further detail by gluing leaves or moss to the stakes. You can also wrap vines through the chains and around the finials.
*You will not use the entire bottle’s content for this project.