Friday, July 30, 2021

The Crimes of Jeffery Dahmer: A Mini-Essay

     In June of 1978, Jeffrey Dahmer, a troubled and introverted teenager with a history of alcohol abuse, performed his first murder when he killed Steven Hicks, an eighteen-year-old hitchhiker Dahmer had brought to his parents’ home in a semi-rural area of Bath, Ohio.[1] With his parents out of town, Dahmer engaged in sexual acts with Hicks and, when the young traveler decided to leave, the jilted Dahmer struck him upside the head with a barbell, strangled him to death, and used a bowie knife to dismember the body and bury the parts – wrapped in plastic bags – in the wooded area surrounding the house.[2] Over the proceeding thirteen years, Dahmer murdered an additional seventeen men, many of whom he had picked up outside of adult bookstores and gay bars and lured back to his Oxford Apartment Complex with the promise of paying them for nude photograph sessions.[3] Once the men arrived at his apartment, Dahmer drugged and killed them (some by drilling holes into their skulls and injecting muriatic acid into their brains), performed necrophilia on their bodies, dissected them, and ingested the portions of their corpses that he did not preserve as trophies.[4] In July of 1991, Dahmer’s attempts to make the thirty-two-year-old Tracy Edwards his next victim failed as, during the middle of the shoot, the handcuffed Edwards fled Dahmer’s apartment and alerted the police.[5] A police investigation later that day revealed a charnel house masked by the façade of an immaculately cleaned homestead: pictures of victims in erotic poses and differing states of dismemberment, human remains in varying degrees of decomposition concealed in the closet, heads and other body parts preserved in the refrigerator and freezer, and a barrel filled with mutilated limbs.[6] Although Dahmer was diagnosed with borderline personality disorder and schizotypal personality disorder, he was labeled sane enough to stand trial and, in 1992, he was sentenced to a combined term of 957 years and incarcerated in the Columbia Correctional Institute in Portage, Wisconsin, where he was attacked and killed two years later by a fellow inmate while performing janitorial services.[7] 

Works Referenced

Ferllini, Roxana. Silent Witness: How Forensic Anthropology is Used to Solve the World’s Toughest Crimes. Buffalo, NY: Firefly Books, 2002.

[1] Ferllini, 86-87.
[2] Ferllini, 86.
[3] Ferllini, 66-67.
[4] Ferllini, 66.
[5] Ferllini, 66.
[6] Ferllini, 67.
[7] Ferllini, 67.

Friday, July 23, 2021

Baseball Bat Skull

$30 - $40 (based on 2019 prices)
Makes one skull
 
Back in 2017, my office selected a demented circus theme for our annual decorating competition. The contest gave me an opportunity to tackle one of the two subjects I swore I would never touch: clowns. By drawing inspiration from turn-of-the-century travelling shows, I was able to focus on a twisted carnival idea that did not relying too heavily on clowns. In 2019, the haunt’s venue elected to do its own carnival concept, which gave me a second chance to revisit the idea. Utilizing the same inspiration, I expanded on the props made for 2017 and applied a more twisted slant. This particular prop was part of the games display – a macabre allotment of traditional carnival games with a gory slant.
  • One human-size plastic skull
  • One plastic baseball bat (about two feet in length)
  • One roll of painter’s tape
  • One 10 oz. can of interior/exterior, fast-drying spray paint flat white*
  • One 2 oz. bottle of acrylic paint in flat black*
  • One roll of colorful wrapping paper (roughly seventeen square feet)
  • One 4 oz. bottle of all-purpose tacky glue*
  • One 10 oz. can of interior/exterior, fast-drying spray paint in flat brown*
  • One 10 oz. can of interior/exterior, fast-drying spray paint in flat black*
  • One small, white ping pong ball (1 3/8” in diameter)
  • One 0.44 oz. bottle of clear nail polish*
  • One 0.3 fluid ounce bottle of red food coloring*
  • One 4 oz. bottle of clear, all-purpose tacky glue gel*
1. Remove the mandible from the skull and hot glue it agape to create a screaming face. To aid the process, use a sturdy object – a glass jar or tin can – to support the skull as the glue dries. You may need to apply multiple coats to ensure a firm hold.
2. Use a sharp knife to cut the baseball bat in half. If it helps, measure and mark your cut first. Also, purchase a bat that is made of thin plastic. This will not only make it easier to cut, but prevent the prop from being too top heavy.
3. Adhere the two cut ends of the bat to the skull using either hot glue or superglue. You can position them however you desire. For my version, the end jutted out of the right eye and the handle protruded from the back of the head. To improve stability, cut openings into the skull large enough to accommodate the bat portions and insert their cut ends into the holes.
4. To create the classic red-and-white-striped circus pattern, begin by taping off sections of the bat pieces with painter’s tape. To speed up the process, purchase a red bat (or a white bat and use red spray paint in step five).
5. On a newspaper-lined surface in a well-ventilated area, give both sections of the bat two even coats of white spray paint (or red, if you purchased a white bat). Do not worry too much if the paint gets of the skull, since it will be covered with wrapping paper in step seven.
6. Once the paint has dried, carefully remove the painter’s tape and, to clean up the spaces between the stripes, paint black bands. During this step, you can also paint the portions covered by the tape an alternate color before applying the black bands.
7. Cut or tear apart the wrapping paper. You can either isolate distinct images or use random sections (as I did). Cover the entire surface of the skull with the cuttings. This process works best if you move in stages: apply a layer of glue to one section, press the paper down until it sticks, and repeat the process.
8. On a newspaper-lined surface in a well-ventilated area, dust the skull and bat sections with a light coat of black and brown spray paint to add age and distress. To give the appearance of dirt, hold the can over twelve inches away from the skull’s surface and make quick flicking motions. You can also apply a flecking of black paint and smears of brown paint to enhance the weathered appearance.
9. Apply a couple coats of clear nail polish to the ping pong ball to give it a glossy appearance and glue it into the skull’s eye socket. I decided to keep the eye a ghostly white; however, you could paint irises and pupils on it for a more whimsical look. Also, to aid in the painting process, create a small stand to hold the ball (I used an upturned paper plate with a hole cut into it).
10. In a plastic container (because the food coloring will stain, use something disposable or that you won’t mind dying), pour in your desired amount of clear glue gel and slowly add red food coloring to the solution until it achieves the sanguine hue you desire. To give the blood further density, add blue food coloring and mix well.
11. On a newspaper-lined surface, apply the blood glue to the prop and allow it to fully dry. You can use an old spoon or plastic utensil to strategically dripple the liquid along chosen areas (e.g. around the openings of the eyes and nose and pooled about the areas where the bat portions protrude from the skull) or pour it haphazardly for a gory mess.
12. You can enhance the prop’s creepiness by gluing clusters of bugs to its surface or writing words like fun and play in red paint along its features.
*You will not use the entire bottle’s content for this project.

Friday, July 16, 2021

Ghost Jars

$10 - $15 (based on 2018 prices)
Makes three jars
 
For 2018’s ghost theme, which was part of my office’s annual decorating competition, I incorporated dozens of old photographs with cryptic numbers into the décor and, using a few of these items, created ghost jars to amplify the motif. Also known as spirit jars, ghost jars are implemented in many hoodoo and voodoo practices, where images or personal belongings of an individual are placed within a container which is then used to trap their spirit or soul. Although I made three to decorate the altar, the ambitious haunter can make dozens to line a walkway or scatter throughout a graveyard.
  • Three glass jars (roughly eight inches tall and four inches in diameter)
  • One 8 oz. can of oil-based interior wood stain in Jacobean*
  • One 4 oz. bottle of all-purpose tacky glue*
  • One 33 oz. bag of Spanish moss
  • Three LED tealights
  • Hot glue gun and glue sticks
  • One 0.44 oz. bottle of glossy white nail polish
  • Three ghost photographs (learn how to make them here)
  • Two to three yards of twine
  • One 2 oz. bottle of acrylic paint in flat black*
1. Thoroughly wash and dry the jars. If there is any sticker residue, use rubbing alcohol to remove it (soak a paper towel in the solution, let it sit over the area for a few minutes, and wipe away the remaining glue). After cleaning the jars, roughen their surfaces with coarse sandpaper to help the stain adhere. Then, on a newspaper-lined surface in a well-ventilated area, paint the jars with the stain. I discovered that applying a thin coat and patting it with paper towels produces a hazed appearance. Likewise, brushing the rims and base with a swift downward motion creates the illusion of grime buildup.
2. Once the stain has dried, coat the bottoms of the jars with a generous amount of glue and affix clusters of Spanish moss. You want enough to remain highly visible after adding the candles and photographs, but not so much that it dominates the prop. It may help to work in stages: insert the moss, place the other props on top of it, and add or subtract moss as needed.
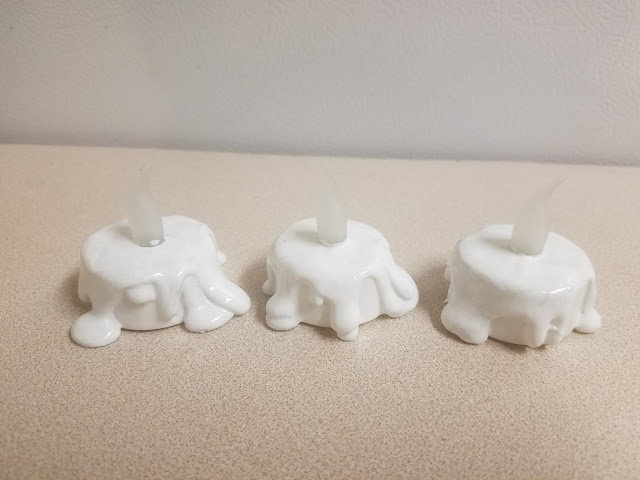
3. On a wax-paper-lined surface, use hot glue to give the candles extra girth (the paper will make it easier to release the candles). This process works best if you move in stages, applying one layer at a time and allowing the glue to dry between each application. Also, I found that pumping the glue along the top of the candles and allowing it to naturally run downward creates the best results.
4. To make the candles look waxy, cover them in two or more coats of glossy white nail polish. I elected to use white to provide a clear contrast with the dull hues of the jars and moss; however, you can utilize another color.
5. Insert the photographs into the jars and allow them to spread across the back of the containers. Then, place the candles in the moss. Depending on the width of the jars’ mouths, you may need to use a long pair of tweezers of kitchen tongs to position the items if you cannot fit your hand through the openings.
6. Wrap the necks of the jars with twine. Do not overthink your application, since a haphazard pattern will look spookier. Also, coat the necks with a light brushing of glue prior to applying the twine to help it adhere to the glass and remain in place.
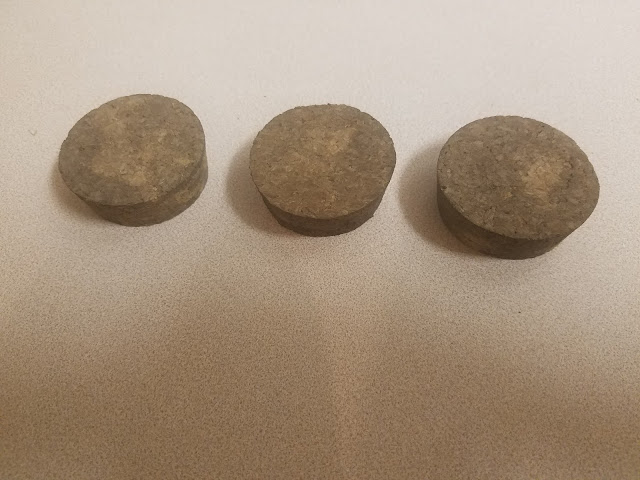
7. To give the cork lids a grimy appearance, water down black acrylic paint and brush it over their surfaces, ensuring the liquid settles into all the cracks and fissures (you can also use a spray bottle for the application). Allow the mixture to sit for a few minutes and then wipe it clean. You may want to experiment with the consistency prior to doing this: the more water you add, the fainter/lighter the wash; the less water you add, the deeper/darker the wash.
8. The props can be enhanced further with additional details to cater them to your haunt’s specific needs. For instance, you can accompany the candles and photographs with aged bones or personal trinkets or decorate the jars with strands of voodoo beads or clusters of chicken feathers.
*You will not use the entire bottle’s content for this project.

Friday, July 9, 2021

"The Choice, III" (A Poem)

Originally published in his 1870 Poems and reprinted in his 1881 The House of Life, Dante Gabriel Rossetti’s The Choice is a collection of three sonnets which explore the pursuits of human life in relation to the finality of death. While some literary scholars read the trilogy as one cohesive unit, others read each poem as a separate piece which provides its own unique perspective.[1] Here, we will conduct a hybrid of both techniques, presenting each sonnet as its own distinct entry over the next three month, but acknowledging their united nature. The first sonnet, which was featured in May, critiques humanity’s futile quest for physical enjoyment. The second sonnet, which was featured last month, comments on mankind’s religious asceticism. The third sonnet, printed below, completes the narrative by discussing human self-development.

Think thou and act; to-morrow thou shalt die.
Outstretched in the sun’s warmth upon the shore,
Thou say’st: Man’s measured path is all gone o’er:
Up all his years, steeply, with strain and sigh,
Man clomb until he touched the truth; and I,
Even I, am he whom it was destined for.
How should this be? Art thou then so much more
Than they who sowed, that thou shouldst reap thereby?
Nay, come up hither. From this wave-washed mound
Unto the furthest flood-brim look with me;
Then reach on with thy thought till it be drown’d.
Miles and miles distant though the last line be,
And though thy soul sail leagues and leagues beyond, -
Still, leagues beyond those leagues, there is more sea.[2]

Works Referenced

Rossetti, Dante Gabriel. “The Choice, I.” The House of Life: A Sonnet Sequence. 1881. Portland, ME: Thomas B. Mosher, 1903. 76.

Rossetti, William Michael, ed. The Poems of Dante Gabriel Rossetti with Illustrations from His Own Pictures and Designs. London: Ellis and Elvey, 1904.

____________________
[1] W. Rossetti, 237-238.
[2] D. Rossetti, 76.

Friday, July 2, 2021

Sugar Skull Ribbon Wreaths

$15 - $20 (based on 2017 prices)
Makes two wreaths
 
The Dia de Los Muertos portion of 2017’s haunted house required dozens of wreaths and flowers for an intricate funeral scene. To prevent myself from using the same design for each prop, I did variations on the sugar skull motif. For this version, I decided to create an explosion of color that started with the painted skulls at the wreaths’ centers, spread to the floral arrangements covering their circular frames, and concluded with a trail of ribbons streaming down their bases.
  • Two nine-inch grapevine wreaths
  • Two wooden skull cutouts
  • One 2 oz. bottle of acrylic paint in flat black*
  • One 2 oz. bottle of acrylic paint in flat blue*
  • One 2 oz. bottle of acrylic paint in flat green*
  • One 2 oz. bottle of acrylic paint in flat orange*
  • One 2 oz. bottle of acrylic paint in flat purple*
  • One 2 oz. bottle of acrylic paint in flat red*
  • One 2 oz. bottle of acrylic paint in flat white*
  • One 2 oz. bottle of acrylic paint in flat yellow*
  • One five-yard spool of blue ribbon
  • One five-yard spool of orange ribbon
  • One five-yard spool of pink ribbon
  • One five-yard spool of red ribbon
  • One five-yard spool of yellow ribbon
  • Artificial flowers in multiple colors and sizes (e.g. dahlias, daises, hydrangeas, sunflowers, zinnias)
  • One yard of steel wire
  • One yard of gray ribbon
1. On a newspaper-lined surface in a well-ventilated area, give the wooden cutouts three even coats of white paint and, once they have dried, detail their faces with a variety of colors. Your designs can be as fanciful or frightening as you desire. Since these were used for a Dia de Los Muertos haunt, I stayed with playful imagery and, to save time, covered just the side which would be displayed.
2. Cut each five-yard spool of ribbon into five nine-inch, five twelve-inch, and five fifteen-inch sections. For visual unity, you want to select colors which correspond with those on the sugar skulls. To prevent them from fraying, burn their edges. You can also use pinking shears to give their ends a decorative flourish and add further interest to the prop.
3. Evenly divide the total number of sections between each wreath and hot glue them to the lower portions. By varying their colors and lengths, you will create a more impactful statement.
4. Use hot glue to adhere the flowers to the wreaths. While doing so, build up layers and vary the color patterns so that blooms with the same hues and shapes are not concentrated in one area. You may want to play with the arrangement first before gluing it in place. Likewise, you want to pick colors which complement the ribbons and designs on the skulls.
5. Cut steel wire into four one-foot sections, bend them in the middle, and adhere one to the top and bottom of each skull cutout. This will serve to attach the items to the wreaths. To help hide the wires, purchase one in a color which matches those of the ribbons or flowers. I you cannot find colored wire, you can always spray paint it.
6. Using the wire, attach the skulls to the wreath. You will do this by running the wire through an opening in the frame and wrapping it around on of the vines. For added support, glue the wire in place.
7. The wreaths can be hung in a variety of ways: a traditional hanging hook, a hanging loop made from gray ribbon cut into fourteen-inch sections (as I did for this version), or a sturdier loop made with the same steel wire used in steps five and six.
8. You could add further embellishments by incorporating colorful beads, exotic feathers, or glittery branches into the wreath’s design.
*You will not use the entire bottle’s content for this project.