Friday, April 24, 2020

The Unique Nature of the Epitaph Tomb: A Mini-Essay

     Between the eleventh and eighteenth centuries, a unique vault – the epitaph tomb – emerged in the churches of Europe. A small slab nestled in either the interior or exterior walls, these enclosures, some as small as eight inches by sixteen inches, possessed small placards on their openings that served as epitaphs for the deceased individual’s remains found within.[1] What made these tombs distinctive, in turn, was their function. In an effort to save space as mounting numbers of corpses filled the churches’ charnels and garrets, these small inserts served as compact crypts where the dried-out bones of the dead were permanently deposited after their time in the cemetery.[2] As time progressed, these epitaph tombs fell out of favor; however, they provided the model for the sarcophagus mausoleums found in contemporary cemeteries.[3] 

Works Referenced

Ariès, Philippe. The Hour of Our Death: The Classic History of Western Attitudes Toward Death Over the Last One Thousand Years. 1977. Trans. Helen Weaver. New York: Barnes and Noble Books, 2000.
____________________
[1] Ariès, 234.
[2] Ariès, 234.
[3] Ariès, 234.

Friday, April 17, 2020

Shrunken Head Cloche

$25 - $30 (based on 2019 prices)
Makes one display

Part of 2020’s twisted carnival theme involved Dr. Victor’s Oddity Museum, a collection of bizarre artifacts meant to resemble the curiosity exhibits customary in turn-of-the-century travelling shows. To achieve this, I crafted a bevy of familiar oddities, from mummified mermaids to shrunken heads. For this particular prop, I elected to use a plastic cloche rather than a glass version to reduce the risk of injury. Also, to save time, I repurposed an old store-bought shrunken head used in 2015’s voodoo theme; however, you can craft your own to personalize the item.
  • One plastic cloche with detachable base and handle (roughly eight inches tall)
  • One shrunken head small enough to fit within the cloche
  • One 10 oz. can of interior/exterior, fast-drying spray paint in hammered bronze
  • One 2 oz. bottle of acrylic paint in flat black*
  • One 2 oz. bottle of acrylic paint in grasshopper*
  • One 2 oz. bottle of acrylic paint in hunter green*
  • One 2 oz. bottle of acrylic paint in olive*
  • One 2 oz. bottle of acrylic paint in orange spice*
  • One 2 oz. bottle of acrylic paint in surf blue*
  • One 8 oz. can of oil-based interior wood stain in Jacobean*
  • Two pieces of 8” x 11.5” copy paper (one with specimen labels printed on it and one blank)
  • At least four tablespoons of black tea (e.g. Darjeeling, Earl Gary, English Breakfast, etc.)
  • One pan large enough to soak the copy paper
  • One 4 oz. bottle of all-purpose tacky glue*
  • One foot of brown twine
1. Disassemble the cloche and, on a newspaper-lined surface in a well-ventilated area, apply an even coat of hammered bronze spray paint to the base and handle. Although I only used one coat, you may want more depending on your desired coverage. Keep in mind, though, that this is the base coat and much of the bronze will be covered by the other paints.
2. Begin the aged patina by building up layers of green paint: grasshopper, hunter green, and olive. You want the metal to appear oxidized, so focus your application on the areas that would be exposed to the elements and work from dark to light. I found that applying small amounts of paint to a stippling sponge and patting it lightly on the surface works best. You may want to practice on a piece of cardboard first, though.
3. Complete the aged patina by applying a light speckling of orange spice and surf blue to the surface. Akin to step two, use a stippling sponge for this application and keep its coverage to a minimum. You want the colors to accent the oxidization and not be too overpowering. Also, give the base and handle a flecking of black paint. You can do this by either quickly flicking a paintbrush or using an old toothbrush and strumming your finger across the bristles. Since this process flings paint everywhere, it’s best to perform it outside.
4. Boil enough water to completely submerge the copy paper and pour it into the pan. Add the tea. The longer you allow the tea to brew, the darker the stain will become. Likewise, greater amounts of tea will produce a richer stain. I found that a combination of English and Irish Breakfast brewed for over ten minutes produces a nice, deep brown. Submerge the paper into the tea mixture and soak it until it reaches the color you desire. I soaked mine for eight hours and scattered the loose-leaf tea over the top of the paper to add spots. Remove the paper from the water and allow it to dry. Although it can be time consuming, this process works best if you stain each sheet of paper individually.
5. Once the paper has dried, trace the outline of the base onto the blank sheet, cut it out, and glue it in place. To make the paper appear even more decrepit, crinkle it and create holes before adhering it to the base.
6. On a newspaper-lined surface in a well-ventilated area, paint the cloche with the wood stain. I discovered that applying a thin coat and patting it with paper towels produces a hazed appearance. Likewise, brushing the rim with a swift downward motion creates the illusion of grime buildup.
7. Center the shrunken head on the base and glue it in place. For a sturdier hold, consider using superglue.
8. Cut out the specimen label, leave a small border, and give the specimen a name. To roughen the label’s appearance, use sandpaper to fray its sides and create holes. You can also use olive or vegetable oil to add further stains to the label. I discovered that applying a small amount of oil to your index finger and patting it on the paper works well.
9. Reattach the handle to the cloche, wrap twine around its base, and knot the ends, trimming one and leaving the other with a two- or three-inch excess. Punch a hole in the top of the label and thread the twine through it, knotting the ends and trimming the excess.
10. Reattach the cloche to its base. If you plan for a more permanent display, you can glue the item down. Likewise, you can add extra embellishments, such as strands of voodoo beads, to cater the prop to your haunt’s theme.
*You will not use the entire bottle’s content for this project.

Friday, April 10, 2020

"Silence" (A Poem)

Despite its short length, Thomas Hood's "Silence" explores the concept from a variety positions, from the reticent depths of the ocean to the stilled confines of the human mind. In fact, the poem's gothic tone, Marion Wynne-Davies highlights, served as inspiration for the surreal dream sequences of Jane Campion's film The Piano (1993).[1]

There is a silence where hath been no sound,
There is a silence where no sound may be,
In the cold grave - under the deep, deep sea,
Or in the wide desert where no life is found,
Which hath been mute, and still must sleep profound;
No voice is hushed - no life treads silently,
But clouds and cloudy shadows wander free,
That never spoke, over the idle ground:
But in green ruins, in the desolate walls
Of antique palaces, where Man hath been,
Though the dun fox, or wild hyena, calls,
And owls, that flit continually between,
Shriek to the echo, and the low winds moan,
There the true Silence is, self-conscious and alone.[2]

Works Referenced 

Hood, Thomas. "Silence." The Complete Poetical Works of Thomas Hood: With a Biographical Sketch and Notes. Ed. Epes Sargent. Boston, MA: Phillips, Sampson, and Company, 1859. 196.

Wynne-Davies. Marion. "The Rhythm of Difference: Language and Silence in The Chant of Jimmie Blacksmith and The Piano." Post-Colonial Literature: Expanding the Canon. Ed. Deborah Madsen. London: Pluto Press, 1999. 58-71.
_____________________

[1] Wynee-Davies, 58. 
[2] Hood, 196.

Friday, April 3, 2020

Hanging Insect Specimens

$15 - $20 (based on 2018 prices)
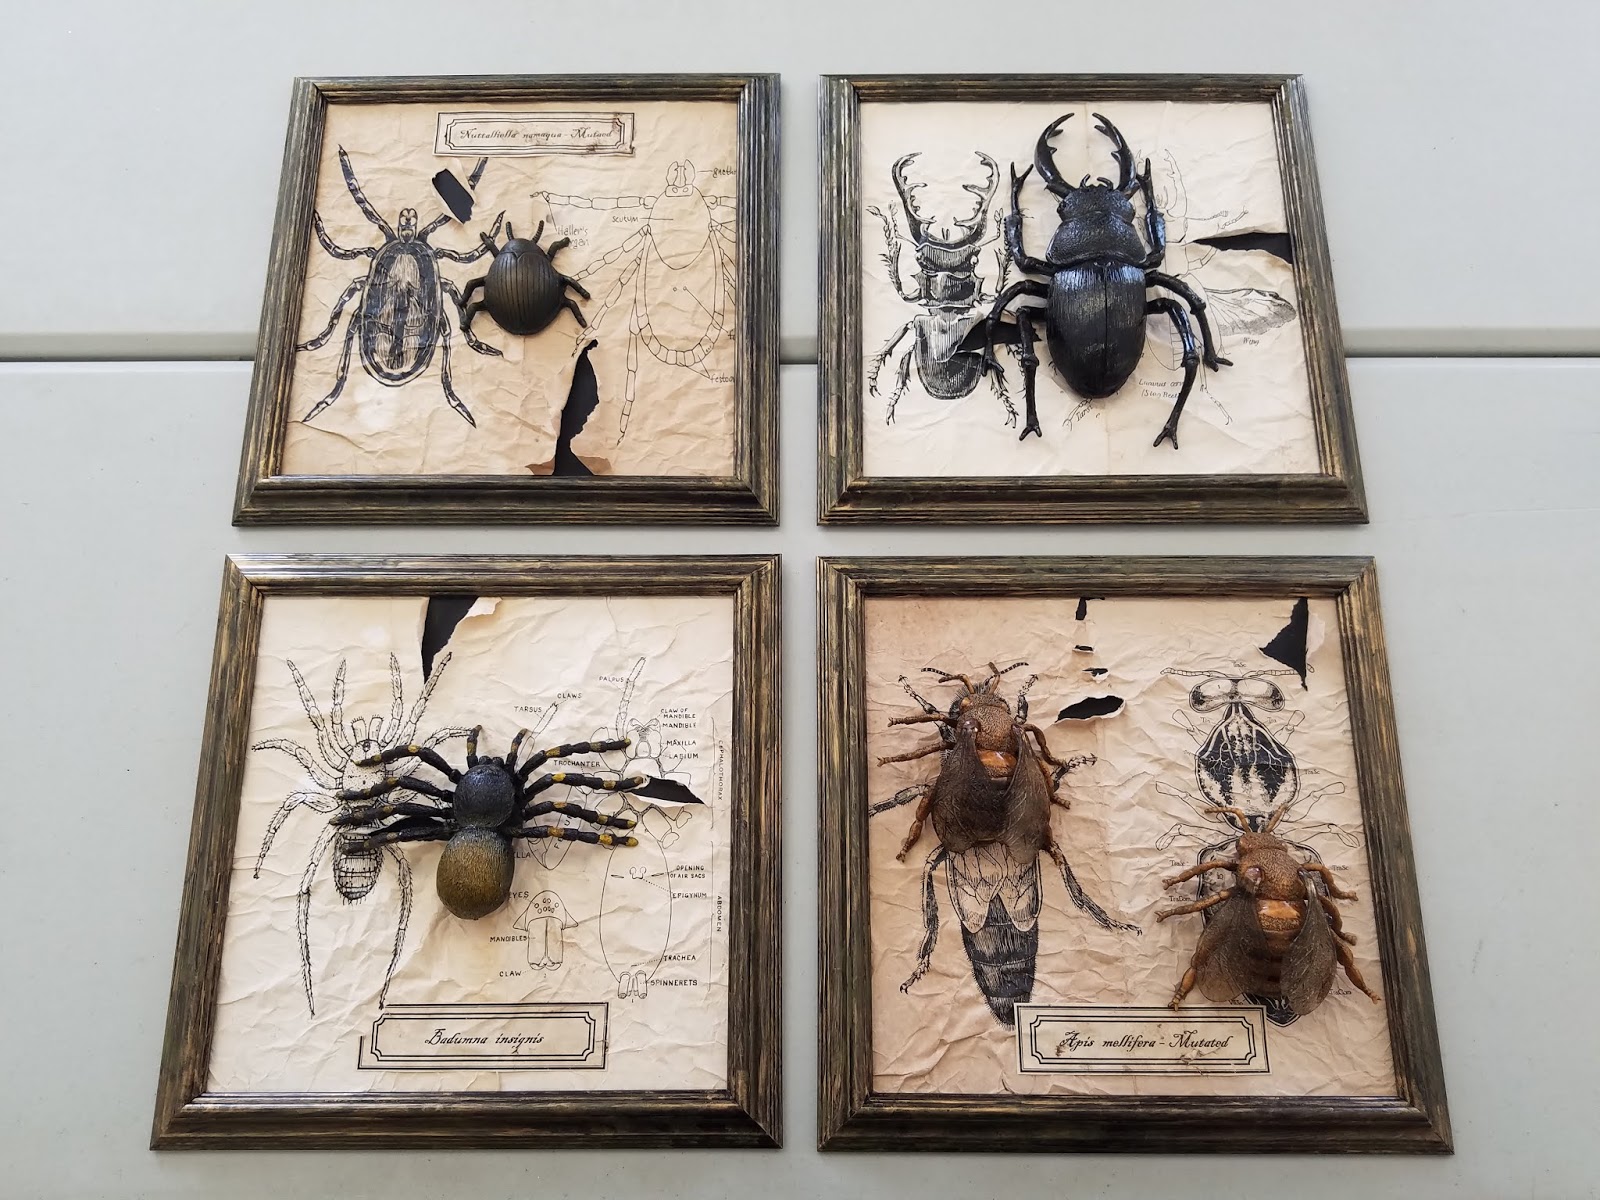
Makes four specimens

For the witch den, which was part of my office’s annual decorating competition, I covered the walls in an assortment of framed specimens. To give the illusion of an eclectic collection, I created small groups of props with varying designs. For this version, I used vintage entomology illustrations and oversized plastic insects. You can, of course, cater the props to your specific needs by altering the size (a subtle statement with a small, cheap frame or a dramatic impression with something more massive and ornate) or specimens (an eerie mixture of rat skulls or a bizarre cluster of bat wings).
  • Four 12” x 12” frames
  • One 10 oz. can of interior/exterior, fast-drying spray paint in flat black
  • One 2 oz. bottle of acrylic paint in metallic bronze*
  • One 2 oz. bottle of acrylic paint in olive*
  • Five pieces of 8” x 11.5” copy paper (four with vintage entomology illustrations printed on them and one with scientific labels)
  • At least four tablespoons of black tea (e.g. Darjeeling, Earl Gary, English Breakfast, etc.)
  • One pan large enough to soak the copy paper
  • One 4 oz. bottle of all-purpose tacky glue*
  • Five plastic insects in various sizes
  • One 8 oz. can of oil-based interior wood stain in Jacobean*
1. Remove the backings and any glass from the frames and, on a newspaper-lined surface in a well-ventilated area, apply an even coat of black spray paint. Although I only used one coat, you may want more depending on your desired coverage. Keep in mind, though, that this is the base coat and much of the black will be covered by the metallic bronze and olive paint.
2. Once the paint has dried, detail the frames by apply a layer of metallic bronze. You want to give the illusion of worn metal, so gently brush the paint along the raised surfaces of the frames in a quick, back-and-forth motion. It may work best to experiment with a scrap of cardboard first. Also, to enhance the aged patina, randomly smudge olive paint on the frames with either a paper towel or sponge.
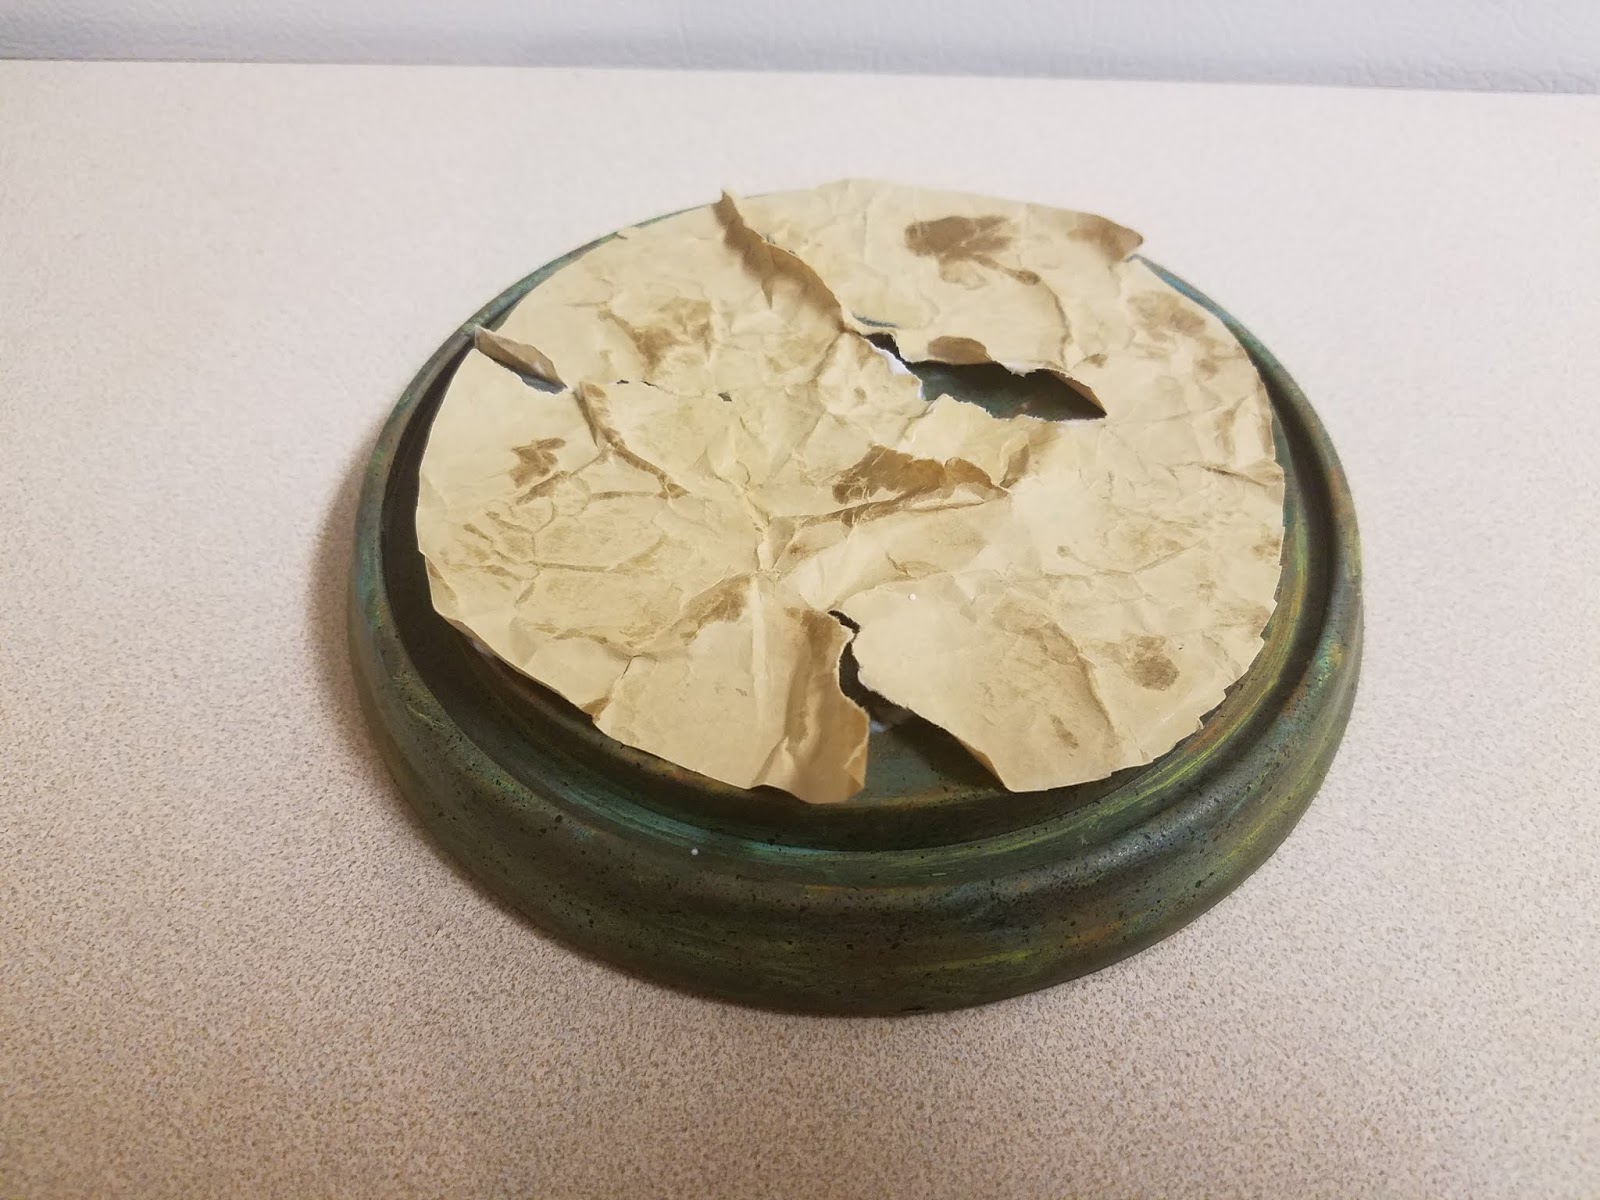
3. Boil enough water to completely submerge the copy paper and pour it into the pan. Add the tea. The longer you allow the tea to brew, the darker the stain will become. Likewise, greater amounts of tea will produce a richer stain. I found that a combination of English and Irish Breakfast brewed for over ten minutes produces a nice, deep brown. Submerge the paper into the tea mixture and soak it until it reaches the color you desire. I soaked mine for eight hours and scattered the loose-leaf tea over the top of the paper to add spots. Remove the paper from the water and allow it to dry. Although it can be time consuming, this process works best if you stain each sheet of paper individually.
4. Glue the stained paper to the cardboard backings. To make it appear even more decrepit, crinkle the paper and create holes.
5. On a newspaper-lined surface in a well-ventilated area, stain the insects. I began by giving each one a light, even coat with a foam brush. After that, I applied heavy amounts of stain and patted away the excess with paper towels. You want the color to build up in the cracks and fissures. Although you may use whatever color of stain you desire, I chose Jacobean because it gives the insects an old, rotted appearance. Once you have achieved your intended look, allow the insects to dry. I let mine sit outside in the sun for three days.
6. Center the specimens on the backings and glue them in place. For a sturdier hold, consider using superglue.
7. Cut out the tea-stained specimen labels and adhere them to the backings. For this prop, I decided to use the genus and species of the insects, but you could christen each insect with a whimsical name or its role in a magical potion.
8. Attach the frames to the backings. For added support, glue the backings in place, particularly if you plan to display these in windy conditions. If the frames did not come with hanging hooks, you can add store-bought items to the back or fashion your own with steel wire.
*You will not use the entire bottle’s content for this project.