Friday, January 26, 2024

Mahafaly Funeral Totems: A Mini-Essay

     The Mahafaly in the south-western region of Madagascar honor the dead by placing aloalo on their graves.[1] These funeral totems are made of the sacred wood hazomanga and are either painted or carved to represent the life of the deceased, with a wealthy individual’s aloalo often depicting their worldly possessions and the aloalo of a person with many children sometimes being explicitly erotic to represent their virility.[2] Others possess images of men hunting zebu and become a means for the Mahafaly to pay homage to the deceased and their ancestors, representing how the living and the dead are closely linked.[3] Traditionally, aloalo were reserved only for Mahafaly chiefs and people with royal lineages, with their tombs located outside villages in the forests believed to be the domain of ancestral spirits.[4]

Works Referenced

Magnin, Andre, and Jacques Soulillou. Contemporary Art of Africa. New York: Abrams Books, 1996.

McElroy, Colleen. Over the Lip of the World: Among the Storytellers of Madagascar. Seattle, WA: University of Washington Press, 1999.
____________________
[1] Magnin and Soulillou, 24.
[2] McElroy, 29-30.
[3] McElroy, 30.
[4] Magnin and Soulillou, 24.

Friday, January 19, 2024

Creepy Doll with Candles

$10 - $15 (based on 2023 prices)
Makes one prop

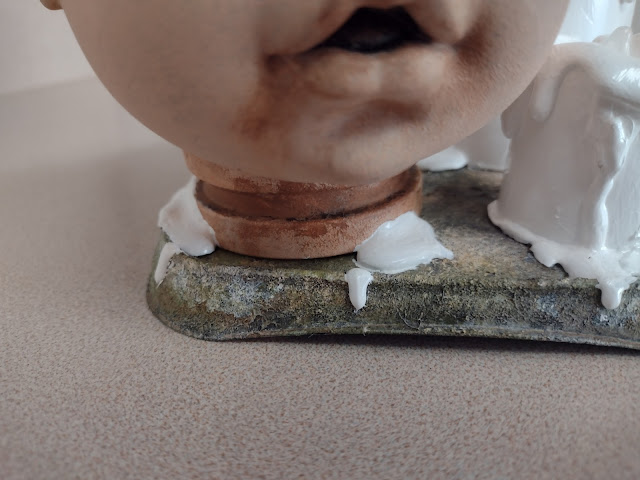
In 2023, I was commissioned by a local theater to serve as a consultant and prop builder for their production of The Haunting of Hill House, which was based on Shirley Jackson’s novel. Being a fan of the books since I was a teenager, I jumped at the opportunity and spent several months creating a collection of items to decorate both the house depicted on the stage and the cemetery created in the lobby to greet patrons before they entered the theater. For this prop, I used a series of recycled items, including a lid from a food container, to fashion a creepy doll surrounded by several candles which was nestled on a bookcase within the set.
  • One 5” x 5” sheet of plastic
  • One 5 oz. tube of siliconized caulk*
  • One 10 oz. can of interior/exterior, fast-drying spray paint in flat black*
  • One 2 oz. bottle of acrylic paint in flat beige*
  • One 2 oz. bottle of acrylic paint in flat brown*
  • One 2 oz. bottle of acrylic paint in flat gray*
  • One 2 oz. bottle of acrylic paint in flat olive*
  • One 2 oz. bottle of acrylic paint in flat white*
  • One 2 oz. bottle of acrylic paint in glossy white*
  • Three LED candles in varying sizes
  • One hot glue gun and glue sticks
  • One vinyl doll’s head
1. Thoroughly wash and dry the sheet of plastic. If there is any sticker residue, use rubbing alcohol to remove it (soak a paper towel in the solution, let it sit over the area for a few minutes, and wipe away the remaining glue). Then, use a paper towel to pat the caulking onto the sheet. Apply a small dollop to the towel and gently dab it onto the surface to create a stone-like texture. Do not overthink your application because a random pattern produces a more natural look.
2. Allow the caulking to dry for at least twenty-four hours and then, on a newspaper-lined surface in a well-ventilated area, give the sheet one or two even coats of black spray paint. You can apply additional layers; however, keep in mind that this is the base coat and much of it will be covered by the other colors.
3. Use a stippling brush to build up layers of gray and white paint, working from dark to light to give the sheet the look of stone. If one color becomes too overpowering, you can always apply more of the other color to dial it back.
4. To age the prop, water down brown paint and brush it along the sheet’s surface, allowing it to settle in the fissures. Then, use the stippling brush to pat olive paint randomly onto the sheet to mimic moss. How much of both colors you apply depends on the level of weathering you want.
5. Determine where the candles will sit, trace their outlines, and cut them out, ensuring the holes are slightly smaller than the outlines to prevent the candles from falling through. This will allow access to the power switch and battery compartment. Because this process can damage the paint job, it might be better to perform this step before steps one through four.
6. Glue two of the three candles to their corresponding holes and use hot glue to build up layers of wax. The process works best if you move in stages, applying one layer at a time and allowing the glue to dry between each application. Also, I found that pumping the glue along the top of the candle and allowing it to naturally run downward creates the best results.
7. Give the candles two to three coats of glossy white paint. You can always use an alternate color to cater the prop to your haunt’s chosen aesthetic or use multiple hues to make it look like a random assortment of candles.
8. Use a sharp knife to remove the doll’s eyes and the top of its head. For visual interest, make jagged edges. Also, purchase a doll made from thin plastic or vinyl to make this process easier.
9. Trace the outline of the third candle onto the base of the head and cut it out, ensuring the candle fits snuggly into the opening but not gluing it in place (this will occur during step thirteen).
10. On a newspaper-lined surface in a well-ventilated area, give the inside and outside of the head one to two even coats of black spray paint. As with step two, this is just the base coat and will be covered with other paints, so you may not want to apply too many coats.
11. Use a stippling brush to build up layers of beige paint, allowing parts of the black to remain visible in order to give the head the look of aged porcelain. For an alternate look, you can apply a crackle paint effect.
12. To give the head a layer of age, gently brush brown paint long the edges of the openings and the creases of the face, focusing your efforts on places where dirt would naturally accumulate.
13. Insert the candle into the opening at the base of the head, glue it in place, and then build up layers of hot glue around it to make it appear like a melted candle. Following this, give the glue two or three coats of glossy white paint (or any other color you choose for the candle).
14. Attach the head to the base, guaranteeing the candle rests above the opening to make the power switch and battery compartment accessible. For added stability and visual interest, build up puddles of glue around the base of the head and paint these with glossy white paint to look like melted wax.
15. The prop can be enhanced further to correspond with your haunt’s theme. For instance, clusters of Spanish moss can be woven between the candles or swarms of spiders can be glued to the sides of the face.
*You will not use the entire bottle’s content for this project.

Friday, January 12, 2024

"The Deserted House" (A Poem)

“The Deserted House” was Lizette Woodworth Reese’s first published poem, appearing within The Southern Magazine in 1874 and becoming one of many works where the poet examines the darker side of life.[1] Detailing the forsaken grounds of an old manor, the poem hints at the ghosts of the past and how they linger in the silent confines of abandoned places.

To the sweet memory of Sidney Lanier

The old house stands deserted, gray,
With sharpened gables high in air,
And deep-set lattices, all gay
With massive arch and framework rare;
And o’er it is a silence laid,
That feeling, one grows sore afraid.

The eaves are dark with heavy vines;
The steep roof wears a coat of moss;
The walls are touched with dim designs
Of shadows moving slow across;
The balconies are damp with weeds,
Lifting as close as streamside reeds.

The garden is a loved retreat
Of melancholy flowers, of lone
And wild-mouthed herbs, in companies sweet,
‘Mid desolate green grasses thrown;
And in its gaps the hoar stone wall
Lets sprays of tangled ivy fall.

The pebbled paths drag, here and there,
Old lichened faces, overspun
With silver spider-threads-they wear
A silence sad to look upon:
It is so long since happy feet
Made them to thrill with pressure sweet.

The fountain stands where crowd the trees,
And solemn branches o’er it part:
How human sound its melodies!
“A broken heart – a broken heart!”
For this is all it hath to say
Throughout the livelong summer’s day.

The dial marks a terrace low,
Its uncouth visage weird with time,
With one black shadow moving slow,
As though it felt the fountain’s rhyme;
A pace beyond, a little stair
Of moss-grown rock leads close to where,

‘Mid drear but fragrant shrubs there stands
A saint of old made mute in stone,
With tender eyes and yearning hands,
And mouth formed in a sorrow lone;
‘Tis thick with dust, as long ago
‘Twas thick with fairest blooms that grow.

Steppeth the iron gate aside,
To point the ancient moat without
That lieth deep and cool and wide,
With many a shadow thrown about,
To whom, with dreariness untold,
It gives its legend old, old, old.

The glossy fields beyond it lie,
The solitary fields – they meet
The narrow road that stretcheth nigh
The west, and hastes with dusty feet
Where dips the city dreamily,
Half-seen, amid a purple sea.

There falls the sunshine faint with mist –
It falleth – ah! so still, so still –
The dark trees let their brows be kissed;
An e’en the dark moat hath its fill –
A far-off light, a shining lone,
As though on sacred things it shone.

The bees flit by with scarce a noise;
The fountain rhymeth mournfully;
A wind comes near with plaintive voice;
Without the moat moves drearily;
A wind with plaintive voice doth come –

It stirs a leaf and then is dumb.
Quick lizards quiver here and there
About the paths, but mute is each;
The sounds that make the summer’s air
So quaintly weird – the dull fly’s speech,
Or cricket’s drowsy ballad – thrill
Around, and yet it seems to still!

E’en to the road the calmness climbs
And then is lost; a peasant-maid
Who loiters home sings softest rhymes,
And ‘tween them pauseth half afraid
To hear the winds come slow and sweet,
And touch the grasses at her feet.

Or else, from out the distance steals,
Half heard, the tramp of oxen, or
The bleak and hoarse stir of slow wheels
Bound cityward; but more and more,
As these are hushed, or yet increase,
About the old house clings its peace.
[2]

Works Referenced

Reese, Lizette Woodworth. “The Deserted House.” The Southern Magazine 14.6 (1874): 605-607.

Spangler, Matthew. “Lizette Woodworth Reese.” Southern Writers: A New Biographical Dictionary. Eds. Joseph Flora and Amber Vogel. Baton Rouge, LA: Louisiana State University Press, 2006. 337-338.
____________________
[1] Spangler, 338.
[2] Reese, 605-607.

Friday, January 5, 2024

Laboratory Monster in a Box

$40 - $50 (based on 2020 prices)
Makes one box

2020’s mad scientist haunt was a massive undertaking, with the laboratory needing several large pieces of equipment to truly sell the theme. To create a unified set, I decided to use similar elements in all of the pieces: copper and silver pipes and joints, lights fashioned out of Christmas ornaments, and steel-colored bases. For this version, I repurposed an old latex head and frosted storage container to make an eerie monster trapped in a box. For the budget-conscious haunter, you can substitute the latex head with a foam wig stand covered in a cheap mask.
  • One 20” x 20” board of foam insulation
  • One 10 oz. can of interior/exterior, fast-drying spray paint in flat black
  • One 10 oz. can of interior/exterior, fast-drying spray paint in metallic copper
  • One 10 oz. can of interior/exterior, fast-drying spray paint in metallic silver
  • A random assortment of bolts, caps, and screws
  • One latex monster head large enough to fit within the plastic box
  • One 12” x 12” x 12” frosted plastic box
  • One 8 oz. can of oil-based interior wood stain in red chestnut*
  • One 8 oz. can of oil-based interior wood stain in Jacobean*
  • One 1” x 3’ PVC pipe
  • Four one-inch PVC elbow joints
  • One one-inch PVC coupling joint
  • One one-inch PVC tee joint
  • One LED pumpkin light
  • One clear plastic Christmas ornament (two inches in diameter)
  • Three feet of 3/4” clear plastic tubing
  • Two feet of red steel wire
  • Two feet of black steel wire
  • One 0.3 fluid ounce bottle of red food coloring*
  • One 4 oz. bottle of clear, all-purpose tacky glue gel*
1. On a newspaper-lined surface in a well-ventilated area, build up layers of black and metallic silver spray paint to give the foam board the look of steel. I found it works best to apply a base coat of black to the entire prop and then add the sliver, working in quick bursts to allow parts of the black to remain visible. You can also touch up portions with additional blasts of black if the silver becomes too heavy.
2. Detail the board with the assortment of bolts, caps, and screws, applying a small dab of glue to the bottoms of their heads and pushing them into the foam. Your arrangement is entirely based on your chosen aesthetic, so you can apply as many or as little as you like.
3. Center the box on the board and lightly trace its outline. Then, position the head in the center of the outline and glue it in place. If the frosted effect is fairly thick, you may need to bring the head forward so it becomes visible. It is best to play with the positioning beforehand, since repositioning the head after it had been glued to the board can prove rather difficult.
4. On a newspaper-lined surface in a well-ventilated area, paint the box with the Jacobean wood stain. Begin by applying a thin coat and patting it with paper towels to produce a hazed appearance. Then, brush the edges with a swift downward motion to create the illusion of grime buildup. Finally, dab the surfaces with the red chestnut wood stain to create spots of dried blood.
5. Reposition the box over the outline and glue it in place. For a sturdier hold, you may want to consider using superglue rather than hot glue.
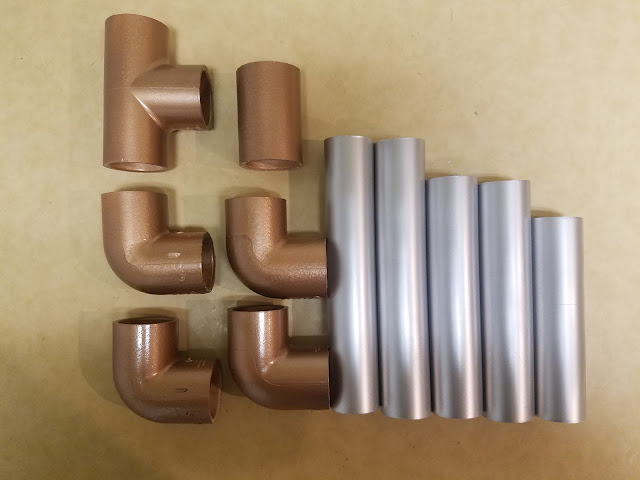
6. Measure, mark, and cut the PVC pipe into two seven-inch sections, two six-inch sections, and one five-inch section. These measurements may need to be increased or decreased depending on the size of the box. You want them large enough to form a frame that snuggly wraps around its sides.
7. On a newspaper-lined surface in a well-ventilated area, give the pipe sections two even coats of silver spray paint and the joints two coats of copper. You can always vary the colors to cater the prop to your haunt’s distinct color scheme.
8. Assemble the joints and pipes as shown in the picture to create the frame and then, using hot glue, attach it to the foam board. You may need to use a collection of sturdy objects to help support the framework while the glue fully dries. To improve the prop’s aesthetic, paint the glue joining the frame to the base silver to make it look welded to the board.
9. Paint the sides of the LED pumpkin light copper to match the joints and glue it to the top of the box just above the monster’s head, ensuring the light faces downward to illuminate the prop inside.
10. Cut the top off of the Christmas ornament and, on a newspaper-lined surface in a well-ventilated area, give it a coat of metallic copper spray paint. Once this has dried, accent its tip with metallic silver paint, cut two small holes on either side, and insert bolts into the openings.
11. Cut a three-inch section of the tubing and mangle its ends with a pair of scissors. Following this, give the tubing an even coat of metallic silver spray paint and a light dusting of black at the mangled end to make it appear charred. Then, insert the tubing into the ornament’s opening and glue it in place, painting the glue silver to make it look welded. Once all of this is done, nestle the ornament over the light. This will help hide it but also make it accessible to turn it on and change the batteries.
12. Cut the tubing into a twenty-five-inch section and, on a newspaper-lined surface in a well-ventilated area, give it an even coat of silver spray paint. Once it dries, position the tube beside the box, cut a hole into the board, and glue it in place. You want the tubing long enough to reach over the box and attach to the cover for the LED light, so you may need to adjust the measurements if your box is larger or smaller.
13. Using the same technique in step eleven, mangle the end of the twenty-five-inch tubing and dust it with black paint to make it appear singed.
14. Cut the black and red wire into five four-inch sections of each color, cluster them together, and bind their ends. Following this, run the wires between both ends of the tubing and glue them inside to give the illusion of exposed electrical wires.
15. In a plastic container (because the food coloring will stain, use something disposable or that you won’t mind dying), pour in your desired amount of clear glue gel and slowly add red food coloring to the solution until it achieves the sanguine hue you desire. To give the blood further density, add blue food coloring and mix well.
16. Use the blood glue to detail the prop, dribbling the liquid around the joints, pouring it down the sides of the pipes, and creating puddles at the base of the box.
17. The prop can be enhanced further with extra details to cater it toward your haunt’s needs, like biohazard labels adhered to the sides of the box. Also, the red food coloring can be substituted for green to make slime rather than blood.
*You will not use the entire bottle’s content for this project.