Friday, September 29, 2023

The Fertility Festivals of the Bōyas: A Mini-Essay

     In the Ballari district of Karnataka, which is located in southwestern India, the Bōyas, a huntsmen caste who serve the ruling powers, are rewarded for their services with rent-free land, known as inām. To ensure the prosperity of this land, the Bōyas participate in a fertility ritual called bhūta bali. At midnight on the day before the festival, the Bōya priest shaves himself and sacrifices either a buffalo or sheep. The blood of the animal is then mixed with rice and formed into balls, which are distributed to members of the community. As the priest performs his ritual the following day, the entire town bolts their doors to avoid witnessing the act in fear of disrupting the priest’s propitiation of the village goddesses. In addition to the rice balls, the Bōyas also display colorful silt drums during bhūta bali to symbolize the fertility process. These carved figurines possess bells around their necks and grasp a large detachable phallus that can be stored in their bellies.[1]
 
Works Referenced 
 
Thurston, Edgar. Omens and Superstitions of Southern India. London: T. Fischer Unwin, 1912.
____________________
[1] Thurston, 22.

Friday, September 22, 2023

Framed Rotting Face

$20 - $30 (based on 2020 prices)
Makes one frame
 
To accompany props like the skinned lab monster, I built this framed rotting face to hang in the laboratory and add to the mad scientist’s bevy of maniacal experiments. To save on cost, I purchased the mask in an after-Halloween sale and bought an old frame from a secondhand store. Additionally, I used two large scraps of white fabric left over from previous builds.
  • One 10” x 15” picture frame
  • One 10 oz. can of interior/exterior, fast-drying spray paint in flat black*
  • One 10 oz. can of interior/exterior, fast-drying spray paint in flat brown*
  • One 10 oz. can of interior/exterior, fast-drying spray paint in metallic silver*
  • One 2 oz. bottle of acrylic paint in flat black*
  • One 2 oz. bottle of acrylic paint in flat brown*
  • Two pieces of 8” x 11.5” cream-colored copy paper
  • One 6” x 12” gray photo matte
  • One 4 oz. bottle of all-purpose tacky glue*
  • One to two yards of white fabric
  • One latex mask
  • Six 1.5-inch T-pins
  • One piece of 8”x 11.5” copy paper with labels printed on it
  • At least four tablespoons of black tea (e.g. Darjeeling, Earl Gary, English Breakfast, etc.)
  • One pan large enough to soak the paper
  • One 0.3 fluid ounce bottle of red food coloring*
  • One 4 oz. bottle of clear, all-purpose tacky glue gel* 
1. Remove the backing and any glass from the frame and, on a newspaper-lined surface in a well-ventilated area, apply two even coats of silver spray paint. Although I used two coats, you may want more or less depending on your desired coverage.
2. To give the frame a filthy appearance, water down brown paint and brush it over the surface, ensuring the liquid settles into all the fissures (you can also use a spray bottle for the application). Allow the mixture to sit for a few minutes and then wipe it clean. You may want to experiment with the consistency prior to doing this: the more water you add, the fainter the wash; the less water you add, the darker the wash. After you have achieved your desired look, apply a slight flecking of black paint. You can do this by either quickly flicking a paintbrush or using an old toothbrush and strumming your finger across the bristles. Since this process flings paint everywhere, it is best to perform it outside.
3. Glue the cream-colored paper to the backing and then affix the matte atop of it. To enhance the aesthetic, you can use olive or vegetable oil to add stains to both items, applying a small amount of oil to your index finger and patting it onto their surfaces.
4. On a newspaper-lined surface in a well-ventilated area, give the backing a light dusting of brown spray paint to simulate dirt. To achieve this effect, hold the can over twelve inches away from the backing’s surface and make quick flicking motions. Once the paint has dried, run watered-down brown paint along the upper edge of the backing, allowing the liquid to naturally run downward. Akin to step two, you may need to play with the consistency before applying it to the prop.
5. Determine where you would like the face to rest on the backing. Then, bunch up the white fabric into a ball and glue it to that spot. This will provide padding to prevent the mask from caving in. Once this is done, dust the fabric with black spray paint. For the time-pressed haunter, you can just purchase black fabric and bypass this step.
6. Position the mask over the fabric and glue it in place. You want the cloth to be dark in case portions of it show through the mask’s eyes and mouth; hence, it is important not to skip the second part of step five (or merely buy a yard or two of black fabric).
7. Insert the T-pins into the edges of the mask, using them to mold the face and make it appear tacked to the backing. These can be substituted for other items, like screws or wooden skewers, to cater the prop to your haunt’s theme.
8. Boil enough water to completely submerge the copy paper and pour it into the pan. Add the tea. The longer you allow the tea to brew, the darker the stain will become. Likewise, greater amounts of tea will produce a richer stain. I found that a combination of English and Irish Breakfast brewed for over ten minutes produces a nice, deep brown. Submerge the paper into the tea mixture and soak it until it reaches the color you desire. I soaked mine for eight hours and scattered the loose-leaf tea over the top of the paper to add spots. Remove the paper from the water and allow it to dry.
9. After the paper has dried, cut out the label, leaving a small border around its edges. To roughen its appearance, use sandpaper to fray its sides and create holes. You can also crumple the paper to produce creases.
10. Once you have achieved your desired level of distress, glue the label to the backing just below the mask’s chin. Just like with step three, you can use oil to add additional stains.
11. In a plastic container (because the food coloring will stain, use something disposable or that you won’t mind dying), pour in your desired amount of clear glue gel and slowly add red food coloring to the solution until it achieves the sanguine hue you desire. To give the blood further density, add blue food coloring and mix well.
12. Apply the blood glue to the prop. You can use an old spoon or plastic utensil to strategically dribble the liquid along chosen areas (around the edges of the mask) or pour it haphazardly for a gory mess.
13. Reattach the backing to the frame, gluing it in place for extra stability. The prop can also be enhanced with additional details, like swarms of maggots or a specimen tag. 
*You will not use the entire bottle’s content for this project.

Friday, September 15, 2023

Cauldron Gifts Baskets

$5 - $10 (based on 2017 prices)
Makes two baskets 
 
In 2017, a local dance studio asked me to create two gift baskets to auction off at their annual charity event. The theme was sorcery, so I created cauldron containers to house an assortment of witch-themed props. Although I used these for a charity event, they can easily be modified to fit a variety of purposes, like party favors for a Halloween gathering or gift bags for a macabre birthday party.
  • Two eight-inch-diameter plastic cauldrons
  • One package of alphabetical stickers in glittery silver
  • One sheet of gray creepy cloth
  • One sheet of white creepy cloth
  • Two to three yards of brown twine
  • Six artificial feathers in various colors
  • Two skull-and-crossbones decals
  • One 4 oz. bottle of clear, all-purpose tacky glue*
1. Thoroughly wash and dry the cauldrons. If there is any sticker residue, use rubbing alcohol to remove it (soak a paper towel in the solution, let it sit over the area for a few minutes, and wipe away the remaining glue).
2. Use the alphabetical stickers to write witch-themed words, like positions and spells, on the sides of the cauldrons. You can limit these to just one word per container or cover them in a variety of mystical terms. If the adhesive fails to attach the lettering, especially along the cauldrons’ curves, consider using superglue. Also, purchase a set of stickers with more than one of each letter (this gives you a backup in case stickers tear).
3. Spread the creepy cloth across a flat surface and cut each sheet in half. Then, line the bottoms of the cauldrons with the fabric, starting with the gray and proceeding with the white to add contrast. Drape the edges over the sides of the cauldrons and fray their ends for additional creepiness. Whether or not you glue the cloth to the cauldrons’ bottoms is entirely up to you and your final plans for the baskets.
4. Wrap twine around the handles in a haphazard design. Do not aim for perfection (the more chaotic the pattern, the spookier the final product will be). If you like, you can string wooden beads onto the twine before twisting it around the handles. To help the string remain adhered, glue portions at various spots, namely around the curves.
5. Fashion a talisman by binding three of the artificial feathers together with the skull-and-crossbones decal. Following this, attach it to the area where the cauldron and handle meet. You can decide how intricate to make the talisman. Since the contents of the basket were my primary focus, I kept these rather simplistic; however, you can fabricate an elaborate version with chicken bones and voodoo beads.
6. Use the remaining twine to attach a business card, nametag, or other identifying element to the cauldrons, attaching it to the side opposite the talisman to create balance.
7. Fill the baskets with your chosen goodies. For this version, I included a set of potion bottles, some witch bottles, a “double double” banner, and a haunted bust. If you like, you can also embellish the containers further by gluing swarms of spiders along the side, aging the cauldrons with a dusting of black and brown spray paint, or drizzling green paint down the sides to make it appear as though potion has boiled over.
*You will not use the entire bottle’s content for this project.

Friday, September 8, 2023

"Cusheen Loo" (A Poem)

From Samuel Ferguson’s “The Fairy Well of Lagnanay” and “The Fairy Thorn” to William Allingham’s “The Fairies” and William Butler Yeats’ “The Stolen Child,” fairy imprisonment of the living is a major theme in Irish folklore and literature. J. J. Callanan’s “Cusheen Loo” is another example of this motif, with a young bride who is confined to a fairy palace singing to another woman and pleading with her to fetch her husband and break the enchantment.

Sleep, my child! for the rustling trees,
Stirr’d by the breath of summer breeze,
And fairy songs of sweetest note,
Around us gently float.

Sleep! for the weeping flowers have shed
Their fragrant tears upon thy head,
The voice of love hath sooth’d thy rest,
And thy pillow is a mother’s breast.
Sleep, my child!

Weary hath pass’d the time forlorn,
Since to your mansion I was borne,
Tho’ bright the feast of its airy halls,
And the voice of mirth resounds from its walls.
Sleep, my child!

Full many a maid and blooming bride
Within that splendid dome abide,
And many a hoar and shrivell’d sage,
And many a matron bow’d with age.
Sleep, my child!

Oh! thou who hearest this song of fear,
To the mourner’s home these tidings bear.
Bid him bring the knife of the magic blade,
At whose lightning-flash the charm will fade.
Sleep, my child!

Haste! for tomorrow’s sun will see
The hateful spell renewed for me;
Nor can I from that home depart,
Till life shall leave my withering heart.
Sleep, my child!

Sleep, my child! for the rustling trees,
Stirr’d by the breath of summer breeze.
And fairy songs of sweetest note,
Around us gently float.
[1]

Works Referenced

Callanan, J.J. “Cusheen Loo.” The Book of Irish Ballads. Ed. D.F. M’Carthy. Dublin: James Duffy, 1986. 78-79.
____________________
[1] Callanan, 78-79.

Friday, September 1, 2023

Arm Tank

$50 - $60 (based on 2020 prices)
Makes one device

2020’s mad scientist haunt was a massive undertaking, with the laboratory needing several large pieces of equipment to truly sell the theme. To create a unified set, I decided to use similar elements in all of the pieces, particularly copper and silver hardware. For this version, I used an old fish tank, severed arm, and strobe light to create a gory, light-up prop.
  • One twenty-gallon glass aquarium with mesh lid
  • One large plastic container (13” x 8” x 14”)
  • One 10 oz. can of interior/exterior, fast-drying spray paint in flat black
  • One 10 oz. can of interior/exterior, fast-drying spray paint in metallic copper
  • One 10 oz. can of interior/exterior, fast-drying spray paint in metallic silver
  • One 2 oz. bottle of acrylic paint in metallic copper*
  • One 2 oz. bottle of acrylic paint in metallic silver*
  • A random assortment of screws
  • One sheet of off-white copy paper with dial images printed on it
  • One sheet of pink copy paper with biohazard warning labels printed in it
  • One sheet of yellow copy paper with electrical warning labels printed in it
  • One 4 oz. bottle of clear, all-purpose tacky glue gel*
  • One clear plastic Christmas ornament (two inches in diameter)
  • One mini LED strobe light with variable speeds
  • Five feet of half-inch plastic tubing
  • One 8 oz. can of oil-based interior wood stain in red chestnut*
  • One 8 oz. can of oil-based interior wood stain in Jacobean*
  • One plastic syringe
  • One 0.3 fluid ounce bottle of red food coloring*
  • One 4 oz. bottle of clear, all-purpose tacky glue gel*
  • One latex or plastic severed arm
  • One 2 oz. bottle of acrylic paint in beige*
  • One 2 oz. bottle of acrylic paint in coral*
  • One 2 oz. bottle of acrylic paint in maroon*
  • One 2 oz. bottle of acrylic paint in red*
  • One 2 oz. bottle of acrylic paint in white*
  • Five feet of black wire
1. On a newspaper-lined surface in a well-ventilated area, give the inside of the container a coat of black spray paint and the outside a coat of metallic silver. The black will help darken the interior to improve the light’s reflection. The silver, on the other hand, can always be substituted for an alternate color to cater the prop to your haunt’s distinct theme.
2. Once the paint has dried, use metallic copper paint to accent any details on the container. Then, drill small holes into its surface and insert screws to give the item additional intricacy. How and where you decide to apply these elements are entirely up to you and your chosen aesthetic.
3. Cut out the electrical label from the copy paper, center it on the side of the container which will become the front of the prop, and glue it in place. If you are going for an aged look, you can stain the paper with coffee or tea prior to this step.
4. Cut out the dial image and use it to accent the prop, placing it near the electrical label. As with step three, you can stain the item with coffee or tea prior to this stage for an aged look.
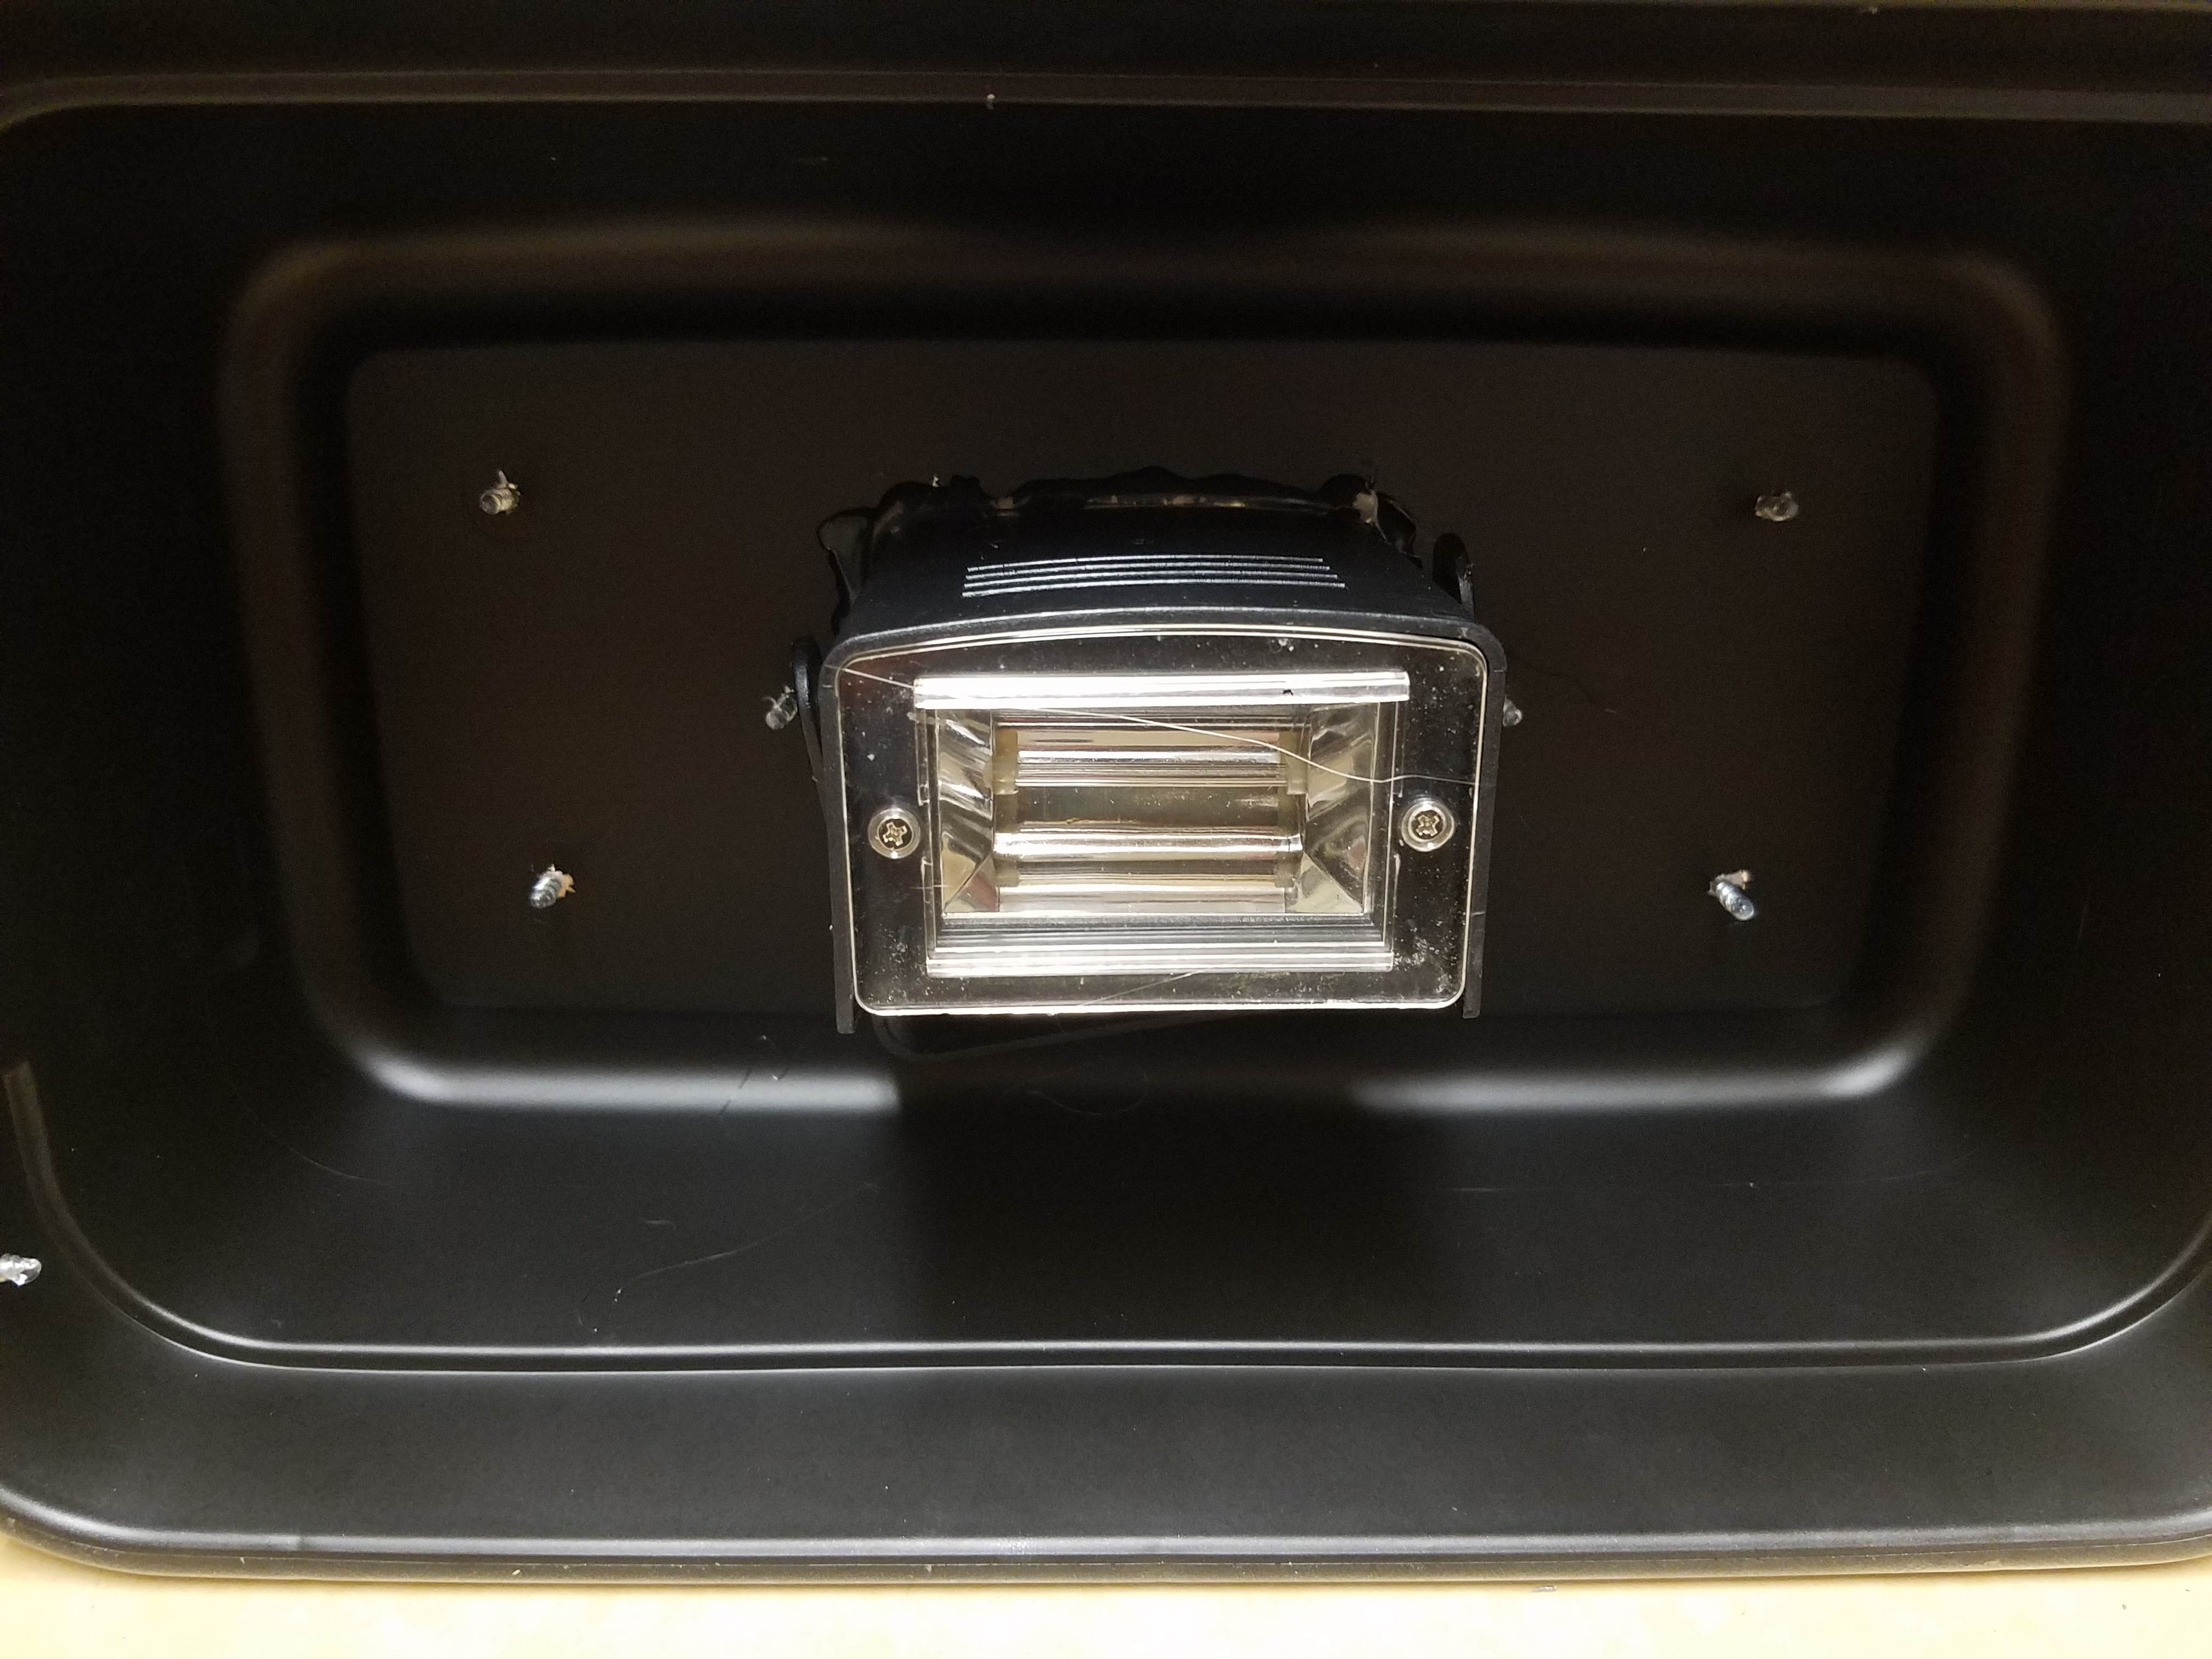
5. Remove the hanging loop from the Christmas ornament and then cut it in half (you will not need the top; however, you can reserve it for builds like the organ transfusion device). Glue the bottom over the dial to create a cover and outline its circumference with silver paint. Here, too, if you want a derelict look for the prop, paint the ornament with wood stain for an aged patina prior to gluing it in place.
6. Center the strobe light on the container, trace its outline, and then cut it out. To aid in this process, purchase a container made of a lightweight plastic that is thin enough to cut into but still sturdy enough to support the weight of the light and other items once the prop has been assembled.
7. Nestle the strobe light into the opening so the light is facing downward and glue the item in place. Although I used hot glue, you might consider superglue for a sturdier hold.
8. Tape off the details of the strobe light, such as the dial and electrical cord, and spray paint the top silver to match the container and cover any dings made while cutting the hole. In hindsight, it may prove more efficient to perform steps six and seven before beginning with step one.
9. On a newspaper-lined surface in a well-ventilated area, apply an even coat of copper spray paint to the aquarium’s mesh lid. Like step one, the color and be altered to fit your haunt’s theme.
10. Center the plastic container on the lid and glue it in place. Here, too, superglue can be used for a sturdier hold.
11. Cut part of the tubing into one ten-inch section and two five-inch sections and then, on a newspaper-lined surface in a well-ventilated area, give each one a coat or two of copper spray paint to match the mesh lid.
12. Use a half-inch drill bit to make holes in the container and feed the tubing between it and the lid, painting the hot glue silver to look soldered.
13. Cover the glass of the aquarium with plastic and, on a newspaper-lined surface in a well-ventilated area, give the trim an even coat of metallic copper spray paint to match the lid and the accents on the container.
14. Once the paint has dried, remove the plastic covering and paint the glass with the Jacobean wood stain. I discovered that applying a thin coat and patting it with paper towels produces a hazed appearance. Likewise, building up layers where the glass and trim meet helps create the illusion of grime. For the look of dried blood, gently pat red chestnut wood stain on random spots.
15. Repeat the process in step fourteen with the syringe, giving it a grotesque appearance to amplify the prop’s creepiness.
16. In a plastic container (because the food coloring will stain, use something disposable or that you won’t mind dying), pour in your desired amount of clear glue gel and slowly add red food coloring to the solution until it achieves the sanguine hue you desire. To give the blood further density, add blue food coloring and mix well.
17. Fill the syringe with the blood glue, tape its end to prevent the liquid from spilling out, and allow the glue to dry. For the time-pressed haunted, you can fill the syringe and hot glue its opening closed to create a seal.
18. Glue the syringe to the bottom of the aquarium and then create a puddle around it by using additional blood glue.
19. Cut the remaining tubing into three twelve-inch sections and glue them to the upper corners of the tank. Depending on the size of your tank, you may need to lengthen or shorten the tubes. You want one of them long enough to rest along the bottom of the aquarium and two of them long enough to connect to the arm during step twenty-four.
20. Apply three even coats of beige paint to the severed arm. Although I used three, you may want more or less based on your desired coverage. Then, give the limb a smudging of coral paint, focusing primarily on the creases and joints. Use your own skin patterns or those found in a medical textbook for reference.
21. Paint the nails by beginning with a dab of light pink. You may want to pat the excess with a paper towel, working with the coverage until it achieves a natural look. Then, smudge red paint around the tips of the fingers and along their cuticles. Here, too, patting the paint around the cuticles helps to blend it into the light pink. Finally, brush a band of white paint along the tips of the nails. Again, it may prove useful to reference your own hand or a medical textbook.
22. Give the exposed bone three coats of white paint and a light brushing of coral along the joints and raised areas.
23. Bloody the stump with red paint and use a stippling brush or a brush with splayed bristles to smatter the paint along the edges of the wound. To give further depth, deepen the blood with burgundy or maroon.
24. Use the black wire to string up the arm (you can also use clear fishing wire if you want the limb to look suspended in the tank). After this, attach two of the three tubes to the arm, positioning them in places that would seem logical, like protruding out of the stump.
25. Use the remaining blood glue to cover the tubes and detail the tank with puddles in the corners and smears on the glass. Just how much of the liquid you apply depends on how gory you want to make the prop.
26. Cut out the biohazard label from the copy paper, center it on the backside of the aquarium where the glass and trim meet, and glue it in place. Just like with step three, you can stain the paper with coffee or tea prior to this step for an aged look.
27. Reattach the lid to the aquarium. The prop can be enhanced further with additional details to cater it toward your haunt’s needs, like swarms of cockroaches crawling across the equipment. Also, the red food coloring can be substituted for green to make slime rather than blood.
*You will not use the entire bottle’s content for this project.