Friday, May 29, 2020

The Green Children of Woolpit: A Mini-Essay

     During the middle of the twelfth century, the small farming community of Woolpit in Suffolk, England, experienced a bizarre occurrence which has baffled historians and scientists and left an enduring mark on the town, with the village sign commemorating the incident in its ironwork.[1] Early one summer morning, farmworkers were startled to witness two children, their skin a greenish hue and their clothing an unfamiliar design, emerge from a nearby pit. They spoke to each other in an alien tongue and, when presented with food, refused to eat anything but green beans.[2] Although the young boy died shortly after their discovery, the girl lived a long life, slowly adjusting to a normal diet, losing her green coloration, and learning English, which allowed her to recount how the two younglings had escaped their homeland of perpetual twilight and, after being blinded by a dazzling light, awakened in a pit outside of the village.[3] Her story baffled the villagers and, to this day, continues to confuse scholars and laymen alike. In 1621, Robert Burton proposed the youths were angels who had fallen from heaven and, in 2012, Duncan Lunan conjectured the beings were extraterrestrials mistakenly transported from their home planet to Earth. While Burton and Lunan propose otherworldly explications, Paul Harris and Nick Redfern present more plausible clarifications. For Harris, the two children were part of a group of Flemish immigrants who, evading persecution by King Henry II, settled in the Thetford Forest and were either orphaned or separated from their parents.[4] Although Harris’ postulation accounts for the foreign dress and language, it does not account for the green skin; therefore, Redfern argues they suffered from Hypochromic Anemia, a result of malnourishment (which would have been plausible during the immigrants’ hiding) that causes the skin to develop a greenish-yellow tint and abates once a more nutritious diet is obtained, as was the case with the little girl.[5]

Works Referenced

Burton, Robert. The Anatomy of Melancholy, What It Is, with All the Kinds, Causes, Symptoms, Prognostics, and Several Cures of It. London: William Tegg, 1863.

Harris, Paul. “The Green Children of Woolpit.” Fortean Times 57 (1991): 39, 41.

Jones, Richard. Myths and Legends of Britain and Ireland. New York: Barnes and Noble Books, 2003.

Lunan, Duncan. Children from the Sky: A Speculative Treatment of a Mediaeval Mystery – the Green Children of Woolpit. London: Mutusliber, 2012.

Redfern, Nick. Secret History: Conspiracies from Ancient Aliens to the New World Order. Detroit, IL: Visible Ink, 2015. 
____________________
[1] Jones, 76.
[2] Jones, 76.
[3] Jones, 76.
[4] Harris, 39, 41.
[5] Redfern, 89.

Friday, May 22, 2020

Skull Lollipop

$5 - $10 (based on 2017 prices)
Makes one lollipop

Zombies and clowns are the two themes, in my opinion, which have been overdone in yard haunts and professional attractions. Because of this, I was a little leery when my office selected a demented circus theme for 2017. To tackle the challenge, I decided to focus on the twisted carnival idea and draw inspiration from turn-of-the-century travelling shows. I wanted something that looked vintage and did not relying too heavily on clowns.
  • One three-inch wooden skull cutout
  • One 3/16” wooden dowel
  • One 2 oz. bottle of acrylic paint in flat black*
  • One 2 oz. bottle of acrylic paint in flat red*
  • One 2 oz. bottle of acrylic paint in flat yellow*
  • One 0.44 oz. bottle of clear nail polish
  • One foot of brown yarn
  • One 12” x 12” sheet of clear cellophane
  • One distressed playing card (learn how to make it here)
1. Glue the wooden dowel to the back of the cutout. For a sturdier hold, use superglue. Depending on how long you want the stick, you could adhere it the full length of the skull or only half or a quarter of the way.
2. Using various hues of paint, create a swirl pattern on the cutout. If you feel comfortable free handing the design, use a pencil or pen to lightly sketch the shapes. If not, create a pattern with paper and trace it onto the wood. Since the prop was in a location where people could pick it up and examine it, I painted both sides; however, if only one side will be seen by visitors, you can save time by only painting that portion.
3. To give the cutout a glossy appearance that resembles hard candy, apply a couple coats of clear nail polish. Here too, you can do this to both sides or just the one visible in the haunt.
4. Center the skull on the sheet of cellophane and wrap it around the prop, tying the end with the yarn and flaring the edges. Although I elected to utilize clear wrapping, you could use colored versions to cater the prop to your specific theme. Likewise, you can modify the string to fit your needs, replacing it with colored florist wire or metallic ribbon.
5. Use red paint and a distressed playing card to create a label for the lollipop. You want the wording to be haphazard. To achieve this, exaggerate curves, create sharp points, and elongate certain aspects. You could also write letters backwards and deliberately misspell words. Keep in mind, though, that the label needs to be readable, so try not to overdo your artistic flairs.
6. Punch a hole in a corner of the card and use a strand of the yarn to attach it to the prop. If you plan to make several of these for a candy display, you could have each card serve as one letter in a creepy or whimsical message.
7. You can enhance the prop’s creepiness by smearing its surface with blood, splattering it with phosphorescent goo, or gluing clusters of bugs to the cellophane.
*You will not use the entire bottle’s content for this project.

Friday, May 15, 2020

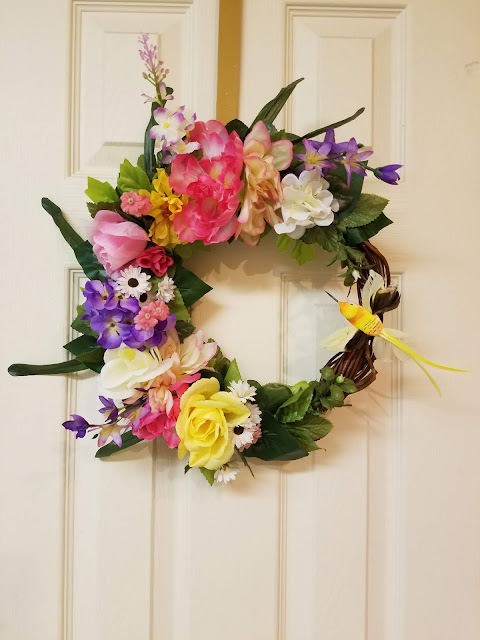
Hummingbird Wreath

$10 - $15 (based on 2017 prices)
Makes one wreath

The Dia de Los Muertos portion of 2017’s haunted house required dozens of wreaths and flowers for an intricate funeral scene. To prevent myself from using the same design for each prop, I did variations on the sugar skull motif. For this version, I chose to utilize the bright blues, pinks, reds, and yellows employed in other pieces and create a happier design with a hummingbird. Sadly, the wreath never made it into the haunt (my mother stole it for her own decorative schemes).
  • One twelve-inch grapevine wreath
  • Hot glue gun and glue sticks
  • Two to three four-foot garlands of fall leaves (roughly thirty-six leaves per garland)
  • Artificial flowers in multiple colors and sizes (e.g. asters, dahlias, hydrangeas, larkspurs, peonies, roses)
  • One decorative hummingbird
  • One yard of pink ribbon
1. Separate the leaves from the garlands and the stems of the fake flowers. Although you could do this while you glue them to the wreath, I found that performing this step beforehand made the following process much easier. Plus, it gives you a clear idea of exactly how many leaves you have. Depending on how lush a coverage you want, you may need to purchase additional garlands for larger amounts of leaves.
2. Cover a large portion of the wreath in a dense arrangement of greenery. For visual interest, build up layers and vary the color patterns so that leaves with the same hues and shapes are not concentrated in one area.
3. Repeat the method in step two with the artificial flowers. To enhance the appearance of the prop, ensure you create contrast by using different hues and sizes in various positions. You may want to play with the arrangement first before gluing it in place.
4. Glue the hummingbird to the open portion of the wreath. Although I used hot glue, you can utilize superglue for a sturdier hold, especially if you plan to display this item in windy outdoor conditions for an extended period of time.
5. If the wreath did not come with hanging loops, you can fashion one with ribbon. Cut a fifteen-inch section in a chosen hue that matches your color scheme and glue it to the back of the prop.

Friday, May 8, 2020

"A Legend of Tyrone" (A Poem)

In the 1880s, four poetic friends, Ellen O’Leary among them, each wrote individual ballads about the Irish legend of the dead mother common in the hills of Tyrone, with O’Leary's rendition, “A Legend of Tyrone,” first appearing within The Irish Monthly in 1887. According to the folklore, children are often visited by their deceased mother, particularly when their grieving father turns to alcoholism and neglect, as her spirit endeavors to calm her troubled offspring and bring some semblance of parental care.[1] 

Crouched round a bare hearth in hard, frosty weather,
Three lonely helpless weans cling close together;
Tangled those gold locks, once bonnie and bright -
There's no one to fondle the baby to-night.

"My mammie I want; oh! my mammie I want!"
The big tears stream down with the low wailing chant.
Sweet Eily's slight arms enfold the gold head:
"Poor weeny Willie, sure mammie is dead -

And daddie is crazy from drinking all day -
Come down, holy angels, and take us away!"
Eily and Eddie keep kissing and crying -
Outside, the weird winds are sobbing and sighing.

All in a moment the children are still,
Only a quick coo of gladness from Will.
The sheeling no longer seems empty or bare,
For, clothed in soft raiment, the mother stands there.

They gather around her, they cling to her dress;
She rains down soft kisses for each shy caress.
Her light, loving touches smooth out tangled locks,
And, pressed to her bosom, the baby she rocks.

He lies in his cot, there's a fire on the hearth;
To Eily and Eddy 'tis heaven on earth,
For mother's deft fingers have been everywhere;
She lulls them to rest in the low suggaun chair.

They gaze open-eyed, then the eyes gently close,
As petals fold into the heart of a rose,
But ope soon again in awe, love, but no fear,
And fondly they murmur, "Our mammie is here."

She lays them down softly, she wraps them around;
They lie in sweet slumbers, she starts at a sound,
The cock loudly crows, and the spirit's away -
The drunkard steals in at the dawning of day.

Again and again, 'tween the dark and the dawn,
Glides in the dead mother to nurse Willie Bawn:
Or is it an angel who sits by the hearth?
An angel in heaven, a mother on earth.[2]


Works Referenced

O’Leary, Ellen. “A Legend of Tyrone.” The Irish Monthly 15 (1887): 158-159.
____________________

[1] O'Leary, 158.
[2] O'Leary, 158-159.

Friday, May 1, 2020

Maggot Doll

$15 - $20 (based on 2017 prices)
Makes one doll

2017’s haunt explored the legend of La Llorona. To expand upon the element of prolicide prevalent in the folklore, I drew inspiration from La Isla de las Muñecas and filled the haunt with dolls to represent the specter’s drowned children. Although the process of transforming dozens of dolls into macabre monsters eventually became rather tiring, the final results were well worth the time and effort.
  • One twelve-inch doll with vinyl limbs and head
  • One 2 oz. bottle of acrylic paint in flat black*
  • One 2 oz. bottle of acrylic paint in hot cocoa*
  • One 2 oz. bottle of acrylic paint in spice brown*
  • One 2 oz. bottle of acrylic paint in flat tan*
  • One 5 lbs. flour sack
  • At least four tablespoons of dark roasted coffee grounds
  • One pan large enough to soak the flour sack
  • One to two yards of light brown twine
  • One bag of maggots (roughly one-hundred insects per bag)
  • One 0.14 oz. bottle of superglue gel
1. Remove all of the doll’s clothes and, on a newspaper-lined surface in a well-ventilated area, paint its limbs and head tan. Although I used three coats, you may want more depending on your desired coverage. Keep in mind, though, that this is the base coat and much of it will be covered up by the darker shades of brown.
2. Detail the limbs and head by building up layers of smudged black, hot cocoa, and spice brown paint around the eyes, mouth, nose, and along the edges of wrinkles. To enhance the visual impact, move from light to dark. Finish the initial painting process by filling the openings to the ears, eyes, mouth, and nose with black paint.
3. Boil enough water to completely submerge the flour sack and pour it into the pan. Add the coffee. The longer you allow the coffee to brew, the darker the stain will become. Likewise, greater amounts of coffee will produce a richer stain. Submerge the sack in the coffee mixture and soak it until it reaches the color you desire. I soaked mine for four days and scattered the coffee grounds over the top of the fabric to add spots. Remove the sack from the water and allow it to dry.
4. Once the flour sack has dried, cut a hole along the bottom seam and two along the sides large enough for the doll’s head and arms to fit through. Using a darning needle, thread the twine along the outer edges of the sack (do not sew up the three holes). You want the needlework to look messy and uneven, giving the outfit a disheveled appearance. Dress the doll in the sack. You can add further distress by shredding parts of the fabric or smudging it with brown paint to simulate dirt.
5. Glue the maggots to the doll. For believability, you want to select one or two areas where they will swarm the body. I elected to do this with one of the eyes, building up a large mass in the socket and gradually spreading the insects outward along the face and body. Since the particular maggots I used were made of a sticky gel, I had to use superglue to hold them in place. Although it took several hours to adhere each insect individually, the final product was well worth the effort and time.
6. You can enhance the prop’s creepiness by inserting a recordable voice box into the doll, causing it to make baby noises or demonic growls whenever someone presses the doll.
*You will not use the entire bottle’s content for this project.