Friday, August 28, 2020

The Commercialization of Halloween, Part One: A Mini-Essay

     Although the habit of donning costumes during Halloween festivities hearkens back to the Celtic Samhain ritual of dressing as spirits to ward off evil entities, the contemporary practice arose from twentieth-century traditions fed by a fiercely consumerist society. Where the Victorian Halloween was an adult-oriented celebration featuring divination and fireside ghost stories, the Edwardian version at the beginning of the twentieth century pushed the holiday into the realm of children, where costumes and treats became standard fare.[1] What began as simple, homemade attire consisting of bedsheet ghosts and lacey pixies evolved in the 1920s into burglars, gypsies, and Indians and, with the Great Depression in the 1930s, hoboes; however, the global dominance of World War II during the 1940s dampened Halloween revelries as supplies normally allocated to costumes and parties were diverted to wartime efforts.[2] The close of the war and the rise of an affluent society in the 1950s that created a child-based culture, in turn, elevated Halloween to new heights as the entertainment industry, mainly Walt Disney, released prefabricated costumes that allowed consumer-savvy kids to dress as their favorite characters, including Mickey Mouse and Tinkerbell.[3] As the trend continued in the ensuing decades, children’s costumes became more elaborate and expensive and, as Richard Dick of Castle Blood Haunt Couture highlights, the science-fiction craze of the 1980s revolutionized the marketplace with more realistic masks and screen-accurate renditions of outfits from blockbusters like Star Wars.[4] Yet, the child dominance of Halloween was ephemeral as the 1970s witnessed the homosexual communities of Florida’s Key West, New York’s Greenwich Village, and San Francisco’s Castro District push the costume parades – a longtime tradition in small-town Halloween merriments – into the realm of the adult populace.[5] From the ten-day Fantasy Fest Parade in Key West to the extravagant Halloween Carnaval in West Hollywood, the minority group incorporated the same camp and flair popularized in their drag shows and bars into elaborate spectacles that sparked a renewed adult interest in the holiday, with the number of adult participants skyrocketing from twenty-five percent in the 1980s to over seventy percent at the start of the twenty-first century.[6]

Works Referenced

Bannatyne, Lesley Pratt. A Halloween How-To: Costumes, Parties, Decorations, and Destinations. Gretna, LA: Pelican Publishing Company, 2002.

Horovitz, Bruce. “Scary! Halloween’s Been Hijacked by Adults.” USA Today, October 24, 2012.
____________________

[1] Bannatyne, 51.
[2] Bannatyne, 51-53.
[3] Bannatyne, 53.
[4] Bannatyne, 53.
[5] Bannatyne, 53.
[6] Horovitz.

Friday, August 21, 2020

Faceless Girl Sign

$20 - $30 (based on 2019 prices)
Makes one sign

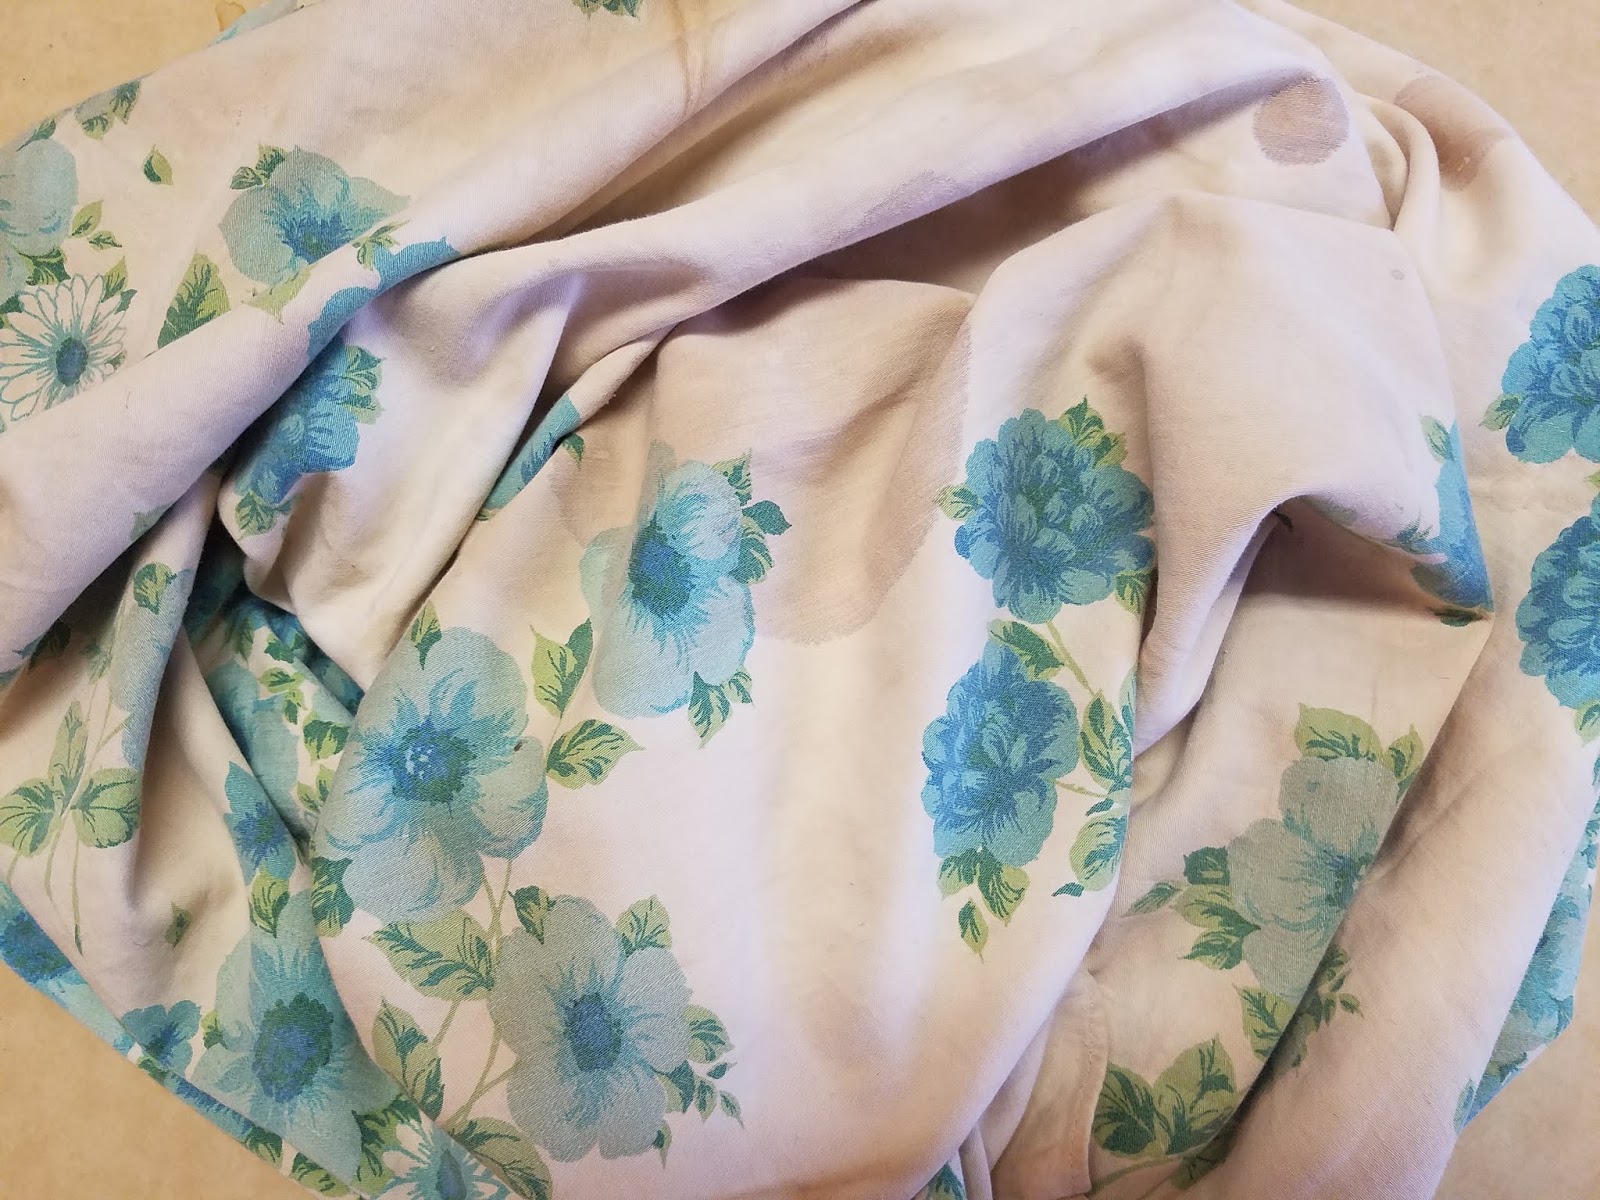
Part of 2020’s twisted carnival theme included an assortment of poster-size signs meant to resemble the attraction advertisements customary in turn-of-the-century travelling shows. Although they had the same basic attributes to maintain a uniform appearance when they were hung on the sides of the tent, I wanted each to have their own unique look. For this one, I used a flowery fabric to provide an unsettling contrast with the gore of the severed face.
  • One 20” x 30” foam board
  • One yard of floral fabric
  • At least four tablespoons of dark roasted coffee grounds
  • One pan large enough to soak the fabric
  • One 4 oz. bottle of all-purpose tacky glue*
  • Three to four yards of dark brown twine
  • One latex face mask
  • One 2 oz. bottle of acrylic paint in beige*
  • One 2 oz. bottle of acrylic paint in brown*
  • One 2 oz. bottle of acrylic paint in coral*
  • One 2 oz. bottle of acrylic paint in gray*
  • One 2 oz. bottle of acrylic paint in maroon*
  • One 2 oz. bottle of acrylic paint in red*
  • One 2 oz. bottle of acrylic paint in white*
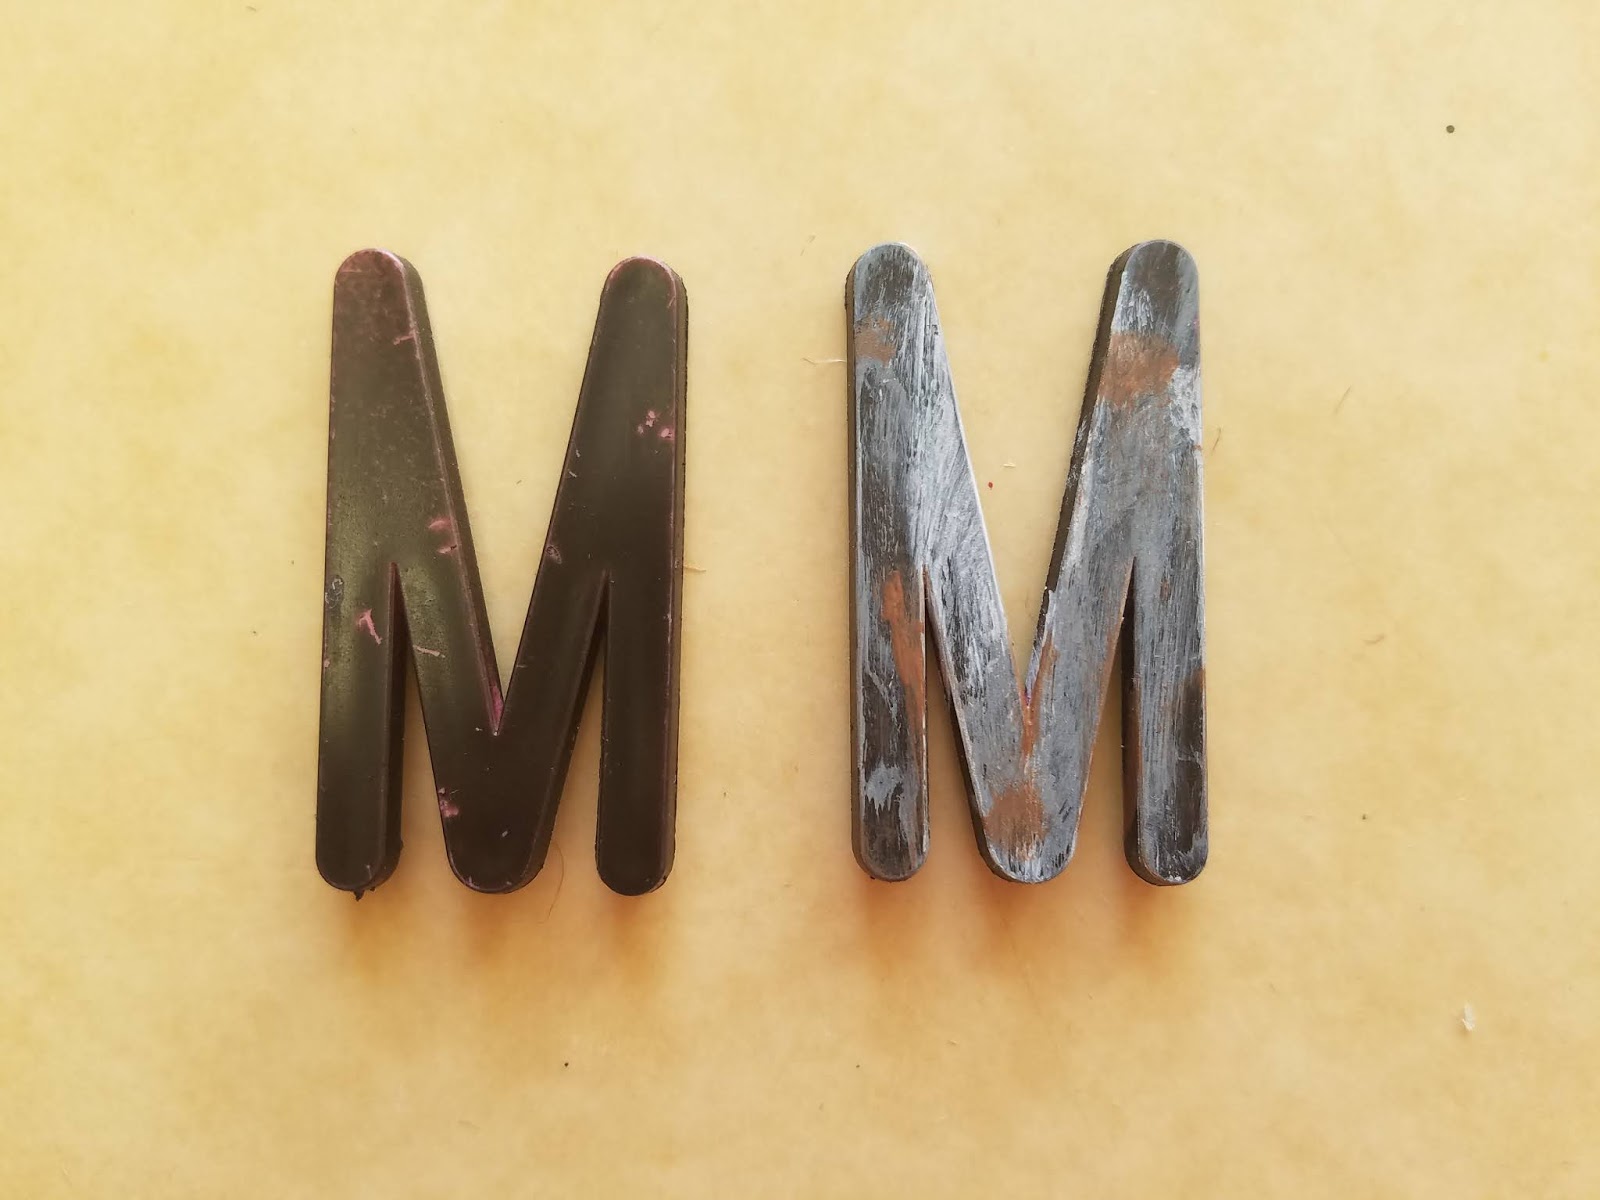
  • One package of two-inch letterboard letters
  • One 10 oz. can of interior/exterior, fast-drying spray paint in flat black
  • One 0.3 fluid ounce bottle of red food coloring*
  • One 4 oz. bottle of clear, all-purpose tacky glue gel*
1. Boil enough water to completely submerge the fabric and pour it into the pan. Add the coffee. The longer you allow the coffee to brew, the darker the stain will become. Likewise, greater amounts of coffee will produce a richer stain. Submerge the cloth in the coffee mixture and soak it until it reaches the color you desire. I soaked mine for four days and scattered the coffee grounds over the top of the fabric to add spots. Remove the cloth from the water and allow it to dry.
2. Trim the fabric to 22” x 32”, stretch it across the foam board, and glue it in place. I found it works best to glue one side to serve as an anchor and then work the fabric from there, ensuring the surface is as smooth as possible. Although I gave myself a one-inch border to work with, you may want to leave additional fabric to give you more leeway.
3. Using a darning needle, thread the twine along the outer edges of the board. Since the fabric is already attached to the foam, this will give the illusion that it is haphazardly sewn on. You want the needlework to look messy and uneven, giving the sign a disheveled appearance.
4. Remove the mask’s elastic band and, on a newspaper-lined surface in a well-ventilated area, apply three even coats of beige paint. Although I used three, you may want more or less based on your desired coverage.
5. Give the face a smudging of coral paint, focusing primarily on the cheeks, lips, and nose. Use your own skin patterns or those found in a medical textbook for reference. I discovered that applying a small amount of paint to your thumb and index finger and rubbing it onto the prop works well.
6. Smudge red paint around the eyes, lips, and nose and along the edges of the mask. To give further depth, deepen the blood with a darker red like burgundy or maroon. You will want to focus this final color in the crevices of the mouth, the folds along the eyes, and the openings of the nostrils.
7. Position the mask on the board and glue it in place. Depending on how large you plan to make the sign’s lettering, you may need to play with its placement beforehand.
8. On a newspaper-lined surface in a well-ventilated area, give the letterboard letters and even coat of black spray paint. Although I only used one coat, you may want more depending on your desired coverage. Keep in mind, though, this is the base coat and much of the paint will be covered up by other colors. Once the paint has dried, give the letters an aged patina by gently brushing brown, gray, and white paint over their surfaces. Try not to overthink your application. A random pattern will produce the best result.
9. Arrange the letters on the board and glue them in place. Akin to step seven, it might work best to pre-position everything on the board to determine their desired placement before permanently affixing them.
10. For additional detail, do not use the letterboard letters to spell out every word or all words in full. Rather, emphasize certain words or parts of words by using red paint to write these elements. For this step, you want the wording to be haphazard. To achieve this, exaggerate curves, create sharp points, and elongate certain aspects. You could also write letters backwards and deliberately misspell words. Keep in mind, though, that the sign needs to be readable, so try not to overdo your artistic flairs.
11. In a plastic container (because the food coloring will stain, use something disposable or that you won’t mind dying), pour in your desired amount of clear glue gel and slowly add red food coloring to the solution until it achieves the sanguine hue you desire. To give the blood further density, add blue food coloring and mix well.
12. On a newspaper-lined surface, apply the blood glue to the prop and allow it to fully dry. You can use an old spoon or plastic utensil to strategically dripple the liquid along chosen areas (e.g. around the edges of the mask) or pour it haphazardly for a gory mess.
13. Use steel wire to create a hanging loop and attach it to the back of the sign. You can also embellish the prop further with clusters of insects crawling across its surface.
*You will not use the entire bottle’s content for this project.

Friday, August 14, 2020

"Dirge" (A Poem)

Hearkening back to the epicedium (songs sung over the body of the deceased) of ancient Greece, the dirge is a poem or song similar to an elegy meant to commemorate the dead and, in the tradition of American literature, has a long history of appearing in the works of writers like Ralph Waldo Emerson, Kenneth Fearing, Heather McHugh, Herman Melville, Thomas Merton, Edna St. Vincent Millay, Walt Whitman, and David Wojahn.[1] Composed sometime between 1825 and 1844, Thomas Lovell Beddoes' "Dirge" is just one example of the genre.

We do lie beneath the grass
In the moonlight, in the shade
Of the yew-tree. They that pass
Hear us not. We are afraid
They would envy our delight,
In our graves by glow-worm night.
Come follow us, and smile as we;
We sail to the rock in the ancient waves,
Where the snow falls by thousands into the sea,
And the drowned and the shipwrecked have happy graves.[2]

Works Referenced

Boddoes, Thomas Lovell. "Dirge." The Poems Posthumous and Collected of Thomas Lovell Boddoes. Vol. 2. London: William Pickering, 1851. 163.

Hirsch, Edward. A Poet’s Glossary. Boston, MA: Houghton Mifflin Harcourt, 2014.
____________________
[1] Hirsch, 166-167.

[2] Beddoes, 163.

Friday, August 7, 2020

Mummy Hand Wall Sconces

$20 - $30 (based on 2019 prices)
Makes two sconces

Part of 2020’s twisted carnival theme involved Dr. Victor’s Oddity Museum, a collection of bizarre artifacts meant to resemble the curiosity exhibits customary in turn-of-the-century travelling shows. To achieve this, I crafted a bevy of familiar oddities, from mummified mermaids to shrunken heads. For this particular prop, I wanted to complement the mummy hand by fabricating two wall sconces with a similar Egyptian theme that would light the entryway of the exhibition. Unfortunately, I underestimated their weight and the hanging hooks repeatedly broke, which meant they were never utilized in the final haunt.
  • Two 5” x 7” frames
  • One 10 oz. can of interior/exterior, fast-drying spray paint in metallic gold
  • One 10 oz. can of interior/exterior, fast-drying spray paint in nutmeg
  • One 2 oz. bottle of acrylic paint in flat brown*
  • One 2 oz. bottle of acrylic paint in hunter green*
  • One 2 oz. bottle of acrylic paint in navy blue*
  • One 2 oz. bottle of acrylic paint in metallic gold*
  • One 2 oz. bottle of acrylic paint in metallic silver*
  • One 2 oz. bottle of acrylic paint in flat white*
  • Six jeweled spider rings
  • Two plastic skeleton arms
  • Two yards of white fabric
  • At least four tablespoons of dark roasted coffee grounds
  • One pan large enough to soak the fabric
  • One 4 oz. bottle of all-purpose tacky glue*
  • Two battery-operated LED candles
  • One hot glue gun and glue sticks
  • One 0.44 oz. bottle of clear nail polish* 
1. Remove the backings and any glass from the frames and, on a newspaper-lined surface in a well-ventilated area, apply an even coat of metallic gold spray paint. Although I used one coat, you may want more depending on your desired coverage. To mute the color, water down brown paint and brush it on the frames (you can also use a spray bottle for the application). Allow the mixture to sit for a few minutes and then wipe it clean. You may want to experiment with the consistency prior to doing this: the more water you add, the fainter/lighter the wash; the less water you add, the deeper/darker the wash.
2. Detail the frames with Egyptian hieroglyphs written in blue and green paint. You could mimic deigns found in historical references or create your own patterns.
3. Shorten the legs on four jeweled spider rings, cut off the bands so they sit level, and paint them silver to create scarabs that will decorate the frames. I glued mine in the corners opposite the painted fern leaves.
4. Cut the joints on the hands of the skeleton arms and hot glue them in a grasping pose. For the best results, work each finger individually. You could also utilize a heat gun to gently mold the fingers into the correct shape. If you do use a heat gun, keep safety in mind by wearing heat-resistant work gloves while molding the plastic.
5. Glue the arms to the frames’ backing. To aid the process, use a sturdy object – a glass jar or tin can – to support them as the glue dries. Also, it might help to temporarily reattached the frames to guide their positioning and ensure they are properly centered. You may need to apply multiple coats to ensure a firm hold. 
6. Boil enough water to completely submerge the fabric and pour it into the pan. Add the coffee. The longer you allow the coffee to brew, the darker the stain will become. Likewise, greater amounts of coffee will produce a richer stain. Submerge the cloth in the coffee mixture and soak it until it reaches the color you desire. I soaked mine for four days and scattered the coffee grounds over the top of the fabric to add spots. Remove the fabric from the water and allow it to dry.
7. Tear the fabric into strips and wrap the arms and backing. You do not want the props to look pristine, so do not overthink your application and try not to aim for even strips and uniform coverage. Likewise, for visual interest, leave one or two strands free to dangle once the props are hung.
8. To enhance the aging process, dust the arms with a light coat of nutmeg spray paint. To give the illusion of dirt, hold the can over twelve inches away from the arms and make quick flicking motions. You can also apply a flecking of black paint and smears of brown.
9. Shorten the legs on two additional jeweled spider rings, paint them gold, and glue them to the pinkies of each hand to decorate the prop.
10. Nestle the LED candles into the hands to make it appear they are being held and, using hot glue, give the candles extra girth by building up layers and piping drips of wax down the sides and onto the hands. The process works best if you move in stages, applying one layer at a time and allowing the glue to dry between each application. Also, I found that pumping the glue along the top of the candles and allowing it to naturally run downward creates the best results.
11. Apply three coats of white paint to the candles. I used three, but you are free to use fewer (or more) coats. Once the paint dries, give the candles a waxy look by applying a layer or two of clear nail polish. If you want the candles to seem old and unused rather than freshly melted, do not add the nail polish, but give the candles a light brushing of brown paint to simulate dirt and dust.
12. Attach the frames to the backings. For added support, glue the backings in place, particularly if you plan to display these in windy conditions. If the frames did not come with hanging hooks, you can add store-bought items to the backs or fashion your own with steel wire.
*You will not use the entire bottle’s content for this project.