Friday, March 29, 2019

Robert Donston Stephenson and Jack the Ripper: A Mini-Essay

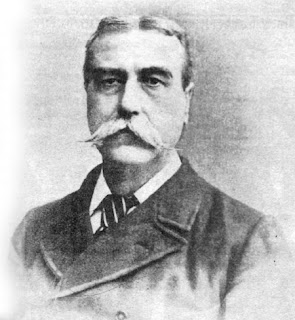
     The true identity of Jack the Ripper has been a subject of debate and controversy since the first victim, Mary Nichols, was found on August 31, 1888. Since then, a ceaseless throng of theories have emerged which propose the infamous killer was everyone from a simple London butcher to Prince Albert Victor, Duke of Clarence and Avondale.[1] One of the more intriguing conjectures comes from William T. Stead, the famed journalist and spiritualist. In the April 1896 issue of his journal Borderland, Stead disclosed that the illustrious serial killer was not a crazed doctor or misogynistic leatherworker, but a writer much like himself and an individual which he knew personally from years of friendship.[2] Although Stead never outwardly named the suspect, members of his closest set understood that he was speaking of Robert Donston Stephenson, also known as Dr. Roslyn D’Onston, who had contributed multiple articles to the Pall Mall Gazette commenting on the Ripper murders.[3] In fact, talk of Stephenson’s identity as the murderer had been circling through his group of acquaintances years before and years after Stead’s claim, with rumors circulating that he possessed a collection of bloody neckties which once held the stolen body parts of his victims.[4] More damning was the fact that Stephenson had been a subject in the case after accusing a doctor at the London Hospital, where he had checked himself in for neurasthenia, of being the notorious killer.[5] Although Stephenson was dismissed as an eccentric artist whose wild claims held no validity, Stead and others familiar with the individual maintained that he had faked his nervous exhaustion and institutionalization as an alibi, slipping out of the London Hospital at night to butcher the prostitutes and using their body parts to engage in black magic rituals.[6] On the morning of April 15, 1912, any truth behind Stead’s assertion was lost as the gentleman, along with 1,522 other individuals, perished during the sinking of Titanic.

Works Referenced

Dimolianis, Spiro. Jack the Ripper and Black Magic: Victorian Conspiracy Theories, Secret Societies and the Supernatural Mystique of the Whitechapel Murders. Jefferson, NC: McFarland and Company, 2011.

Monaghan, David and Nigel Cawthrone. Jack the Ripper’s Secret Confession: The Hidden Testimony of Britain’s First Serial Killer. New York: Skyhorse Publishing, 2010.

Stonewall, Thomas. “Jack the Ripper: A Solution?” The Criminologist 5 (1970): 40-51.
____________________ 

[1] Stonewall, 40-51.
[2] Dimolianis, 107.
[3] Dimolianis, 107.
[4] Monaghan and Cawthrone, 276.
[5] Monaghan and Cawthrone, 277. 
[6] Monaghan and Cawthrone, 227.

Friday, March 22, 2019

Scarecrow

$80 - $100 (based on 2016 prices)
Makes one scarecrow

The crowning prop for 2016’s haunted farm was the massive scarecrow that dominated the display (to this day, it is the largest item I have made). Although I crafted a head for the piece, I was rather dissatisfied with the final result and ended up using a steer skull during the haunt, which gave the scarecrow a satanic tone. After each season, most of my builds are sold or given to friends; however, this prop has remained with me since the farm and, although I have no intentions of reusing it (it hasn’t fit in any other theme since 2016), I thoroughly enjoy its presence and the menacing gaze it gives from its corner in my home office.
  • A whole or partial plastic skeleton
  • One 8 oz. can of oil-based interior wood stain in Jacobean
  • One 8 oz. bottle of wood glue
  • Fifteen sturdy wood screws
  • One 2” x 2” x 8’ wooden post
  • One 1’ x 1’ square board
  • One 1” x 4” x 8’ wooden board
  • One 2’ x 2’ square board
  • One 1” x 2” x 4’ wooden post
  • One 8 oz. can of oil-based interior wood stain in Classic Gray
  • One 10 oz. cans of interior/exterior, fast-drying spray paint in flat black
  • Two sheets of black creepy cloth
  • Two picture hangers with nails
  • Two to three yards of steel wire
  • Two to three yards of jute rope
  • One to two yards of dark brown twine
  • One scarecrow skull (learn how to make it here)
1. On a newspaper-lined surface in a well-ventilated area, stain the bones with Jacobian wood stain. I began by giving each one a light, even coat with a foam brush. After that, I applied heavier amounts of stain to the ends and patted away the excess with paper towels. You want the color to build up in the cracks and fissures. Once you have achieved your intended look, allow the bones to completely dry. I let mine sit outside in the sun for three days.
2. Cut the 2” x 2” x 8’ post into a seven-foot section and smoothen its surface with sandpaper. This will form the portion of the T-shaped stand where the head and torso will rest. Depending on your chosen height for the prop, you may cut this post shorter or keep it the full eight feet. Since I wanted something rather imposing (yet still manageable), I elected for seven feet.
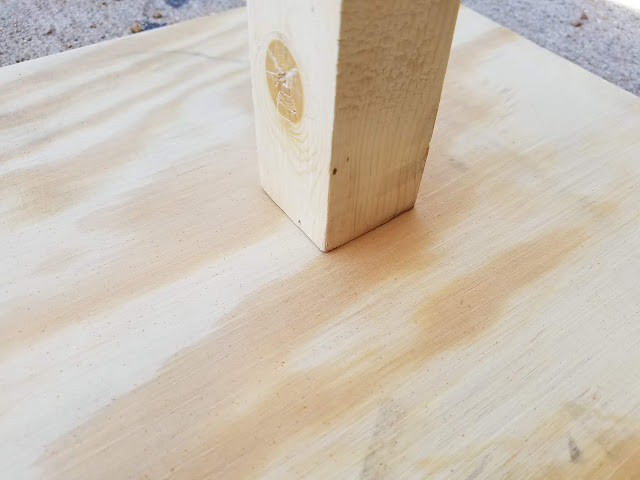
3. Measure, mark, and predrill a hole in the center of a 1’ x 1’ plywood sheet and do the same for one end of the seven-foot post. Once this is done, use a sturdy wood screw to join the pieces together. For added support, apply a modest coat of wood glue to the post before connecting it to the board.
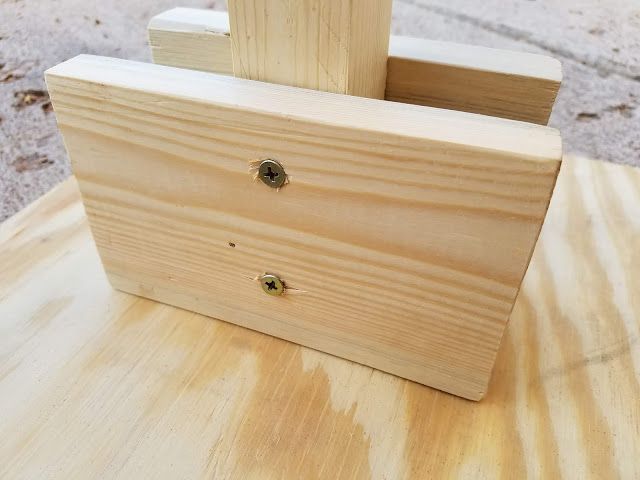
4. Cut two six-inch sections from the 1” x 4” x 8’ wooden board and smoothen their surface with sandpaper. These will serve as braces to support the base and post. Measure, mark, and predrill two holes in the center of each board and perform the same task on both sides of the post, ensuring the holes match up. Repeat the process with the plywood base and the sides of the braces and, using wood screws, join all the pieces together. For added support, apply a modest coat of wood glue to the post and base before connecting the supports.
5. Center the 1’ x 1’ base on a 2’ x 2’ sheet of plywood. Measure, mark, and predrill four holes in each quadrant of the smaller board and perform the same task on the larger board, ensuring that the holes match up. Using wood screws, join the boards together. For added support, apply a modest coat of wood glue to the bottom of the smaller board before connecting it to its larger counterpart.
6. Center a 1” x 2” x 4” post on the seven-foot post six feet up from the base. This will form the portion of the T-shaped form where the shoulders and arms will rest. Akin to the seven-foot section, the length of this post will depend on your desired size of the prop. Once you have measured, marked, and predrilled two holes in the center of the post and performed the same task on the seven-foot post (ensuring the holes match up), use wood screws to join the posts together. For added support, apply a modest coat of wood glue to the back of the smaller post before connecting it to its larger counterpart.
7. On a newspaper-lined surface in a well-ventilated area, stain the wooden frame with Classic Gray wood stain. You want the prop to appear worn, so do not worry if your coverage is not entirely pristine. Once you have achieved your intended look, allow the frame to completely dry. I let mine sit outside in the sun for three days. After the stain dries, complete the weathering process by dusting the frame with a coat of black spray paint.
8. Hammer one of the picture hangers in the center of the cross section. This will provide a supporting hook for the skeleton to hang on. Since I used a skeleton made of light plastic, a strong hook was sufficient to hold the prop; however, if you use a heavier body, you will need a tougher item.
9. Glue the creepy cloth along the full length of the four-foot post. Do not aim for a uniform draping (there is nothing scary about that). Rather, vary its length and use a pair of scissors to shape the fabric for a ghastly look.
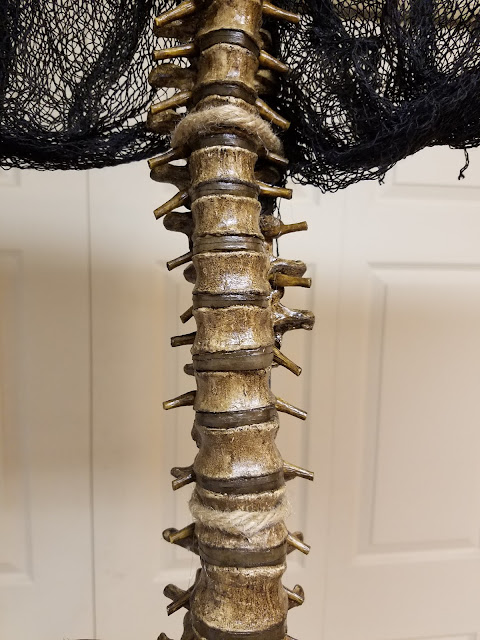
10. Use the picture hook to hang the spine and secure it to the post with steel wire. You want to do this in several places to ensure the item is properly lashed to the frame and entirely immobile, particularly if you plan to display the prop in windy conditions.
11. Once the spine is completely secured, cover the wires with rope. This will give the illusion the body is primitively lashed to the frame (the wire will hold it in place). Trim the excess and glue the knots to reinforce them.
12. Position the arms along the four-foot post and, once their placement is to your liking, repeat steps ten and eleven to fasten them to the frame and hide the wire with rope.
13. Connect the femurs to the pelvis, gluing the ball into the socket (for a sturdier hold, consider superglue), and situate the bones along the sides of the seven-foot post. As with the arms and spine, use the wire to firmly tie the items in place and mask the steel with rope.
14. Wrap twine around the clavicle of the ribcage and string it up by binding it to the four-foot post. I elected to use twine rather than the rope to give the impression the figure had been piecemealed together. For a more unified look, you can employ the rope for this step.
15. Hammer the second picture hanger into the top of the T-shaped frame. This will provide a supporting hook for the skull to hang on. Here, as well, you may want an industrial version if your head is rather heavy.
16. For further detail, you can affix strands of weathered fabric to the bones, perch disheveled crows on the frame and ribs, wrap razor wire around the legs and torso, or randomly superglue plastic insects along the surface of the entire prop.

Friday, March 15, 2019

Scarecrow Skull

$15 - $20 (based on 2016 prices)
Makes one skull

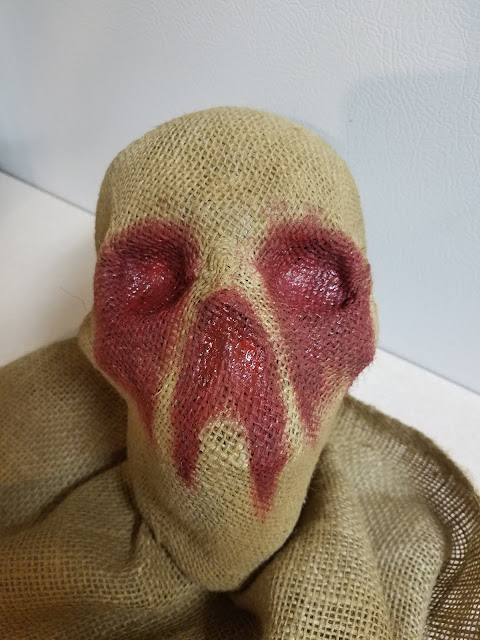
The crowning prop for 2016’s haunted farm was the massive scarecrow that dominated the display (to this day, it is the largest item I have made). To complete the prop, I made this head; however, I was thoroughly displeased with the final result. Due to this factor, I replaced the head with a steer skull, which gave the scarecrow a demonic appearance, and situated this item among the mound of pumpkins and dried corn by the tub of apples.
  • One human-size plastic skull
  • One yard of tan burlap
  • One 4 oz. bottle of all-purpose tacky glue*
  • One 10 oz. cans of interior/exterior, fast-drying spray paint in nutmeg
  • One 2 oz. bottle of acrylic paint in cherry cobbler*
  • One 0.44 oz. bottle of clear nail polish*
  • Seven fake corn leaves (learn how to make them here)
  • One 1.75 oz. bundle of tan raffia
  • One yard of jute rope
  • Three plastic cockroaches
  • One 2 oz. bottle of acrylic paint in flat black*
  • One 2 oz. bottle of acrylic paint in flat brown*
1. Remove the mandible from the skull and hot glue it agape to create a screaming face. To aid the process, use a sturdy object – a glass jar or tin can – to support the skull as the glue dries. You may need to apply multiple coats to ensure a firm hold.
2. Cut a 2’ x 2’ square of burlap. You want the fabric to be large enough to cover the entire skull with excess around the neck. I found it easier to cut the material slightly larger than I needed to give me additional length for error.
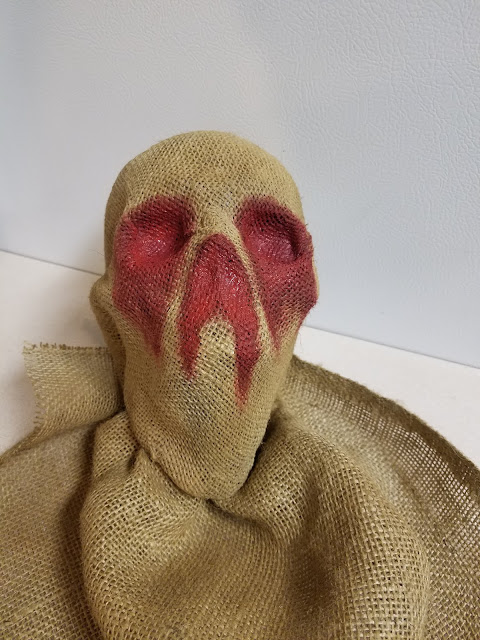
3. Starting at the front of the skull, glue burlap to the prop. I found that this step works best if you move in stages: apply a layer of glue to one section, hold the fabric down until it sticks, and then repeat the process. You may need to apply ample amounts of glue in the eye sockets and nasal cavities to get the fabric to hold their forms.
4. Once the glue has fully dried, give the burlap a light dusting of nutmeg spray paint to simulate dirt. To achieve this, hold the can roughly twelve inches away from the surface and make quick flicking motions.
5. Use cherry cobbler paint to give the illusion of blood seeping from the eyes and nose. It works best to fill in the deepest recesses first and then spread the paint outward, following the course that the flow would naturally take as it drips downward.
6. After the paint has dried, give it a coat or two of clear nail polish to make it appear wet. Akin to step five, start with the depressions made by the eyes and nose and move outward.
7. Glue a ruff of fake corn leaves around the collar and add clusters of raffia to provide further depth. You may find it easier to add the raffia first and then lay the leaves above it. Complete the ruff with a band of rope. If you want a more macabre tone, use a thicker rope and tie it into a noose which hangs tightly around the neck.
8. Glue cockroaches onto the leaves. Try not to over think your application (a random pattern produces the best results). NOTE: The cockroaches I used were made with a slick plastic which did not adhere with hot glue. As a result, I used superglue gel to affix them to the prop.
9. Apply washes of blacks and browns to mute the colors of the leaves and raffia. To accomplish this, water down the paint and brush it over the items, ensuring the liquid settles into all the cracks and fissures (you can also use a spray bottle for the application). Allow the mixture to sit for a few minutes and then wipe it clean. You may want to experiment with the consistency prior to doing this: the more water you add, the fainter/lighter the wash; the less water you add, the deeper/darker the wash.
10. Continue the aging process by using a pair of sharp scissors to tatter the edges of the burlap and create random holes throughout the fabric. You can add further levels of distress by fraying strands with sandpaper and burning portions with a lighter.
11. Finish weathering the prop with washes of black paint brushed onto the burlap’s surface. During this step, accentuate the screaming mouth by darkening the opening with the wash.
12. If you plan to display the prop on a wall or crowning a scarecrow, create a hanging loop with steel wire and hot glue it to the back of the skull.
*You will not use the entire bottle’s content for this project.
Friday, March 8, 2019

“Baby Lies So Fast Asleep” (A Poem)

In 1893, the British poetess Christina Rossetti released an illustrated collection of rhymes focused on the wonders of childbirth and infant rearing. Like so many versions before and after it, Rossetti’s text is filled with tender depictions of children and romanticized presentations of parenthood. Unlike many of its peers, the work also presents darker entries which explore the pains of loss. Two such pieces, “Baby Lies So Fast Asleep” and “A Baby’s Cradle with No Baby in It,” comment on the high infant mortality rate which marred Victorian society and present a poignant glimpse into the era’s mourning process.

Baby lies so fast asleep
That we cannot wake her:
Will the Angels clad in white
Fly from heaven to take her?

Baby lies so fast asleep
That no pain can grieve her;
Put a snowdrop in her hand,
Kiss her once and leave her.[1]

Works Referenced

Rossetti, Christina. “Baby Lies So Fast Asleep.” Sing-Song: A Nursery Rhyme Book. London. MacMillan and Company, 1893. 132.
____________________ 
[1] Rossetti, 132.

Friday, March 1, 2019

Day of the Dead Bottles

$15 - $20 (based on 2017 prices)
Makes three bottles

The Dia de Los Muertos portion of 2017’s haunted house required dozens of wreaths and flowers for an intricate funeral scene. To prevent myself from using the same design for each prop, I did variations on the sugar skull motif. For this version, I repurposed three witch bottles from 2015’s voodoo theme and transformed them into vases for the altar.
  • Three glass bottles in various sizes
  • One 8 oz. can of oil-based interior wood stain in Jacobean*
  • At least four tablespoons of black tea (e.g. Darjeeling, Earl Gray, English Breakfast)
  • One piece of 8” x 11.5” copy paper with potion labels printed on it
  • One pan large enough to soak the copy paper
  • One 4 oz. bottle of all-purpose tacky glue*
  • Three to four yards of colored twine
  • Three wooden skull cutouts
  • One 2 oz. bottle of acrylic paint in flat blue*
  • One 2 oz. bottle of acrylic paint in flat gray*
  • One 2 oz. bottle of acrylic paint in flat green*
  • One 2 oz. bottle of acrylic paint in flat orange*
  • One 2 oz. bottle of acrylic paint in flat purple*
  • One 2 oz. bottle of acrylic paint in flat red*
  • One 2 oz. bottle of acrylic paint in flat turquoise*
  • One 2 oz. bottle of acrylic paint in flat white*
  • One 2 oz. bottle of acrylic paint in flat yellow*
  • Forty-eight artificial gerbera daisies in various colors
1. On a newspaper-lined surface in a well-ventilated area, paint the bottles with the stain. I discovered that applying a thin coat and patting it with paper towels produces a hazed appearance. Likewise, brushing the rim and base with a swift downward motion creates the illusion of grime buildup. To help the stain adhere, roughen the glass with sandpaper.
2. Boil enough water to completely submerge the copy paper and pour it into the pan. Add the tea. The longer you allow the tea to brew, the darker the stain will become. Likewise, greater amounts of tea will produce a richer stain. I found that a combination of English and Irish Breakfast brewed for over ten minutes produces a nice, deep brown. Submerge the paper into the tea mixture and soak it until it reaches the color you desire. I soaked mine for eight hours and scattered the leaves over the top of the paper to add spots. Remove the paper from the water and allow it to dry.
3. After the paper dries, cut out the labels, leaving a small boarder around their edges. To roughen the labels’ appearance, use sandpaper to fray their sides and create holes. You can also crumple the paper to produce creases. Once you have achieved your desired level of distress, glue the labels to the sides of the bottles. You can use olive or vegetable oil to add further stains. I discovered that applying a small amount of oil to your index finger and patting it on the paper works well.
4. Wrap the necks of the bottles with twine, leaving strands at the bases to attach the skull cutouts. Since most of the twine will be covered by the flowers, you may use whichever color you desire (for aesthetic purposes, select a hue which matches the flowers). Although you can skip this step, the twine will give the hot glue a rougher surface to cling to and make it easier to adhere the flowers to the bottles.
5. On a newspaper-lined surface in a well-ventilated area, paint the wooden cutouts. Your designs can be as fanciful or frightening as you desire. Since these were used for a Dia de Los Muertos haunt, I stayed with playful imagery; however, you could paint bloody symbols or cryptic messages on them for a darker theme. Also, I did both the front and the back, but you could cover just the side which will be displayed to save time.
6. Attach the cutouts to the excess string. I used hot glue, but you could use superglue for a sturdier hold. Depending on how low you want the skulls to hang, you may need to trim the strings prior to adhering the cutouts.
7. Glue the flowers to the bottles’ necks. Their placement and color depend on your desired appearance for the prop. You can cluster them together for a lush arrangement or scatter them along the edges for a haphazard placement. Likewise, you can select a polychromatic mixture or stick with a single color to emphasize a particular theme. For added bulk, utilize multiple layers.
8. For additional detail, consider employing colorful beads, paper butterflies, or other decorative trinkets.
*You will not use the entire bottle’s content for this project.