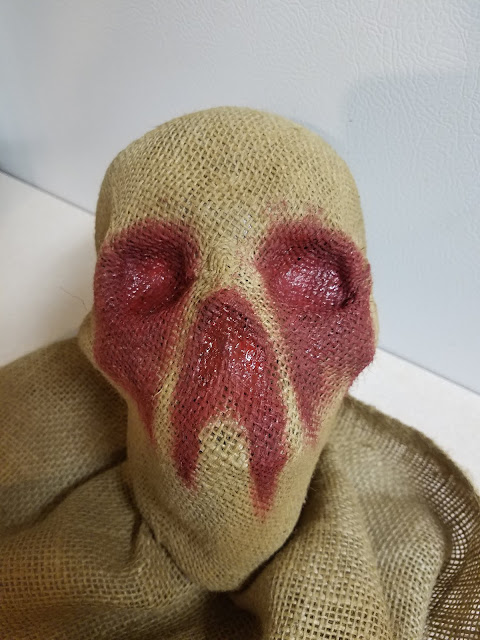
$15 - $20 (based on 2016 prices)
Makes one skull
The crowning prop for 2016’s haunted farm was the massive scarecrow that dominated the display (to this day, it is the largest item I have made). To complete the prop, I made this head; however, I was thoroughly displeased with the final result. Due to this factor, I replaced the head with a steer skull, which gave the scarecrow a demonic appearance, and situated this item among the mound of pumpkins and dried corn by the tub of apples.
- One human-size plastic skull
- One yard of tan burlap
- One 4 oz. bottle of all-purpose tacky glue*
- One 10 oz. cans of interior/exterior, fast-drying spray paint in nutmeg
- One 2 oz. bottle of acrylic paint in cherry cobbler*
- One 0.44 oz. bottle of clear nail polish*
- Seven fake corn leaves (learn how to make them here)
- One 1.75 oz. bundle of tan raffia
- One yard of jute rope
- Three plastic cockroaches
- One 2 oz. bottle of acrylic paint in flat black*
- One 2 oz. bottle of acrylic paint in flat brown*
2. Cut a 2’ x 2’ square of burlap. You want the fabric to be large enough to cover the entire skull with excess around the neck. I found it easier to cut the material slightly larger than I needed to give me additional length for error.
3. Starting at the front of the skull, glue burlap to the prop. I found that this step works best if you move in stages: apply a layer of glue to one section, hold the fabric down until it sticks, and then repeat the process. You may need to apply ample amounts of glue in the eye sockets and nasal cavities to get the fabric to hold their forms.
4. Once the glue has fully dried, give the burlap a light dusting of nutmeg spray paint to simulate dirt. To achieve this, hold the can roughly twelve inches away from the surface and make quick flicking motions.
5. Use cherry cobbler paint to give the illusion of blood seeping from the eyes and nose. It works best to fill in the deepest recesses first and then spread the paint outward, following the course that the flow would naturally take as it drips downward.
6. After the paint has dried, give it a coat or two of clear nail polish to make it appear wet. Akin to step five, start with the depressions made by the eyes and nose and move outward.
7. Glue a ruff of fake corn leaves around the collar and add clusters of raffia to provide further depth. You may find it easier to add the raffia first and then lay the leaves above it. Complete the ruff with a band of rope. If you want a more macabre tone, use a thicker rope and tie it into a noose which hangs tightly around the neck.
8. Glue cockroaches onto the leaves. Try not to over think your application (a random pattern produces the best results). NOTE: The cockroaches I used were made with a slick plastic which did not adhere with hot glue. As a result, I used superglue gel to affix them to the prop.
9. Apply washes of blacks and browns to mute the colors of the leaves and raffia. To accomplish this, water down the paint and brush it over the items, ensuring the liquid settles into all the cracks and fissures (you can also use a spray bottle for the application). Allow the mixture to sit for a few minutes and then wipe it clean. You may want to experiment with the consistency prior to doing this: the more water you add, the fainter/lighter the wash; the less water you add, the deeper/darker the wash.
10. Continue the aging process by using a pair of sharp scissors to tatter the edges of the burlap and create random holes throughout the fabric. You can add further levels of distress by fraying strands with sandpaper and burning portions with a lighter.
11. Finish weathering the prop with washes of black paint brushed onto the burlap’s surface. During this step, accentuate the screaming mouth by darkening the opening with the wash.
12. If you plan to display the prop on a wall or crowning a scarecrow, create a hanging loop with steel wire and hot glue it to the back of the skull.
*You will not use the entire bottle’s content for this project.


No comments:
Post a Comment