Friday, December 31, 2021

Medieval Christianity and the Final Judgement: A Mini-Essay

      As Philippe Ariès explains in his landmark history on death, Christian views of the final reckoning underwent a major shift during the medieval period. Before to the twelfth century, the resurrection and ascension of Jesus Christ to the throne of Heaven, which is detailed in Book of Revelation, dominated the artistic depictions and priestly sermons on the end of times; however, commencing in the twelfth century, the serene ascent marked by flowers and a rainbow was supplanted by a grim apocalypse, inspired by the Gospel According to Saint Matthew, which detailed the revival of the dead, unyielding acts of judgement, and the separation of the moral – sent to Heaven – from the unjust – banished to Hell.[1] Indeed, this bleakly powerful concept of the Last Judgement and its rapture, Ariès explains, extended beyond medieval society into the religious art and homilies of subsequent generations, from the sixteenth-century paintings of Jan Hieronymus Bosch [depicted above] to the seventeenth-century architecture of the Chiesa Nuova in Assisi.[2]

Works Referenced

Ariès, Philippe. The Hour of Our Death: The Classic History of Western Attitudes Toward Death Over the Last One Thousand Years. 1977. Trans. Helen Weaver. New York: Barnes and Noble Books, 2000.
____________________
[1] Ariès, 97-106.
[2] Ariès, 106-110.

Friday, December 24, 2021

Floral Skulls

$15 - $20 (based on 2017 prices)
Makes two skulls
 
Some projects progressively spiral into a chaotic mess and, even following completion, remain a disaster. This was the case for these floral skulls, made for 2017’s haunt. From the pain of lining the skulls’ interiors with fabric to the exhaustive act of individually gluing flowers to their surfaces, I grew to hate these props with every step. Despite my intense distaste, they were a popular feature of the haunt, which is why I have chosen to include them here on the blog.
  • Two hollow plastic skulls
  • On yard of white fabric
  • One 4 oz. bottle of all-purpose tacky glue
  • One 2 oz. bottle of acrylic paint in flat black*
  • Artificial flowers in multiple colors and sizes (e.g. daises, geraniums, lilacs, peonies, zinnias)
  • Two LED tealights
1. Cut the fabric into two 15” x 15” squares. Depending on the size of your skulls, you may need to adjust this measurement. You will want enough cloth to adequately line the inside of the skulls. Also, select a fabric thick enough to prevent the light from bleeding through and reflective enough to cast the light out of the openings of the eyes and nose.
2. Beginning at the back of the skull, glue the fabric to the inner cavity. This process works best if you move in stages: apply glue to small spots, press the cloth to the area until it sticks, and then repeat with a neighboring area. Once the entire surface has been covered, cut out the openings of the eyes and nose and glue the fabric’s edges to their circumferences. To be honest, the entire procedure took four hours (two for each skull) and would be unnecessary if you purchase hollow skulls without openings other than the eyes and nose.
3. Starting at the back of the skulls, hot glue the artificial flowers to their surfaces, working the blooms around the eyes and noses and leaving the space around the teeth free. As you do so, build up layers and vary the color patterns so that flowers with the same hues and shapes are not concentrated in one area.
4. Once the skulls have been covered, outline their teeth with black paint (or a hue that complements the color scheme). This will help reinforce that they are skulls, especially if the floral arrangement is rather dense.
5. The props can be enhanced further with details like butterflies, colorful beads, or sticks dusted with glittery spray paint to cater them to your haunt’s specific needs.
*You will not use the entire bottle’s content for this project.

Friday, December 17, 2021

Monkey’s Paw

$20 - $30 (based on 2019 prices)
Makes one monkey’s paw
 
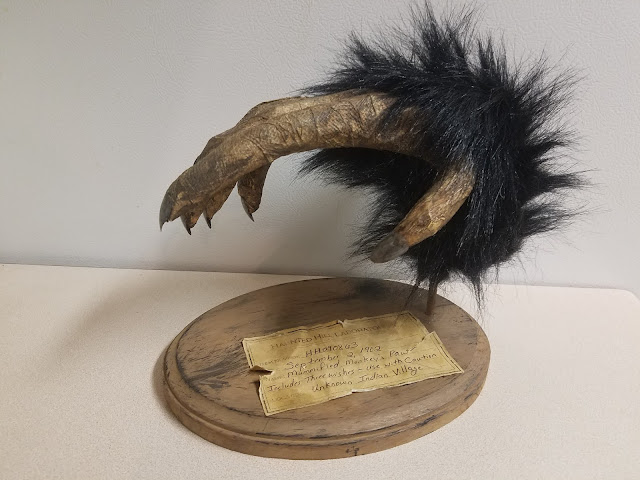
Part of 2019’s twisted carnival theme involved Dr. Victor’s Oddity Museum, a collection of bizarre artifacts meant to resemble the curiosity exhibits customary in turn-of-the-century travelling shows. To achieve this, I crafted a bevy of familiar oddities, from shrunken heads to two-headed babies. For this particular prop, I made a sideshow staple: a magical monkey’s paw guaranteed to give the possessor three wishes.
  • One cheap, plastic skeleton hand
  • One 4 oz. bottle of wood glue
  • One 4 oz. bottle of all-purpose tacky glue
  • Two to three standard-sized newspaper pages
  • One roll of one-ply, white paper towels
  • One 10 oz. can of interior/exterior, fast-drying spray paint in flat ivory*
  • One 10 oz. can of interior/exterior, fast-drying spray paint in flat tan*
  • One 2 oz. bottle of acrylic paint in flat black*
  • One 2 oz. bottle of acrylic paint in flat brown*
  • One 2 oz. bottle of acrylic paint in flat gray*
  • A set of five fake nails
  • One 0.44 oz. bottle of clear nail polish*
  • One yard of faux black fur
  • One 7” x 9” oval wooden plaque
  • One 3/16” wooden dowel
  • One piece of 8” x 11.5” paper with specimen labels printed on it
  • At least four tablespoons of black tea (e.g. Darjeeling, Earl Gary, English Breakfast, etc.)
  • One pan large enough to soak the paper
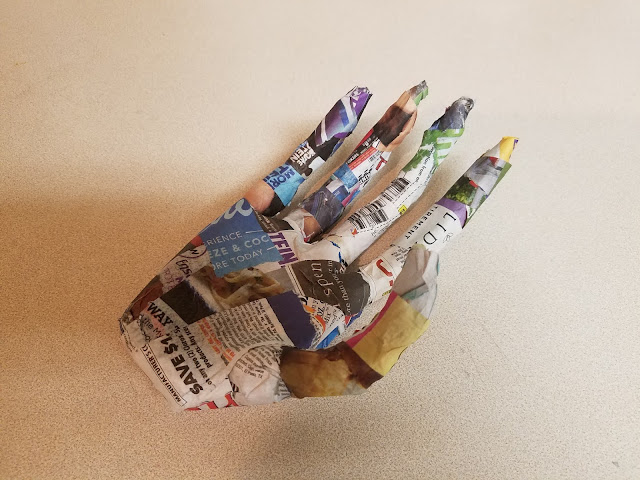
1. Cut the joints on the hand and hot glue them in a more natural resting pose. Also, make the hand appear more apelike by lowering the thumb to the base of the palm. For the best results, work each finger individually. Alternately, you could use a heat gun to gently mold the fingers into the correct shape. If you do use a heat gun, though, keep safety in mind by wearing heat-resistant work gloves while molding the plastic.
2. Make the papier mache paste by mixing ½ cup of glue and ½ cup of water in a bowl. Try to use a sealable container. This gives you the ability to store the mixture for a day or two between applications. To give the paste added support, consider using a combination of all-purpose glue and wood glue (stray away from school glue because it is washable and will dissolve in the water).
3. Cut the newspaper into strips, soak them in the paste, and apply them to the hand. Keep the strips at a reasonable size (roughly two inches long and half an inch wide) to make the process more manageable. Similarly, only apply a few layers at a time and allow each layer to completely dry before adding more. Since this was meant to hide the alterations made to the hand and give it a uniform shape, I only applied two layers. You, of course, are free to add more, if you like.
4. Tear the paper towels into strips and, after soaking them in paste, cover the paw with one or two layers, creating wrinkles to make the flesh appear rotten. If you cannot find one-ply paper towels, simply separate the plies of multi-ply sheets. Akin to step three, keep the strips at a reasonable size, only apply a few layers at a time, and allow each layer to completely dry before adding more. The number of layers, in turn, depends on how rotted you want the hand to appear: you can apply one or two layers to just a few spots for a highly decrepit look or several thick coverings for a more mummified appearance.
5. Once the layers have fully dried, give the paw a base coat of ivory spray paint. Since you will build up detail with other colors, you want your color to be a neutral tone that is not too light and not exceedingly dark.
6. Age the paw with several washes of brown paint. To do this, water down the paint and brush it over the hand, ensuring the liquid settles into all the cracks and fissures (you can also use a spray bottle for the application). Allow the mixture to sit for a few minutes and then wipe it clean. You may want to experiment with the consistency prior to doing this: the more water you add, the fainter/lighter the wash; the less water you add, the deeper/darker the wash. For the best results, slowly build up the layers until you achieve the desired tones and then mute them with a wash of black.

7. Give the nails a base coat of gray paint followed by smudgings and stipplings of black and brown paint to make them appear weathered. After this, apply a coat or two of clear nail polish to seal the patina.
8. Once the polish has dried, attach the nails to the fingertips. For a sturdier hold, use superglue.
9. Cut the fur into a 6” x 8” rectangle (depending on the width of your paw and how long you want the wrist, you may need to adjust the lengths) and glue it to the paw, wrapping the rectangle around the hand to form a tube and positioning the fur toward the base of the knuckles for a more realistic appearance.
10. Use a 15/64 bit to drill a hole into one side of the plaque, allowing it run about halfway through the wood. Then, insert the dowel into the hole and glue it in place with wood glue. I used a six-inch-long dowel, which gave the prop a nice height; however, for your version, you can go longer or shorter to fit your haunt’s needs.
11. On a newspaper-lined surface in a well-ventilated area, give the stand an even coat of tan spray paint. You can apply additional coats, but keep in mind that much of it will be covered by the darker colors.
12. Once the spray paint has dried, apply globs of the black and brown paint and, using a paper towel, smudge it across the plaque. As you do so, smear the paint in the same direction to create a uniform grain. You can also use a stipple sponge to fashion knots or a fine-tipped brush to construct worm holes.
13. Boil enough water to completely submerge the paper and pour it into the pan. Add the tea. The longer you allow the tea to brew, the darker the stain will become. Likewise, greater amounts of tea will produce a richer stain. I found that a combination of English and Irish Breakfast brewed for over ten minutes produces a nice, deep brown. Submerge the paper into the tea mixture and soak it until it reaches the color you desire. I soaked mine for eight hours and scattered the loose-leaf tea over the top to add spots. Remove the paper from the water and allow it to dry. Once the paper has dried, cut out the specimen label, leave a small border, and give the specimen a name. To roughen the label’s appearance, use sandpaper to fray its sides and create holes. You can also use olive or vegetable oil to add further stains to the label.
14. After you have achieved your desired level of distress, glue the label to the stand.
15. Using a 15/64 bit, drill a hole into the base of the hand, feed the tube of fur over the dowel and connect the paw to the stand. For added support, you can glue the item into position, mainly if you plan to display it outdoors in windy conditions. For storage purposes, though, it might be best to keep them detachable.
16. The prop can be enhanced further with additional details, such as an aged bone protruding from the wrist’s opening or cryptic messages written in blood on the base of the stand.
*You will not use the entire bottle’s content for this project.

Friday, December 10, 2021

"The Darkling Thrush" (A Poem)

For millennia, the end of the year had invoked images of death as one time period closes and the other begins. The same, in turn, can be said for centuries, with the shift between one span and another prompting artists and thinkers to expound on the notions of death and rebirth. Such is the case with Thomas Hardy’s poem “The Darkling Thrush.” Published in the Graphic on December 29, 1900, the work utilizes the imagery of death to comment on the end of the nineteenth century and the beginning of the twentieth.[1]
 
I leant upon a coppice gate
When Frost was spectre-grey,
And Winter’s dregs made desolate
The weakening eye of day.
The tangled bine-stems scored the sky
Like strings of broken lyres,
And all mankind that haunted nigh
Had sought their household fires.
 
The land’s sharp features seemed to be
The Century’s corpse outleant,
His crypt the cloudy canopy,
The wind his death-lament.
The ancient pulse of germ and birth
Was shrunken hard and dry,
And every spirit upon earth
Seemed fervourless as I.
 
At once a voice outburst among
The bleak twigs overhead
In a full-hearted evensong
Of joy illimited;
An aged thrush, frail, gaunt, and small,
In blast-beruffled plume,
Had chosen thus to fling his soul
Upon the growing gloom.
 
So little cause for carollings
Of such ecstatic sound
Was written on terrestrial things
Afar or nigh around,
That I could think there trembled through
His happy good-night air
Some blessed Hope, whereof he knew
And I was unaware.[2]
 
Works Referenced
 
Bloom, Harold, ed. Bloom’s Major Poets, Thomas Hardy: A Comprehensive Research and Study Guide. Philadelphia, PA: Chelsea House Publishers. 2004. 
 
Hardy, Thomas. “The Darkling Thrush.” Poems of the Past and the Present. London: Macmillan and Company, 1903. 169-171.
____________________
[1] Bloom, 89-91.
[2] Hardy, 169-171.

Friday, December 3, 2021

Toxic Waste Skeleton

$60 - $70 (based on 2020 prices)
Makes one skeleton
 
The skeleton is the most expensive item in this build, so, for the cash-strapped haunter, try to recycle an old friend to reduce the price of this prop. In fact, I used a skeleton that had been sitting broken at the bottom of the storage closet for years (both of his hands had snapped off in 2014 and his pelvis had separated from his body in 2018).
  • One life-size plastic skeleton
  • One bag of cheap, plastic bones (about a dozen pieces)
  • One 2’ x 2’ board of foam insulation
  • One twelve-cup plastic container
  • One 10 oz. can of interior/exterior, fast-drying spray paint in glossy apple
  • One 10 oz. can of interior/exterior, fast-drying spray paint in flat black
  • One 10 oz. can of interior/exterior, fast-drying spray paint in glossy hunter green
  • One 10 oz. can of interior/exterior, fast-drying spray paint in glossy eden
  • One 10 oz. can of interior/exterior, fast-drying spray paint in metallic silver
  • One piece of 8” x 11.5” copy paper with a biohazard label printed on it
  • At least four tablespoons of dark roasted coffee grounds
  • One pan large enough to soak the copy paper
  • One 4 oz. bottle of all-purpose tacky glue*
  • One 12 oz. can of insulating foam
  • One 2 oz. bottle of acrylic paint in grasshopper*
  • One 2 oz. bottle of acrylic paint in hunter green*
1. Use a hacksaw to cut the femurs and humeri from the bag of bones in half. Although this step is optional, it will double the bone count and make the toxic pit appear deeper than it actually is.
2. Separate the legs and pelvis from the torso of the skeleton. This can be done in a number of ways: cutting the the vertebrae connected to the sacrum with a hacksaw, disassembling the pelvis with a screwdriver, or, in my case, having an old skeleton that already broke apart at this juncture.
3. On a newspaper-lined surface in a well-ventilated area, build up layers of black and metallic silver spray paint to give the container the look of steel. I found it works best to apply a base coat of black to the entire prop and then add the sliver, working in quick bursts to allow parts of the black to remain visible. You can also touch up portions with additional blasts of black if the silver becomes too heavy.
4. Boil enough water to completely submerge the copy paper and pour it into the pan. Add the coffee. The longer you allow the coffee to brew, the darker the stain will become. Likewise, greater amounts of coffee will produce a richer stain. Submerge the paper in the coffee mixture and soak it until it reaches the color you desire. I soaked mine for eight hours and scattered the coffee grounds over the top of the paper to add spots. Remove the paper from the water and allow it to dry. After the paper dries, cut out the label, leaving a small border around its edges, and roughen its surface with sandpaper.
5. Once you have achieved your desired level of distress, glue the label to the front of the container. You can also use olive or vegetable oil to add further stains to the label. Likewise, a dusting of brown spray paint can be applied at the end of this step to give the container a layer of dirt.
6. Position the bones, container, and skeleton on the foam board and, once you have achieved your desired placement, glue them down. You want to provide enough space between each item to allow the foam to expand, so do not cluster them together too much.
7. Give the board a blob-like form by trimming its edges, creating curves and protrusions. Do not worry too much if your cuts are not clean. You want the base to look like spilled toxic waste.
8. Repurpose the trimmings from step seven and employ them to give extra height to portions of the base and to fabricate an incline from the opening of the container to the board. This procedure will prevent the foam from being too level when you apply it in step eleven.
9. Pose the skeleton’s skull into a position that you like and hot glue it in place. I elected for a screaming expression, so I tilted the head upwards toward the right and glued the mouth agape. Your final positioning, in turn, will depend on the story you are trying to tell with the prop.
10. Randomly drip globs of glue along the surfaces of the bones and skeleton. This will give everything a melted appearance that will reinforce the idea the victim is being disintegrated in the toxic solution.
11. Spray the insulating foam into the open spaces of the board to create the waste. Try not to overthink your application. A random pattern produces the best results. Also, keep in mind that the foam will expand as it dries, so do not apply excessive amounts which will overtake and consume the bones, container, and skeleton.
12. After the foam has thoroughly dried, cover the container in a plastic bag and tape off any gaps with painter’s tape. Then, on a newspaper-lined surface in a well-ventilated area, give everything a base coat of hunter green spray paint before building up layers of apple, black, and eden. Akin to step three, you can always apply bursts of hunter green to the prop if the other colors become too overpowering.
13. After the paint had dried, remove the painter’s tape and plastic bag from the container and use grasshopper and hunter green acrylic paint to blend the unpainted foam, stipple the surface, and accent the label. If the tape removed part of the silver paint, you can cover that up with the green paints.
14. Depending on your level of gore, the prop can be enhanced further with severed ears, eyes, and fingers glued to the waste to make it look like they are floating in the liquid.
*You will not use the entire bottle’s content for this project.