Friday, June 25, 2021

The Mummified Cat at Mill Hotel: A Mini-Essay

     Overlooking the River Stour in Sudbury, England, portions of the Mill Hotel harken back to the eleventh century, when the region was used as a Saxon mill. In 1971, when construction began to transform the building into a hotel, the mummified corpse of a cat was discovered in the original structure. As Brian Hoggard clarifies, the act of entombing cats in the ceilings, floors, or walls of homes is an ancient practice found in the British Isles and northern Europe meant as a protection ritual for the homestead and its occupants from evil entities.[1] Due to this factor, it is not unusual, Hoggard explains, for these preserved felines to emerge during renovations and for superstitions regarding their removal to spook construction crews and homeowners.[2] Such, in turn, was the case at Mill Hotel, where collapsed wooden beams, financial misfortunes, and a fire following the mummified cats removal prompted its return to a specially built glass panel in the floor.[3] Also, remodels in 1999 wrought similar results: the road outside the hotel exploded, the manager’s office flooded, and the worker who relocated the cat suffered a severe accident.[4] Although some maintain the occurrences in 1971 and 1999 are proof of the feline’s supernatural powers, others uphold they are mere coincidences and, in January of 1993, the British television show Grace and Favour mocked the idea in an episode titled “The Mummified Cat,” where the removal of a petrified feline from the manor house’s attic prompts a set of farcical misfortunes.

Works Referenced

Hoggard, Brian. “Concealed Animals.” Physical Evidence for Ritual Acts, Sorcery and Witchcraft in Christian Britain: A Feeling for Magic. Ed. Ronald Hutton. London: Palgrave, 2016. 106-117.

Jones, Richard. Haunted Britain and Ireland. New York: Barnes and Noble, 2002. 


[1] Hoggard, 106-117.
[2] Hoggard, 106-117.
[3] Jones, 78.
[4] Jones, 78.

Friday, June 18, 2021

Clown Masks

$15 - $20 (based on 2019 prices)
Makes six masks
 
I normally craft my own mask and costume for each haunt to correspond with the theme; however, working on a haunted house in 2017 presented me with the chance to not only costume myself but also a collection of scare-actors with a series of doll masks. 2019’s haunt, in turn, provided me with the same opportunity and I fabricated these clown masks for each scare-actor to wear and help unify the circus motif.
  • Six plastic skull masks
  • One 10 oz. can of interior/exterior, fast-drying spray paint in glossy black*
  • One 10 oz. can of interior/exterior, fast-drying spray paint in glossy green*
  • One 10 oz. can of interior/exterior, fast-drying spray paint in glossy orange*
  • One 10 oz. can of interior/exterior, fast-drying spray paint in metallic silver*
  • One 10 oz. can of interior/exterior, fast-drying spray paint in flat white*
  • One 2 oz. bottle of acrylic paint in flat black*
  • One 2 oz. bottle of acrylic paint in flat blue*
  • One 2 oz. bottle of acrylic paint in flat brown*
  • One 2 oz. bottle of acrylic paint in flat gray*
  • One 2 oz. bottle of acrylic paint in flat green*
  • One 2 oz. bottle of acrylic paint in flat orange*
  • One 2 oz. bottle of acrylic paint in flat red*
  • One 2 oz. bottle of acrylic paint in flat yellow*
  • Six clear plastic Christmas ornaments (two inches in diameter)
  • One small bag of Halloween-themed party favors
  • One 0.14 oz. bottle of superglue gel*
1. After removing the masks’ elastic bands and any other accessories, give each one two coats of white spray paint. I used two coats, but you may want more or less depending on your desired coverage. Likewise, you could select a different base color or a variation of hues to cater the items to your haunt’s needs.
2. Detail the masks with a variety of colors to create a series of clown-like faces. Based on your haunt, you can fabricate fanciful expressions for a whimsical theme or something more maniacal. Additionally, each face could be a unique character for scare-actors to develop or all one uniform look for an unsettling throng of clones. Once the paint has dried, outline the patterns in black to help accentuate the colors.
3. Using hues which complement the main colors, write words across the masks’ foreheads. As with step two, these can be altered to fit your theme, with remarks like laugh and smile written in bold, bright colors helping to convey a happier tone for younger children or commands like cry and scream penned in blood-red paint amplifying adult-oriented scares.
4. Remove the hanging hoops from the backs of the ornaments and, on a newspaper-lined surface in a well-ventilated area, give them two even coats of spray paint. Akin to the previous steps, these can be all one universal hue or different colors that correspond with the tones of the masks.
5. Glue the portion of the ornaments where the hanging hoops once were to the masks to fashion noses. For a sturdier hold, especially if the scare-actors plan to be highly active, use superglue.
6. Reattached the elastic bands and accent the masks with a collection of Halloween-themed party favors (e.g. plastic bats, flies, spiders, etc.) or other items to reinforce the theme of the haunt.
*You will not use the entire bottle’s content for this project.

Friday, June 11, 2021

"The Choice, II" (A Poem)

Originally published in his 1870 Poems and reprinted in his 1881 The House of Life, Dante Gabriel Rossetti’s The Choice is a collection of three sonnets which explore the pursuits of human life in relation to the finality of death. While some literary scholars read the trilogy as one cohesive unit, others read each poem as a separate piece which provides its own unique perspective.[1] Here, we will conduct a hybrid of both techniques, presenting each sonnet as its own distinct entry over the next three month, but acknowledging their united nature. The first sonnet, which was featured last month, critiques humanity’s futile quest for physical enjoyment. The second sonnet, printed below, comments on mankind’s religious asceticism. The third sonnet, which will be featured next month, completes the narrative by discussing human self-development.

Watch thou and fear; to-morrow thou shalt die.
Or art thou sure thou shalt have time for death?
Is not the day which Gods word promiseth
To come man knows not when? In yonder sky,
Now while we speak, the sun speeds forth: can I
Or thou assure him of his goal? Gods breath
Even at the moment haply quickeneth
The air to a flame; till spirits, always nigh
Though screened and hid, shall walk the daylight here.
And dost thou prate of all that man shall do?
Canst thou, who hast but plagues, presume to be
Glad in his gladness that comes after thee?
Will his strength slay thy worm in Hell? Go to:
Cover thy countenance, and watch, and fear.[2]

Works Referenced

Rossetti, Dante Gabriel. “The Choice, I.” The House of Life: A Sonnet Sequence. 1881. Portland, ME: Thomas B. Mosher, 1903. 75.

Rossetti, William Michael, ed. The Poems of Dante Gabriel Rossetti with Illustrations from His Own Pictures and Designs. London: Ellis and Elvey, 1904.

____________________
[1] W. Rossetti, 237-238.
[2] D. Rossetti, 75.

Friday, June 4, 2021

Framed Face

$15 - $20 (based on 2019 prices)
Makes one frame
 
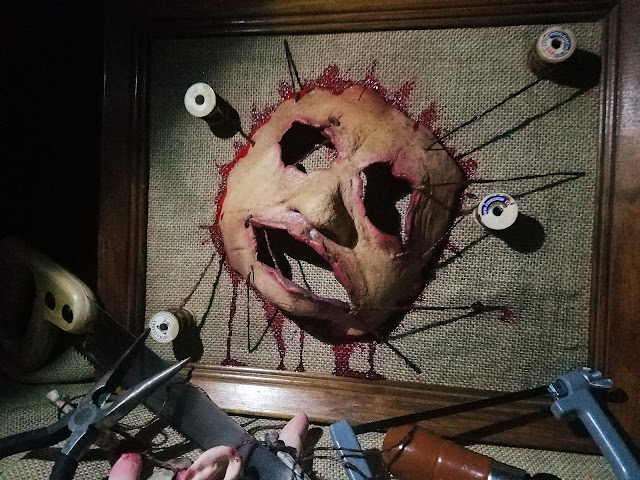
I knew 2020’s mad scientist theme would be a massive undertaking, so I began the prop building process in 2019. This item was among the first crafted and it was thematically off, being more crazed serial killer rather than unhinged doctor. In hindsight, gauze, a steel frame, and white thread would have made it adhere more toward the medical tone; however, I still love its appearance and the way it screams Texas Chainsaw Massacre.
  • One 10” x 13” wooden frame
  • One yard of burlap
  • One 4 oz. bottle of all-purpose tacky glue*
  • One 10 oz. can of interior/exterior, fast-drying spray paint in flat black*
  • One 10 oz. can of interior/exterior, fast-drying spray paint in flat brown*
  • Four wooden spools
  • Three to four yards of twine
  • One latex mask
  • One 0.3 fluid ounce bottle of red food coloring*
  • One 4 oz. bottle of clear, all-purpose tacky glue gel*
1. Remove the backing and glass from the frame. I deliberately selected an old wooden version with plenty of dents and scratches because I liked the aesthetic. For an alternate appearance, consider utilizing the techniques outlined in the instructions for the framed insect specimens or the haunted portraits to create an aged patina that complements your theme.
2. Cut the burlap into a square large enough to amply cover the backing. I cut the fabric into a 12” x 15” piece, which gave me extra fabric to allow for any mistakes. Once the cloth is sized, stretch it across the backing and glue it in place. I found it works best to glue one side to serve as an anchor and then work the fabric from there, ensuring the surface is as smooth as possible. After the glue has dried, trim the excess burlap around the edges.
3. To add age and distress, dust the fabric with a light coat of black and brown spray paint. To give the appearance of dirt, hold the can over twelve inches away from the surface and make quick flicking motions. You can also apply a flecking of black paint and smears of brown paint to enhance the weathered appearance.
4. Arrange the spools on the backing and glue them in place. Because you want to leave ample room for the face, it may prove beneficial to pre-position everything on the board to determine their desired placement before permanently affixing them. Also, for a sturdier hold, consider using superglue.
5. Cut twine into four two-foot sections and wrap them around the spools, leaving a twelve-inch strand free to sew into the mask. To help the thread remain in place, coat the spools with glue first. Although I gave myself a foot of excess to work with, you may want additional inches to give you more leeway.
6. Cut the elastic band off the mask and, for added detail, trim the edges to give it a jagged and uneven look as though it had been haphazardly cut off. Then, position the item on the backing and glue it in place. Like the spools, you may want to use superglue to ensure a stronger bond.
7. Thread the twine through the mask. You want to give the illusion that it is lashed to the backing with the strands. Do not overthink your process (a chaotic web of strings will only enhance the creepiness). I found a darning needle works best, since the latex is too thick for a regular needle.
8. In a plastic container (because the food coloring will stain, use something disposable or that you won’t mind dying), pour in your desired amount of clear glue gel and slowly add red food coloring to the solution until it achieves the sanguine hue you desire. To give the blood further density, add blue food coloring and mix well. 
9. On a newspaper-lined surface, apply the blood glue to the prop and allow it to fully dry. You can use an old spoon or plastic utensil to strategically dripple the liquid along chosen areas (e.g. around the edges of the mask) or pour it randomly for a gory mess.
10. Reattach the backing to the frame. If you plan to display the prop outside in windy conditions, consider gluing the backing in place for additional support. You can also embellish the prop further with clusters of insects crawling across its surface.
*You will not use the entire bottle’s content for this project.