Friday, April 26, 2024

The Seasonal Festival of Slovenia: A Mini-Essay

     In western Slovenia, the villages along the Soča River continue to practice seasonal festivals known as Shrovetide, which predate the Christian era.[1] One of the most popular celebrations is Laufarija. Occurring on the Sunday before Ash Wednesday, this event is meant to celebrate the passing of winter and the coming of spring by trying and convicting Pust, a representation of winter. Each year, a member of the community dons the Pust costume – comprised of straw, moss, and pine branches – and is tried for crimes like harsh weather and lackluster harvests.[2] Following his conviction, Pust is chased out of town and killed by ta grdi (the ugly ones), who wear masked carved of soft lime tree wood that represent devils, while ta lepi (the beautiful ones) go door to door dressed as a young married couple and bless the occupants with prosperity for the coming year.[3]

Works Referenced

Charney, Noah. “How Slovenia’s Monsters Came Back from the Dead.” National Geographic, 16 March 2020, https://www.nationalgeographic.com/travel/article/experience-shrovetide-like-never-before-western-slovenia

Longley, Norm. The Rough Guide to Slovenia. New York: Rough Guides, 2004.
____________________
[1] Charney.
[2] Longley, 181.
[3] Charney.

Friday, April 19, 2024

Creepy Doll with Books

$25 - $30 (based on 2023 prices)
Makes one stack of books

In 2023, I was commissioned by a local theater to serve as a consultant and prop builder for their production of The Haunting of Hill House, which was based on Shirley Jackson’s novel. Being a fan of the books since I was a teenager, I jumped at the opportunity and spent several months creating a collection of items to decorate both the house depicted on the stage and the cemetery created in the lobby to greet patrons before they entered the theater. For this prop, I melded portions of Hugh Crane’s book with the creepy doll with candles props to create a stack of leatherbound tomes to adorn the set’s bookshelf.
  • Two decorative storage boxes (8.5” x 6.5” x 2.1”)
  • Three to four sheets of white tissue paper (20” x 20” per sheet)
  • One 4 oz. bottle of decoupage medium
  • One 2 oz. bottle of acrylic paint in flat beige*
  • One 2 oz. bottle of acrylic paint in flat black*
  • One 2 oz. bottle of acrylic paint in flat brown*
  • One 2 oz. bottle of acrylic paint in flat white
  • One 2 oz. bottle of acrylic paint in glossy white*
  • One 2 oz. bottle of acrylic paint in metallic gold*
  • One 2 oz. bottle of acrylic paint in metallic silver*
  • One 8 oz. can of oil-based interior wood stain in Jacobean*
  • One 8 oz. can of oil-based interior wood stain in red chestnut*
  • Four LED candles in varying sizes
  • One hot glue gun and glue sticks
  • One 10 oz. can of interior/exterior, fast-drying spray paint in flat black
  • One vinyl doll’s head
1. Remove any decorative elements from the boxes to give them a smooth surface. Then, tear the tissue paper into small sections and roll them into tight balls. You want to create as many wrinkles as possible. Working in sections, apply a layer of decoupage medium to the box and then a piece of tissue paper. Leave their edges loose during this step because it will help to fashion creases during step two.
2. Once the entire box is coated with tissue paper, apply a second layer of decoupage medium to fully adhere the paper to the cardboard. During this step, you will want to ensure there are plenty of wrinkles to give the leather texture. Also, fold the excess paper over the covers’ edges and glue it down for a cleaner appearance.  
3. After the decoupage medium has dried, apply an even coat of white paint to the boxes. This will give them a uniform base coat to cover any images or writing and prevent them from showing through on the leather.  
4. Once the white paint dries, give the boxes three washes of brown paint followed by a wash of black. You may want to test the consistency prior to doing this: the more water you add, the fainter/lighter the wash; the less water you add, the deeper/darker the wash.
5. To give the leather fuller depth, paint the boxes with the wood stain, applying a small amount to a paper towel or sponge and patting it onto the surfaces. I used Jacobian and red chestnut to add variety, but you can use the same color for each box to produce a uniform look.
6. Beginning with a base coat of black, stipple silver paint on the sides of the brown book and gold paint on the sides of the red book to make them look like worn goldleaf. Like step five, you can use the same color on both books for a unified appearance.  
7. Decide how you want the books stacked and where you want the candles. Then, trace the outlines onto the books. For visual interest, I clustered the candles together in towers, but you can place just one lone candle on the top book for an alternate look.
8. Cut out the openings, ensuring they are slightly smaller than the outline to prevent the candles from slipping through. After you do this, use painter’s tape to wrap the openings’ edges to stop the cardboard from continuing to fray. You can also use black duct tape or electrical tape for this process.  
9. Position the candles above their corresponding holes, ensuring you still have access to the power switch and battery compartment, and glue them in place. Then, use hot glue to build up layers of wax. The process works best if you move in stages, applying one layer at a time and allowing the glue to dry between each application. Also, I found that pumping the glue along the top of the candle and allowing it to naturally run downward creates the best results.  
10. Give the candles two to three coats of glossy white paint. You can always use an alternate color to cater the prop to your haunt’s chosen aesthetic or use multiple hues to make it look like a random assortment of candles.  
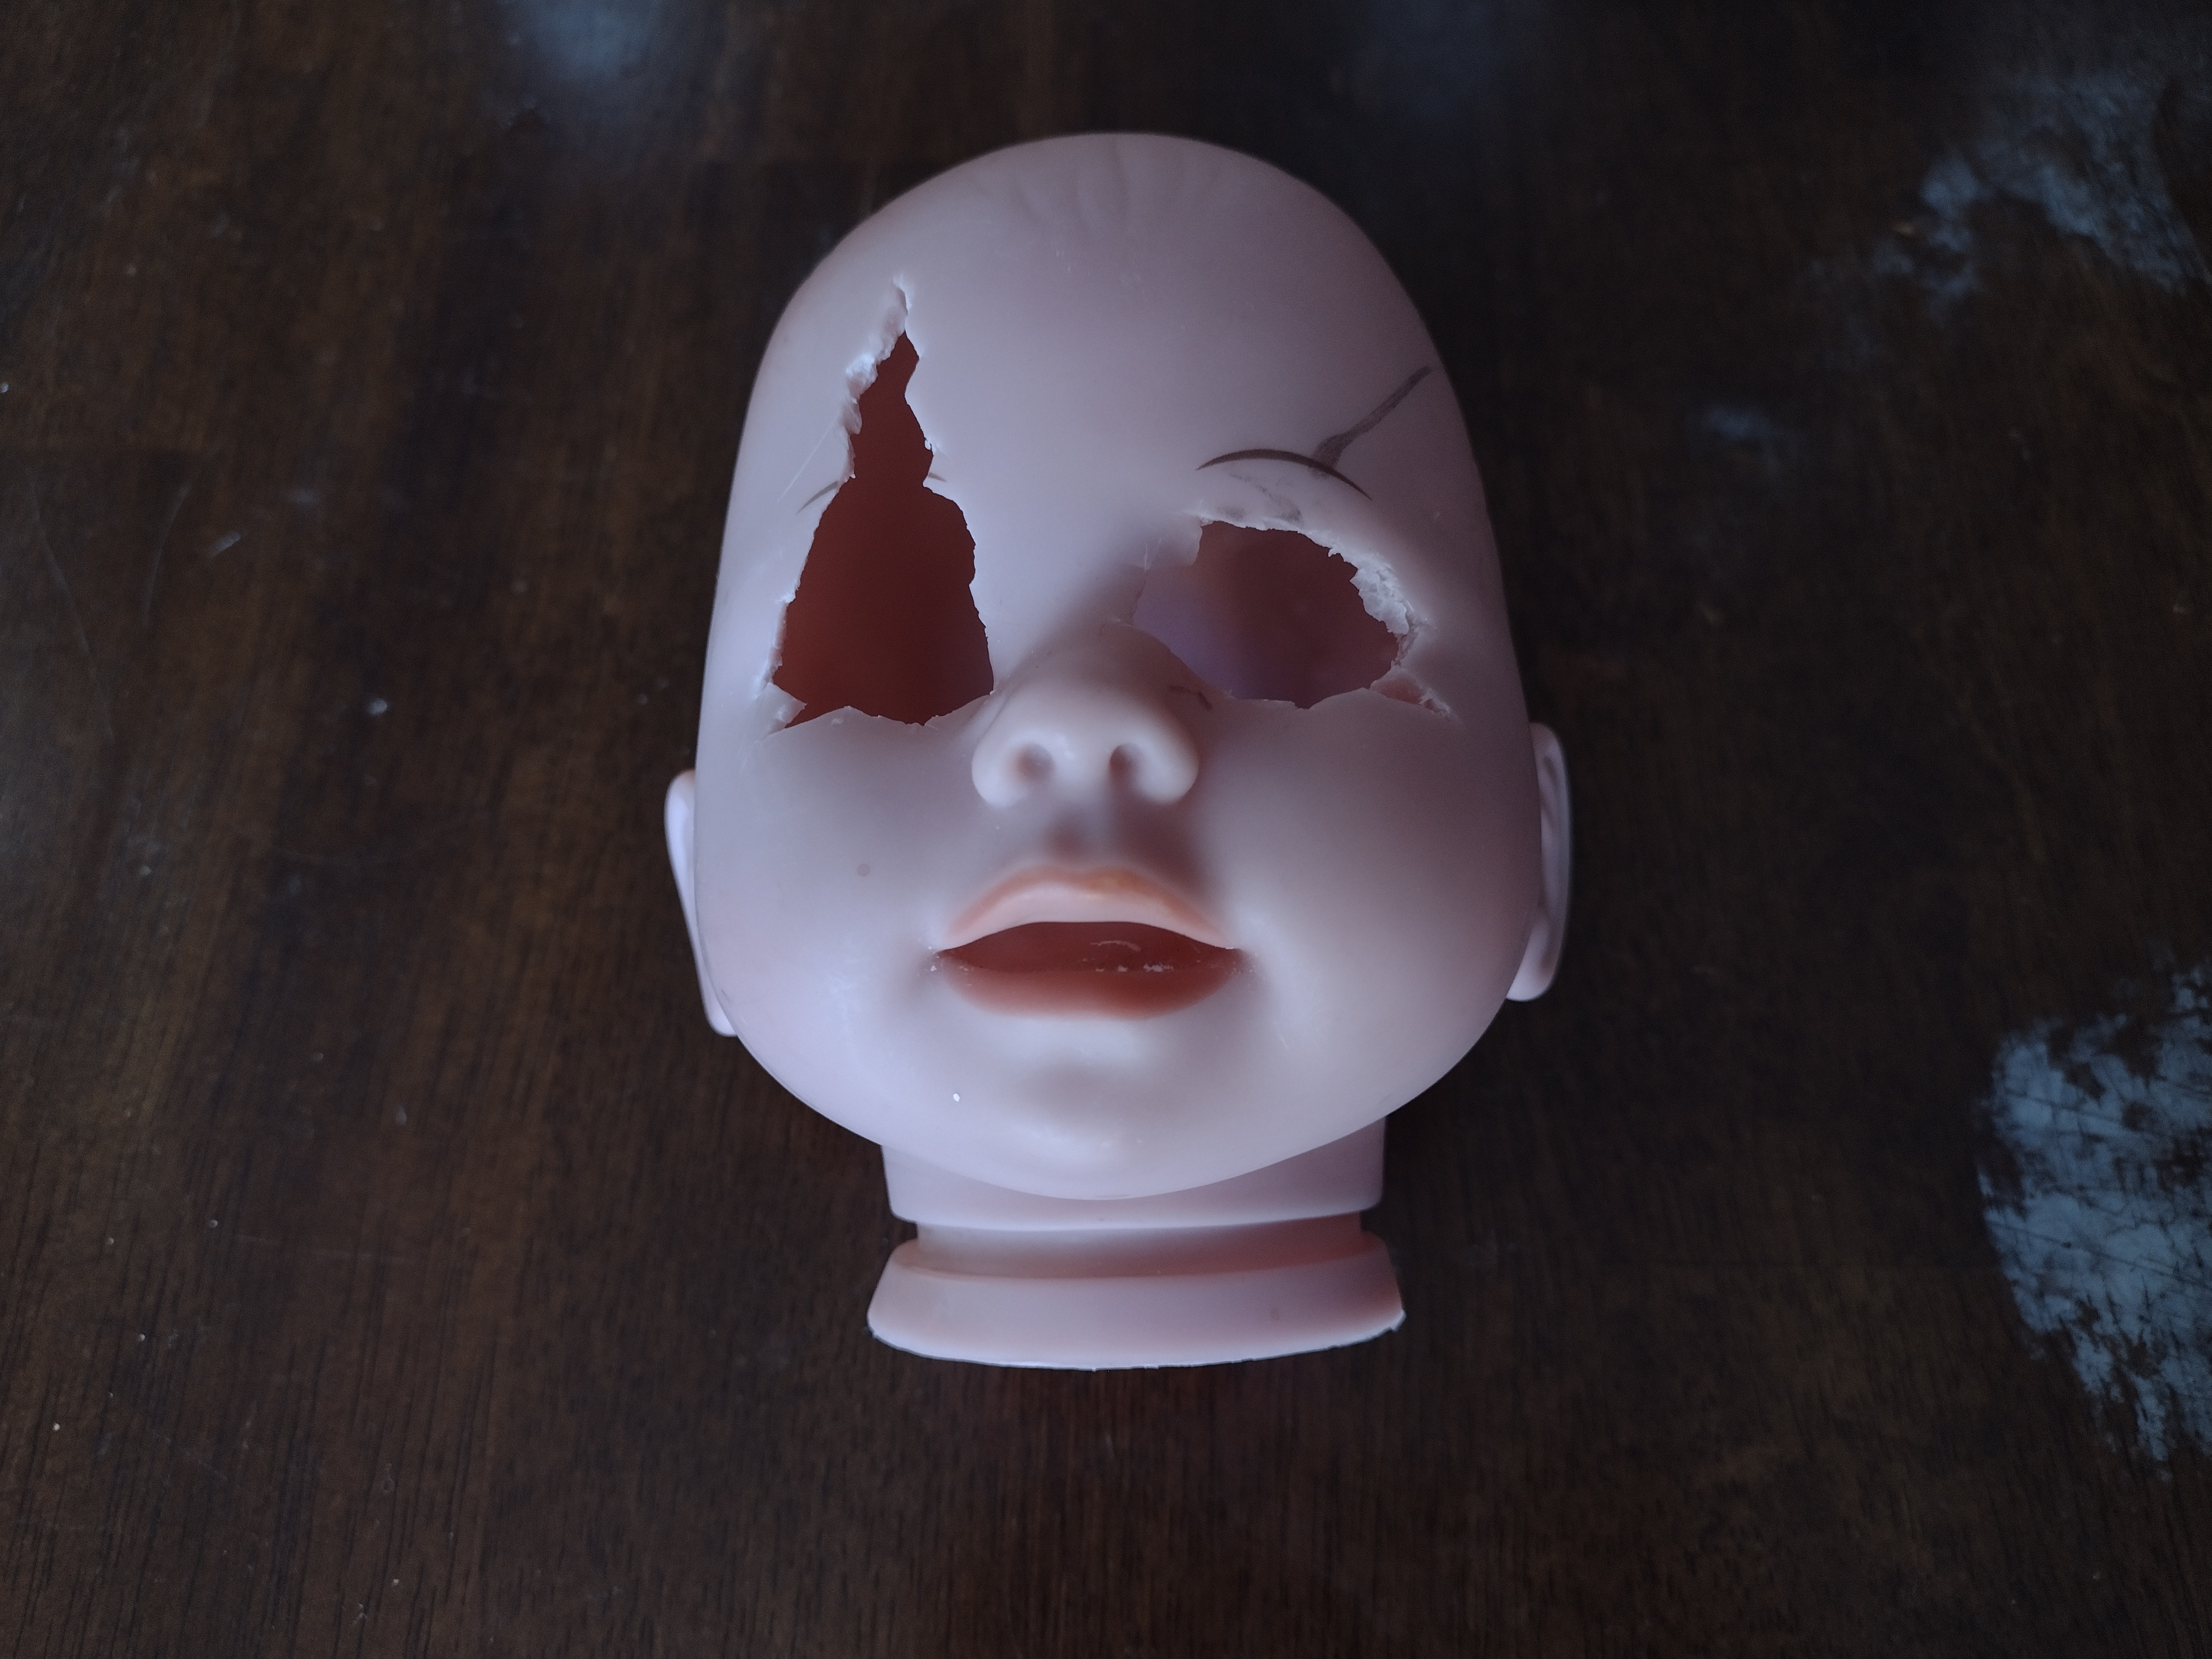
11. Use a sharp knife to remove the doll’s eyes. For visual interest, make jagged edges. Also, purchase a doll made from thin plastic or vinyl to make this process easier.  
12. On a newspaper-lined surface in a well-ventilated area, give the inside and outside of the head one to two even coats of black spray paint. Keep in mind that this is just the base coat and will be covered with other paints, so you may not want to apply too many coats.
13. Use a stippling brush to build up layers of beige paint, allowing parts of the black to remain visible in order to give the head the look of aged porcelain. For an alternate look, you can apply a crackle-paint effect.
14. To give the head a layer of age, gently brush brown paint long the edges of the openings and the creases of the face, focusing your efforts on places where dirt would naturally accumulate.  
15. Assemble the books and head and glue them all in place. For a sturdier hold, consider using superglue rather than hot glue or tacky glue.  
16. The prop can be enhanced further to correspond with your haunt’s theme. For instance, the names of the books can be written on their spines or a swarm of spiders can be glued to the side of the face.
*You will not use the entire bottle’s content for this project.

Friday, April 12, 2024

"The Witch" (A Poem)

Published in 1893 within Gathered Leaves, Mary Elizabeth Coleridge’s poem “The Witch” is a dramatic dialogue between a witch wandering through the winter wilderness and the hapless victim who welcomes her within their home. The first two stanzas are spoken by the witch, masquerading as a beautiful maiden, as she begs for someone to let her into their house. The final stanza is spoken by her victim, who has allowed the witch inside and witnesses the flames of their fire extinguish (a metaphor for their life).  
 
I have walked a great while over the snow,
And I am not tall nor strong.
My clothes are wet, and my teeth are set,
And the way was hard and long.
I have wandered over the fruitful earth,
But I never came here before.
Oh, lift me over the threshold, and let me in at the door!

The cutting wind is a cruel foe.
I dare not stand in the blast.
My hands are stone, and my voice a groan,
And the worst of death is past.
I am but a little maiden still,
My little white feet are sore.
Oh, lift me over the threshold, and let me in at the door!

Her voice was the voice that women have,
Who plead for their heart’s desire.
She came – she came – and the quivering flame
Sunk and died in the fire.
It never was lit again on my hearth
Since I hurried across the floor,
To lift her over the threshold, and let her in at the door.[1]

Works Referenced

Coleridge, Mary Elizabeth. “The Witch.” Fancy’s Following. Portland, ME: Thomas B Mosher, 1900. 53-54.
____________________
[1] Coleridge, 53-54.

Friday, April 5, 2024

Decomposing Eyes

$15 - $20 (based on 2020 prices)
Makes one display

To fill the laboratory for 2020’s mad scientist theme, I created a bevy of specimens, such as these decomposing eyes. Using gray and white paint, I tried to emulate the corneal clouding which occurs a few hours after death as a loss of pressure prevents the cornea and pupil from reflexing.
  • One plastic cloche with detachable base and handle (roughly eight inches tall)
  • One 3/16” wooden dowel
  • One 10 oz. can of interior/exterior, fast-drying spray paint in flat black
  • One 2 oz. bottle of acrylic paint in metallic bronze*
  • One 2 oz. bottle of acrylic paint in olive*
  • One 2 oz. bottle of acrylic paint in flat gray*
  • One 2 oz. bottle of acrylic paint in flat white*
  • One blank piece of 8” x 11.5” copy paper
  • At least four tablespoons of black tea (e.g. Darjeeling, Earl Gary, English Breakfast, etc.)
  • One pan large enough to soak the copy paper
  • One 4 oz. bottle of all-purpose tacky glue*
  • Two small, white ping pong balls (1 3/8” in diameter)
  • One to two feet of red yarn
  • One 0.44 oz. bottle of clear nail polish*
  • One pair of metal tweezers
  • Two 1.5-inch T-pins
  • One 0.3 fluid ounce bottle of red food coloring*
  • One 4 oz. bottle of clear, all-purpose tacky glue gel*
  • One 8 oz. can of oil-based interior wood stain in Jacobean*
1. After separating the cloche from its base, cut the dowel into two six-inch sections. Then, use a 15/64 drill bit to make two evenly spaced holes in the center of the cloche’s base and insert the dowels.
2. On a newspaper-lined surface in a well-ventilated area, apply an even coat of black spray paint to the base and handle. Following this, gently brush bronze paint over the raised surfaces and a stippling of olive paint to make the prop look like worn metal.
3. Boil enough water to completely submerge the copy paper and pour it into the pan. Add the tea. The longer you allow the tea to brew, the darker the stain will become. Likewise, greater amounts of tea will produce a richer stain. I found that a combination of English and Irish Breakfast brewed for over ten minutes produces a nice, deep brown. Submerge the paper into the tea mixture and soak it until it reaches the color you desire. I soaked mine for eight hours and scattered the loose-leaf tea over the top of the paper to add spots. Remove the paper from the water and allow it to dry.  
4. Once the paper has dried, trace the outline of the base onto the sheet, cut it out, and glue it in place. To make the paper appear even more decrepit, crinkle it and create holes before adhering it to the base.
5. Use ping pong balls, red yarn, and clear nail polish to make two fake eyes, utilizing gray and white paint to mimic the corneal clouding seen a few hours after death. For fuller instructions on this process, follow the steps outlined in the tutorial for the severed eye prop.  
6. Use a 15/64 drill bit to make a hole in the bottom of each eye and use the opening to positions them on the dowels. Depending on the height of the cloche, you may need to adjust the eyes’ position so that they properly fit under the enclosure.
7. Detail the base with the metal tweezers or any other medical instruments to cater the prop to your haunt’s needs. For a simpler look, you can skip this step and make the eyes the main focus.
8. In a plastic container (because the food coloring will stain, use something disposable or that you won’t mind dying), pour in your desired amount of clear glue gel and slowly add red food coloring to the solution until it achieves the sanguine hue you desire. To give the blood further density, add blue food coloring and mix well.
9. On a newspaper-lined surface, apply the blood glue to the base and eyes, saturating the yarn and wrapping it around the dowels. You can use an old spoon or plastic utensil to dribble the liquid or pour it haphazardly for a gory mess. Then, add the T-pins to the sanguine mixture for extra detail.  
10. On a newspaper-lined surface in a well-ventilated area, paint the cloche with the wood stain. I discovered that applying a thin coat and patting it with paper towels produces a hazed appearance. Likewise, brushing the rim with a swift downward motion creates the illusion of grime buildup.
11. Reattach the handle to the cloche and use the remaining blood glue to drizzle the liquid down the sides of the cloche. As with step nine, do this on a newspaper-lined surface to protect your counter or table from being stained.  
12. Once the blood glue has dried, reattach the cloche to its base. If you plan for a more permanent display, you can glue the item down. You can also embellish the prop further with a specimen tag of biohazard label.
*You will not use the entire bottle’s content for this project.