$10 - $15 (based on 2023 prices)
Makes one prop
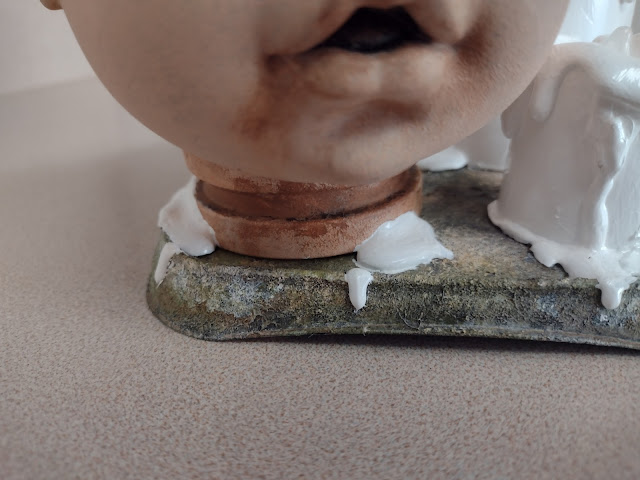
In 2023, I was commissioned by a local theater to serve as a consultant and prop builder for their production of The Haunting of Hill House, which was based on Shirley Jackson’s novel. Being a fan of the books since I was a teenager, I jumped at the opportunity and spent several months creating a collection of items to decorate both the house depicted on the stage and the cemetery created in the lobby to greet patrons before they entered the theater. For this prop, I used a series of recycled items, including a lid from a food container, to fashion a creepy doll surrounded by several candles which was nestled on a bookcase within the set.
- One 5” x 5” sheet of plastic
- One 5 oz. tube of siliconized caulk*
- One 10 oz. can of interior/exterior, fast-drying spray paint in flat black*
- One 2 oz. bottle of acrylic paint in flat beige*
- One 2 oz. bottle of acrylic paint in flat brown*
- One 2 oz. bottle of acrylic paint in flat gray*
- One 2 oz. bottle of acrylic paint in flat olive*
- One 2 oz. bottle of acrylic paint in flat white*
- One 2 oz. bottle of acrylic paint in glossy white*
- Three LED candles in varying sizes
- One hot glue gun and glue sticks
- One vinyl doll’s head
2. Allow the caulking to dry for at least twenty-four hours and then, on a newspaper-lined surface in a well-ventilated area, give the sheet one or two even coats of black spray paint. You can apply additional layers; however, keep in mind that this is the base coat and much of it will be covered by the other colors.
3. Use a stippling brush to build up layers of gray and white paint, working from dark to light to give the sheet the look of stone. If one color becomes too overpowering, you can always apply more of the other color to dial it back.
4. To age the prop, water down brown paint and brush it along the sheet’s surface, allowing it to settle in the fissures. Then, use the stippling brush to pat olive paint randomly onto the sheet to mimic moss. How much of both colors you apply depends on the level of weathering you want.
5. Determine where the candles will sit, trace their outlines, and cut them out, ensuring the holes are slightly smaller than the outlines to prevent the candles from falling through. This will allow access to the power switch and battery compartment. Because this process can damage the paint job, it might be better to perform this step before steps one through four.
6. Glue two of the three candles to their corresponding holes and use hot glue to build up layers of wax. The process works best if you move in stages, applying one layer at a time and allowing the glue to dry between each application. Also, I found that pumping the glue along the top of the candle and allowing it to naturally run downward creates the best results.
7. Give the candles two to three coats of glossy white paint. You can always use an alternate color to cater the prop to your haunt’s chosen aesthetic or use multiple hues to make it look like a random assortment of candles.
8. Use a sharp knife to remove the doll’s eyes and the top of its head. For visual interest, make jagged edges. Also, purchase a doll made from thin plastic or vinyl to make this process easier.
9. Trace the outline of the third candle onto the base of the head and cut it out, ensuring the candle fits snuggly into the opening but not gluing it in place (this will occur during step thirteen).
10. On a newspaper-lined surface in a well-ventilated area, give the inside and outside of the head one to two even coats of black spray paint. As with step two, this is just the base coat and will be covered with other paints, so you may not want to apply too many coats.
11. Use a stippling brush to build up layers of beige paint, allowing parts of the black to remain visible in order to give the head the look of aged porcelain. For an alternate look, you can apply a crackle paint effect.
12. To give the head a layer of age, gently brush brown paint long the edges of the openings and the creases of the face, focusing your efforts on places where dirt would naturally accumulate.
13. Insert the candle into the opening at the base of the head, glue it in place, and then build up layers of hot glue around it to make it appear like a melted candle. Following this, give the glue two or three coats of glossy white paint (or any other color you choose for the candle).
14. Attach the head to the base, guaranteeing the candle rests above the opening to make the power switch and battery compartment accessible. For added stability and visual interest, build up puddles of glue around the base of the head and paint these with glossy white paint to look like melted wax.


No comments:
Post a Comment