Friday, July 29, 2022

The Corpse as a Talisman: A Mini-Essay

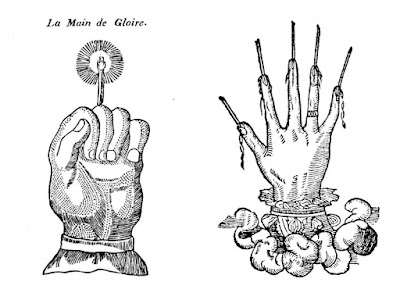
     Superstitions and symbols surrounding the corpse have existed for millennia in cultures throughout the world, with the body of the criminal possessing a bevy of folklore. During the sixteenth century, the mandrake which typically grew beneath the gallows of Europe was believed to be imbued with magical properties as the blood and other bodily fluids from the executed dripped onto the foliage. In fact, the Gypsy princess in Ludwig Achin von Arnim’s novella Isabella of Egypt (1812) uses the mandrake below her father’s gallows to summon a Mandragore to help her achieve her ultimate goal of marrying the prince.[1] During the eighteenth and nineteenth centuries, in turn, the hanged man’s body became the focus of a medical movement concentrated around gallows cures, which asserted contact with the corpse of a recently executed corpse could heal a variety of ailments, including swelling.[2] Indeed, the convict’s hand featured prominently in gallows cures and even developed its own superstitions among fellow criminals. Although the particulars vary (some versions of the folklore required the item to be greased and set aflame while others had it merely hold a candle made of human fat), the Hand of Glory served as a good-luck charm which protected robbers as they pilfered houses and was featured in popular fiction like Walter Scott’s The Antiquary (1816) and Richard Harris Barham’s The Ingoldsby Legends (1840).[3]
 
Works Referenced
 
Davies, Owen, and Francesca Matteoni. “‘A Virtue Beyond All Medicine:’ The Hanged Man’s Hand, Gallows Tradition and Healing in Eighteenth- and Nineteenth-Century England.” Social History of Medicine 28.4 (2015): 686-705.
 
Tarlow, Sarah, and Emma Battell Lowman. Harnessing the Power of the Criminal Corpse. London: Palgrave Macmillan, 2018.
____________________
[1] Tarlow and Lowman, 226-227.
[2] Davies and Matteoni, 686-705.
[3] Tarlow and Lowman, 224-226.

Friday, July 22, 2022

Framed Lab Monster

$25 - $30 (based on 2020 prices)
Makes one frame
 
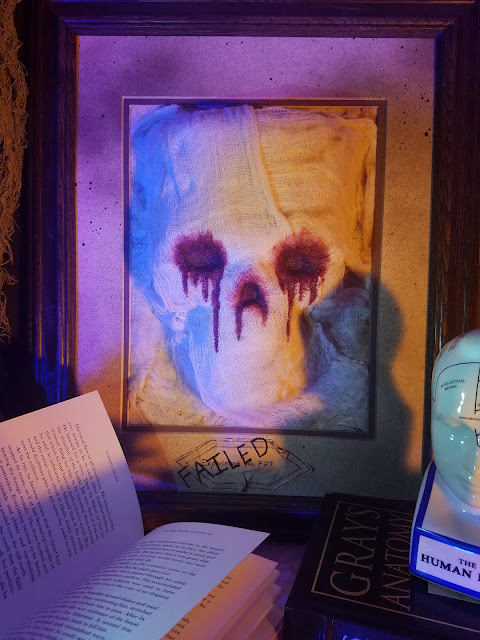
Although a mad scientist would never be willing to admit it, not every experiment ends well. Hence, I wanted to create a failed experimentation to hang on the laboratory wall in 2020’s haunt as proof of this factor. To accomplish this, I repurposed an old mask and the remaining cheesecloth from the brain surgery skull and syringe skull.
  • One 16” x 20” wooden picture frame
  • One 11” x 14” white photo matte
  • One 10 oz. can of interior/exterior, fast-drying spray paint in flat black
  • One 10 oz. can of interior/exterior, fast-drying spray paint in flat brown*
  • One plastic monster mask
  • Six yards of white cheesecloth
  • At least four tablespoons of dark roasted coffee grounds
  • One pan large enough to soak the cloth
  • One 4 oz. bottle of all-purpose tacky glue*
  • One 2 oz. bottle of acrylic paint in flat red*
  • One 0.44 oz. bottle of clear nail polish*
  • One piece of 8” x 11.5” copy paper with labels printed on it
  • At least four tablespoons of black tea (e.g. Darjeeling, Earl Gary, English Breakfast)
  • One pan large enough to soak the copy paper
1. Remove the backing and glass from the frame and, on a newspaper-lined surface in a well-ventilated area, lightly dust the matte with black and brown spray paint to add a level of distress. To further enhance the aged appearance, you can also apply a flecking of black paint.
2. Remove the elastic band from the mask, center it on the backing, and glue it in place. You may need to replace the frame and matte before doing so to ensure the mask is perfectly centered once the entire prop is assembled.
3. On a newspaper-lined surface in a well-ventilated area, give the backing and mask two even coats of black spray paint. Although I used two, you can apply more or less, since this is meant to give the prop a uniform base in case portions of it show through the cheesecloth.
4. Boil enough water to completely submerge the cheesecloth and pour it into the pan. Add the coffee. The longer you allow the coffee to brew, the darker the stain will become. Likewise, greater amounts of coffee will produce a richer stain. Submerge the fabric in the coffee mixture and soak it until it reaches the color you desire. I soaked mine for eight hours (long enough to give it a slight tint) and scattered the coffee grounds over the top to add spots. Remove the cloth from the water and allow it to dry.
5. Starting at the front of the mask, glue the cheesecloth to the prop. I found that this step works best if you move in stages: apply a layer of glue to one section, hold the fabric down until it sticks, and then repeat the process. You want to ensure the entire piece is adequately covered and that the holes for the eyes and nose are still visible.
6. Use red paint to give the illusion of blood seeping from the eyes and nose. It works best to fill in the deepest recesses first and then spread the paint outward, following the course that the flow would naturally take as it drips downward.
7. After the paint has dried, give it a coat or two of clear nail polish to make it appear wet, starting with the depressions made by the eyes and nose and move outward.
8. Glue the matte to the backing. Depending on how thick you applied the layers of cheesecloth, you may need to firmly press the fabric down or trim portions of it in order for the matte to sit level.
9. Repeat the process in step four to tea stain a specimen label for the prop. For the time-pressed haunter, it may prove easier and more efficient to stain everything all at once, removing the label during step four and setting it aside until step ten.
10. Cut out the label and use sandpaper to fray its sides and create holes. You can also crumple the paper to produce creases. Once you have achieved your desired level of distress, glue the labels to the matte just below the monster’s chin. You can use olive or vegetable oil to add further stains.
11. With a permanent marker, write failed across the label. This can be done in black or red ink and the wordage can be altered to fit your haunt’s needs, with variations being anything from abnormal to expired.
12. Reattach the frame to the backing. For extra support, especially if you plan to display the prop outdoors in windy conditions, glue the item in place. You can also attach a store-bought hanging hook on the back to hang the prop on a laboratory wall.
*You will not use the entire bottle’s content for this project.
Friday, July 15, 2022

Corpse Fingers

$10 - $12 (based on 2020 prices)
Makes five fingers
 
When my little brother and I began yard haunting, it was easy to find realistic-looking body parts at local party shops. Over the years, though, the appearance of fake limbs has become more and more pathetic. Now, to acquire something believable, you have to make your own or buy it at an expensive special-effects store. Since the latter option is impracticable (no one has the money for those stores), this project developed from my own attempts at self fabrication.
  • Five vinyl fingers
  • One 2 oz. bottle of acrylic paint in flat black*
  • One 2 oz. bottle of acrylic paint in flat blue*
  • One 2 oz. bottle of acrylic paint in flat gray*
  • One 2 oz. bottle of acrylic paint in flat green*
  • One 2 oz. bottle of acrylic paint flat ivory*
  • One 2 oz. bottle of acrylic paint in flat olive*
  • One 2 oz. bottle of acrylic paint in flat purple*
1. On a newspaper-lined surface, apply three even coats of gray paint to the fingers. Although I used three, you may want more or less based on your desired coverage.
2. Give the fingers a smudging of green paint, focusing primarily on the tips and around the knuckles. I found that applying a small amount of paint to your thumb and index finger and rubbing it onto the prop works well.
3. Once the green paint has dried, repeat the process with olive. During this application, be careful not to cover too much of the other color (as I did).
4. After the olive paint dries, repeat the procedure with purple, accenting the fingertips, knuckles, and stump.
5. To add further depth to the prop, finish the patina with light touches of blue, ensuring it does not overpower the other four colors.
6. Detail the nails with a coat of ivory paint then, after that dries, smudge black along their cuticles.
7. Mix together black and purple paint to create a darkened hue and cover the severed ends of the fingers with several even coats of the paint. Then, using a brush with splayed bristles, apply a stippling of the blackened paint along the surfaces of the fingers. Do not overthink your application, since a random pattern will look more natural.
8. The fingers work well by themselves or you can use them to build other props: create holes around the stumps and thread twine through them to fashion a necklace; place them in a monster’s gnarled mouth; or allow them to take center stage in a specimen display. 
*You will not use the entire bottle’s content for this project.

Friday, July 8, 2022

"A Rhyme of Death's Inn" (A Poem)

From “The Deserted House” and “All Hallows Night” to “The Dead Ship” and “The Death Potion,” the occult was a major theme in the poetical works of Lizette Woodworth Reese. In this poem, akin to her work on Halloween, the author examines the fleeting nature of life.
 
A rhyme of good Death's inn!
My love came to that door;
And she had need of many things,
The way had been so sore. 
 
My love she lifted up her head,
And is there room? said she;
There was no room in Bethlehem's inn
For Christ who died for me.
 
But said the keeper of the inn,
His name is on the door.
My love then straightway entered there:
She hath come back no more.[1]
 
Works Referenced
 
Reese, Lizette Woodworth. A Rhyme of Death's Inn. A Handful of Lavender. Boston, MA: Houghton, Mifflin, and Company, 1891. 36.
____________________
[1] Reese, 36.

Friday, July 1, 2022

Bloody Snowcones

$10 - $15 (based on 2019 prices)
Makes six cones with one tray
 
Along with the lollipop skull, I wanted to create several eye-catching treats to decorate the gory concessions display in 2019’s carnival. For this prop, I went with a simple idea of bloody snowcones. Although I chose a more blood-soaked concept, you can cater the item to your haunt’s needs by switching the food coloring to green to make a slime-drenched version.
  • One 9” x 12” plastic tray
  • One 10 oz. can of interior/exterior, fast-drying spray paint in flat black*
  • One 10 oz. can of interior/exterior, fast-drying spray paint in flat brown*
  • One 10 oz. can of interior/exterior, fast-drying spray paint in metallic silver*
  • Six three-inch Styrofoam balls
  • One 2 oz. bottle of acrylic paint in glossy maroon
  • Six paper party hats
  • One 4 oz. bottle of all-purpose tacky glue*
  • One 0.3 fluid ounce bottle of red food coloring*
  • One 4 oz. bottle of clear, all-purpose tacky glue gel*
1. On a newspaper-lined surface in a well-ventilated area, give the tray one or two even coats of metallic silver spray paint. To ensure the paint sticks to the prop, purchase a paint which adheres to plastic.
2. To add additional age and distress, dust the tray with a light coat of black and brown spray paint, starting with brown and ending with black. To give the appearance of dirt, hold the can over twelve inches away from the tray’s surface and make quick flicking motions.
3. Give the Styrofoam balls two to three coats of the maroon paint, allowing each one to thoroughly dry between coats. To make this step easier, insert a wooden stick into the ball to serve as a handle as you paint them (since part of the ball will not be seen after it is added to the cone, you do not need to worry too much about the hole).
4. Remove the elastic bands from the part hats, separate them at the seam, and resize them to fit the Styrofoam balls. Then, glue the balls into the cones. Depending on the balls’ weight, you may need to use hot glue or superglue for a sturdier hold.
5. In a plastic container (because the food coloring will stain, use something disposable or that you won’t mind dying), pour in your desired amount of clear glue gel and slowly add red food coloring to the solution until it achieves the sanguine hue you desire. To give the blood further density, add blue food coloring and mix well.
6. Arrange the cones on the tray and, on a newspaper-lined surface, apply the blood glue to the prop. You can use an old spoon or plastic utensil to dribble the liquid or haphazardly pour it for a gory mess.
7. If the cones refuse to stand upright or you plan to display the prop in windy conditions, glue them to the tray with a small amount of hot glue.
8. The prop can be enhanced further with additional details, such as swarms of insects crawling across its surface or a few random ears, eyes, fingers, or teeth dangling from its sides.
*You will not use the entire bottle’s content for this project.