$25 - $30 (based on 2020 prices)
Makes one frame
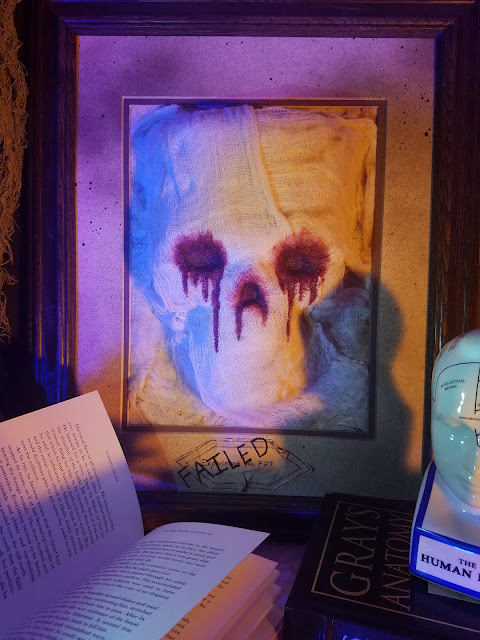
Although a mad scientist would never be willing to admit it, not every experiment ends well. Hence, I wanted to create a failed experimentation to hang on the laboratory wall in 2020’s haunt as proof of this factor. To accomplish this, I repurposed an old mask and the remaining cheesecloth from the brain surgery skull and syringe skull.
- One 16” x 20” wooden picture frame
- One 11” x 14” white photo matte
- One 10 oz. can of interior/exterior, fast-drying spray paint in flat black
- One 10 oz. can of interior/exterior, fast-drying spray paint in flat brown*
- One plastic monster mask
- Six yards of white cheesecloth
- At least four tablespoons of dark roasted coffee grounds
- One pan large enough to soak the cloth
- One 4 oz. bottle of all-purpose tacky glue*
- One 2 oz. bottle of acrylic paint in flat red*
- One 0.44 oz. bottle of clear nail polish*
- One piece of 8” x 11.5” copy paper with labels printed on it
- At least four tablespoons of black tea (e.g. Darjeeling, Earl Gary, English Breakfast)
- One pan large enough to soak the copy paper
1. Remove the backing and glass from the frame and, on a newspaper-lined surface in a well-ventilated area, lightly dust the matte with black and brown spray paint to add a level of distress. To further enhance the aged appearance, you can also apply a flecking of black paint.
2. Remove the elastic band from the mask, center it on the backing, and glue it in place. You may need to replace the frame and matte before doing so to ensure the mask is perfectly centered once the entire prop is assembled.
3. On a newspaper-lined surface in a well-ventilated area, give the backing and mask two even coats of black spray paint. Although I used two, you can apply more or less, since this is meant to give the prop a uniform base in case portions of it show through the cheesecloth.
4. Boil enough water to completely submerge the cheesecloth and pour it into the pan. Add the coffee. The longer you allow the coffee to brew, the darker the stain will become. Likewise, greater amounts of coffee will produce a richer stain. Submerge the fabric in the coffee mixture and soak it until it reaches the color you desire. I soaked mine for eight hours (long enough to give it a slight tint) and scattered the coffee grounds over the top to add spots. Remove the cloth from the water and allow it to dry.
5. Starting at the front of the mask, glue the cheesecloth to the prop. I found that this step works best if you move in stages: apply a layer of glue to one section, hold the fabric down until it sticks, and then repeat the process. You want to ensure the entire piece is adequately covered and that the holes for the eyes and nose are still visible.
6. Use red paint to give the illusion of blood seeping from the eyes and nose. It works best to fill in the deepest recesses first and then spread the paint outward, following the course that the flow would naturally take as it drips downward.
7. After the paint has dried, give it a coat or two of clear nail polish to make it appear wet, starting with the depressions made by the eyes and nose and move outward.
8. Glue the matte to the backing. Depending on how thick you applied the layers of cheesecloth, you may need to firmly press the fabric down or trim portions of it in order for the matte to sit level.
9. Repeat the process in step four to tea stain a specimen label for the prop. For the time-pressed haunter, it may prove easier and more efficient to stain everything all at once, removing the label during step four and setting it aside until step ten.
10. Cut out the label and use sandpaper to fray its sides and create holes. You can also crumple the paper to produce creases. Once you have achieved your desired level of distress, glue the labels to the matte just below the monster’s chin. You can use olive or vegetable oil to add further stains.
11. With a permanent marker, write failed across the label. This can be done in black or red ink and the wordage can be altered to fit your haunt’s needs, with variations being anything from abnormal to expired.
12. Reattach the frame to the backing. For extra support, especially if you plan to display the prop outdoors in windy conditions, glue the item in place. You can also attach a store-bought hanging hook on the back to hang the prop on a laboratory wall.
*You will not use the entire bottle’s content for this project.


No comments:
Post a Comment