Friday, March 25, 2022

The Magical Clover: A Mini-Essay

     Four-leaf clovers have long had a reputation in Irish folklore for their connection with luck; however, in many regions of the Emerald Isle, the leafy charm is also believed to manifest the finder's true love, protect them against the ills of witchcraft, prevent them from being drafted into the military, and grant them the ability to see fairies.[1] Some even maintain that immediately giving the clover to another person will double the good fortune.[2] Yet, four-leaf clovers are not the only trefoil to bring luck: wearing a two-leaf clover in her shoe will supposedly lead a young girl to her future husband and discovering a five-leaf clover can yield to considerable wealth (although other legends uphold it will generate the opposite).[3]
 
Works Referenced
 
Pickering, David. Dictionary of Superstitions. London: Cassell, 1995.
____________________
[1] Pickering, 67-68.
[2] Pickering, 67.
[3] Pickering, 68

Friday, March 18, 2022

Freak Show Wreath

$25 - $30 (based on 2019 prices)
Makes one wreath
 
After the dozens of wreaths created for 2017’s haunt, I swore it would be a long time before I made another one; however, the mood struck me in 2019 to build a carnival-themed version to adorn a wall in the circus tent. It was one of the last props made for the building season (partially due to my reluctance).
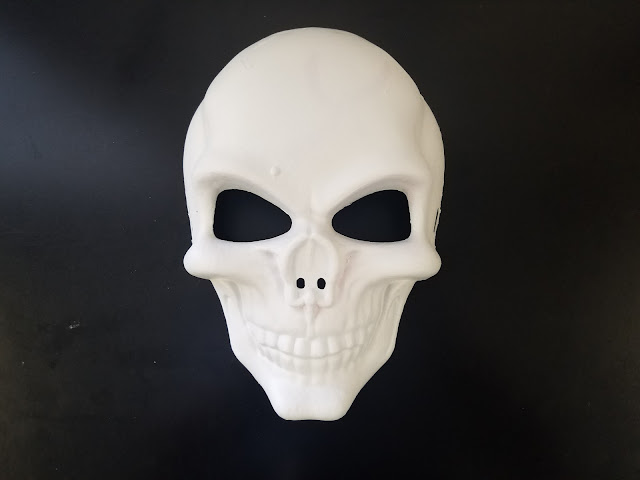
  • One plastic skull mask
  • One twelve-inch wooden sign
  • One fourteen-inch metal wreath frame
  • One roll of colorful wrapping paper (roughly seventeen square feet)
  • One 10 oz. can of interior/exterior, fast-drying spray paint in flat black*
  • One 10 oz. can of interior/exterior, fast-drying spray paint in flat brown*
  • One 10 oz. can of interior/exterior, fast-drying spray paint in flat white*
  • One 2 oz. bottle of acrylic paint in flat black*
  • One 2 oz. bottle of acrylic paint in flat brown*
  • One 2 oz. bottle of acrylic paint in flat gray*
  • One 2 oz. bottle of acrylic paint in flat green*
  • One 2 oz. bottle of acrylic paint in flat orange*
  • One 2 oz. bottle of acrylic paint in flat purple*
  • One 2 oz. bottle of acrylic paint in flat white*
  • One 4 oz. bottle of all-purpose tacky glue*
  • One clear plastic Christmas ornament (two inches in diameter)
  • One package of two-inch letterboard letters
  • Two skeleton hands
  • Five yards of deco mesh in green
  • Five yards of deco mesh in orange
  • One package of red chenille stems (ten twelve-inch pieces)
  • Two large bows
  • Six Halloween-themed ornaments
  • Twelve yards of purple mesh tubing
  • One large party hat
1. Remove the mask’s elastic band and any other accessories and, on a newspaper-lined surface in a well-ventilated area, give it two coats of white spray paint. I used two coats, but you may want more or less depending on your desired coverage. Likewise, you could select a different base color to cater the item to your haunt’s needs.
2. Detail the mask with a variety of colors to create a clown-like face. Based on your haunt, you can fabricate fanciful expressions for a whimsical theme or something more maniacal. Once the paint has dried, outline the pattern in black to accentuate the colors and then, using a hue that complements the main colors, write smile across the forehead. This, too, can be altered to fit your theme, with remarks like laugh written in bright colors to convey a happier tone or commands like scream penned in blood-red paint to amplify the scariness.
3. Remove the hanging hoop from the back of the ornament and, on a newspaper-lined surface in a well-ventilated area, give it a coat of black spray paint. Akin to the previous step, select a color that corresponds with the tones of the mask.
4. Glue the portion of the ornament where the hanging hoop once was to the mask to fashion a nose. For a sturdier hold, use superglue.
5. Glue the mask to the wreath. For visual interest, tilt it slightly at an angle and do not center it on the frame.
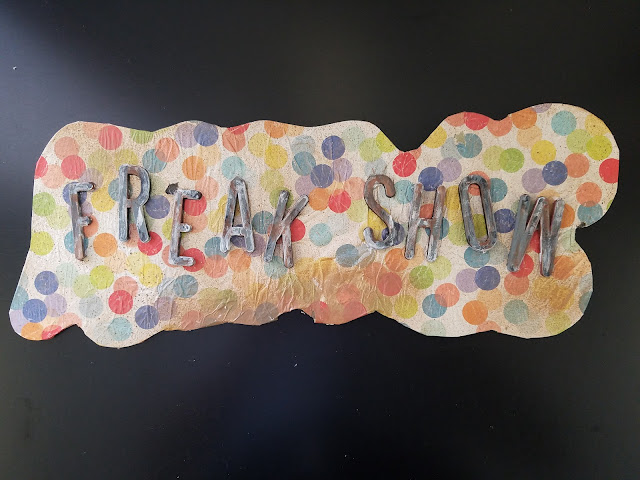
6. Brush a light layer of glue onto the sign and cover it with wrapping paper. To make the paper appear worn, crumple it up prior to adhering it to the board and tear holes into it.
7. Add additional age and distress by dusting the sign with a light coat of brown spray paint. To give the appearance of dirt, hold the can over twelve inches away from the sign’s surface and make quick flicking motions. You can also apply a flecking of black paint and smears of brown paint to enhance the weathered appearance.
8. On a newspaper-lined surface in a well-ventilated area, give the letterboard letters an even coat of black spray paint. Although I only used one coat, you may want more depending on your desired coverage. Keep in mind, though, this is the base coat and much of the paint will be covered up by other colors. Once the paint has dried, give the letters an aged patina by gently brushing brown, gray, and white paint over their surfaces. Try not to overthink your application. A random pattern is ideal.
9. Arrange the letters on the sign and glue them in place. It might work best to pre-position everything to determine their desired placement before permanently affixing them.
10. On a newspaper-lined surface in a well-ventilated area, give one skeleton hand a coat or two of white spray paint and the other a coat or two of black. As with step two, you can use alternate colors to make the prop fit your chosen aesthetic.
11. Affix the sign to the lower portion of the wreath and position the hands on either side of it to make it appear as though they are holding the object.
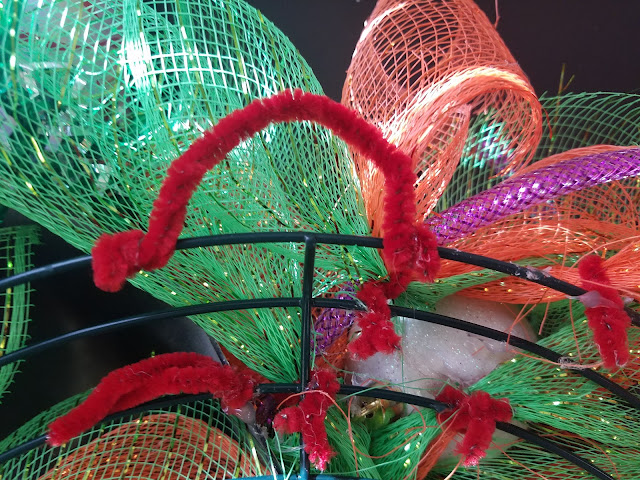
12. Cut the green and orange deco mesh into twenty eight-inch sections and twenty six-inch sections and bind them together with a two-inch piece of chenille stem.
13. Using three-inch sections of chenille stems, attach the mesh bundles to the wreath by wrapping the stems around the mental frame. As you do so, try to vary the colors and sizes.
14. Fill empty spaces and add further detail by adhering bows, Halloween-themed ornaments, and purple mesh tubing to the wreath. Akin to steps two and ten, these items and their colors can be modified to fit the theme of your haunt.
15. Crown the mask with a party hat, ensuring its placement does not cover the word written on its forehead. For an alternate look, you can use a wig.
16. If the wreath did not come with a hanging loop, you can fashion one out of the chenille stems or, for a sturdier version, steel wire.
17. Because of its versatility, the wreath can be embellished with a variety of items, from playing card and foam dice to rolls of tickets and popcorn bags, to achieve a multitude of themes.
*You will not use the entire bottle’s content for this project.

Friday, March 11, 2022

"The Fairies" (A Poem)

First published in 1850, William Allingham’s poem “The Fairies” became an instant bestseller in Victorian society as children were drawn to its fanciful depictions of the enchantment and mischief of fairies; however, the narrative also relates the darker side to these mythical beings, explaining how they kidnap mortal infants and replace them with changelings (as is the case with the poem’s Bridget, who returns after seven years of captivity).[1]
 
Up the airy mountain,
Down the rushy glen,
We daren’t go a-hunting
For fear of little men;
Wee folk, good folk,
Trooping all together;
Green jacket, red cap,
And white owl’s feather!
 
Down along the rocky shore
Some make their home,
They live on crispy pancakes
Of yellow tide-foam;
Some in the reeds
Of the black mountain-lake,
With frogs for their watchdogs,
All night awake.
 
High on the hill-top
The old King sits;
He is now so old and grey
He’s nigh lost his wits.
With a bridge of white mist
Columbkill he crosses,
On his stately journeys
From Slieveleague to Rosses;
Or going up with the music
On cold starry nights,
To sup with the Queen
Of the gay Northern Lights.
 
They stole little Bridget
For seven years long;
When she came down again
Her friends were all gone.
They took her lightly back,
Between the night and morrow,
They thought that she was fast asleep,
But she was dead with sorrow.
They have kept her ever since
Deep within the lake,
On a bed of fig-leaves,
Watching till she wake.
 
By the craggy hillside,
Through the mosses bare,
They have planted thorn trees
For my pleasure, here and there.
Is any man so daring
As dig them up in spite,
He shall find their sharpest thorns
In his bed at night.
 
Up the airy mountain,
Down the rushy glen,
We daren’t go a-hunting
For fear of little men;
Wee folk, good folk,
Trooping all together;
Green jacket, red cap,
And white owl’s feather![2]
 
Works Referenced
 
Allingham, William. “The Fairies.” Fairy and Folk Tales of Ireland. Ed. W.B. Yeats. New York: Touchstone, 1998. 13-14.
 
Heneghan, Liam. Beasts at Bedtime: Revealing the Environmental Wisdom in Children’s Literature. Chicago, IL: The University of Chicago Press, 2018.
____________________
[1] Heneghan, 86.
[2] Allingham, 13-14.

Friday, March 4, 2022

Dr. Frankenstein’s Journal

$10 - $15 (based on 2020 prices)
Makes one journal
 
No mad scientist’s laboratory would be complete without a cataloged account of their experiments, so I created a fake journal to adorn one of the laboratory tables in 2020’s haunt. The prop is rather easy to make and, if there was more time (the curse of most haunters), I would have liked to create several to litter the laboratory.
  • Five sheet of blank tabloid paper
  • Sixteen sheets of blank copy paper
  • Three sheet of copy paper with journal writings
  • One 10 oz. can of interior/exterior, fast-drying spray paint in flat black*
  • One 10 oz. can of interior/exterior, fast-drying spray paint in flat brown*
  • One 2 oz. bottle of acrylic paint in flat black*
  • One 2 oz. bottle of acrylic paint in flat brown*
  • One 2 oz. bottle of acrylic paint in metallic gold*
  • One 2 oz. bottle of acrylic paint in flat red*
  • At least four tablespoons of black tea (e.g. Darjeeling, Earl Gary, English Breakfast, etc.)
  • One pan large enough to soak the paper
  • One 4 oz. bottle of all-purpose tacky glue*
  • One to two yards of gray thread
  • One 20” x 25” piece of cardboard
  • One large paper bag
  • Two small skeleton decals
1. Boil enough water to completely submerge the paper and pour it into the pan. Add the tea. The longer you allow the tea to brew, the darker the stain will become. Likewise, greater amounts of tea will produce a richer stain. I found that a combination of English and Irish Breakfast brewed for over ten minutes produces a nice, deep brown. Submerge the paper into the tea mixture and soak it until it reaches the color you desire. I soaked mine for eight hours and scattered the loose-leaf tea over the top of the paper to add spots. Remove the paper from the water and allow it to dry. Although it can be time consuming, this process works best if you stain each sheet of paper individually.
2. Fold the tabloid sheets in half and glue two sheets of blank copy paper on each side to form folios. Then, for the portion that will be open for display, glue the journal sheets on either side.
3. Glue the four blank folios closed and, after this, adhere two of each to either side of the journal folio. This will form a books which will open in the middle to reveal the written entries.
4. Use the gray thread to haphazardly bind the folios. As you do so, refrain from tying them too tight, since this will prevent the book from opening. This entire step is meant to be purely aesthetic and add to the book’s aged look.
5. Cut the cardboard into two 9” x 11.5” sections to serve as the covers for the book. You do not want them excessively large, since this will prevent the item from opening.
6. Cut the paper bag into two 11” x 13.5” sections and use them to wrap the covers. For the best results, press the paper as smooth as possible, removing any bubbles and wrinkles. To assist in this process, use a firm piece of plastic, like a credit card.
7. On a newspaper-lined surface in a well-ventilated area, dust the covers’ surfaces with black and brown spray paint to give them a level of age. Then, water down black and brown acrylic paint and drip it along the edges.
8. On a newspaper-lined surface in a well-ventilated area, give the skeleton decals a base coat of black spray paint and then, once it has dried, gently brush metallic goal over their raised surfaces to give the appearance of distressed metal.
9. Glue the decals to the covers and use metallic gold to title the journal and red paint to smear bloody handprints on it’s surface.
10. Attached the covers to the folios. To make the book easier to open, align the edges of the covers with the spin.
11. The prop can be enhanced further with additional embellishments like an old bookmark protruding from the pages, dabs of green paint along the cover to simulate mold, or a collection of worms eating the pages.
*You will not use the entire bottle’s content for this project.