Friday, November 29, 2019

Galli and the Cult of Cybele: A Mini-Essay

     Between 218 B.C.E. and 201 B.C.E., the Second Punic War brought a unique cult to the Roman Empire.[1] The conflict introduced Romans to the mythology of Asia Minor and its legend of Cybele captivated a select few. As lore maintains, Cybele’s excessive love for her son, Attis, drove the man mad and, rather than marry another woman, Attis, during a psychotic break, castrated himself and pledged his alliance to his overbearing mother.[2] Roman fascination with the myth prompted the Cult of Cybele and the erection of a temple on the grounds which are the current site for Saint Peter’s Basilica.[3] Although the introduction of a new religious sect was nothing new to Roman society, the behavior of its followers, known as galli, were cause for concern. Following in Attis’ footsteps, galli pledged their devotion to the goddess Cybele and, in a celebration known as the Day of Blood, danced through the streets of Rome, severed their testicles with a knife, and threw the castrated items into the nearest home, where the residents gifted the galli with women’s clothing to wear as they spent the remainder of their lives as cross-dressing eunuchs who tended to the temple of Cybele.[4] The religious practice drew strong ire from many Roman citizens and the conduct of the galli was repeatedly mocked by individuals who felt their behavior was too bizarre – even by Roman standards.[5] In fact, the Roman Senate established strict legislature which forbade citizens from being anything more than spectators in the Day of Blood.[6] Despite these efforts to squelched the trend, the cult maintained its strength until it was dispersed in the fourth century, C.E., by the rise of Christianity.[7]

Works Referenced

Friedman, David. A Mind of Its Own: A Cultural History of the Penis. New York: The Free Press, 2001.

Stevenson, Walter. “The Rise of Eunuchs in Greco-Roman Antiquity.” Journal of the History of Sexuality 5.4 (1995): 485-511.

Taylor, Gary. Castration: An Abbreviated History of Western Manhood. New York: Routledge, 2001.
____________________ 
[1] Friedman, 30.
[2] Friedman, 30.
[3] Friedman, 30.
[4] Stevenson, 485-511.
[5] Taylor, 140.
[6] Friedman, 32-33.
[7] Friedman, 30.

Friday, November 22, 2019

Skull Talismans

$10 - $15 (based on 2018 prices)
Makes three talismans

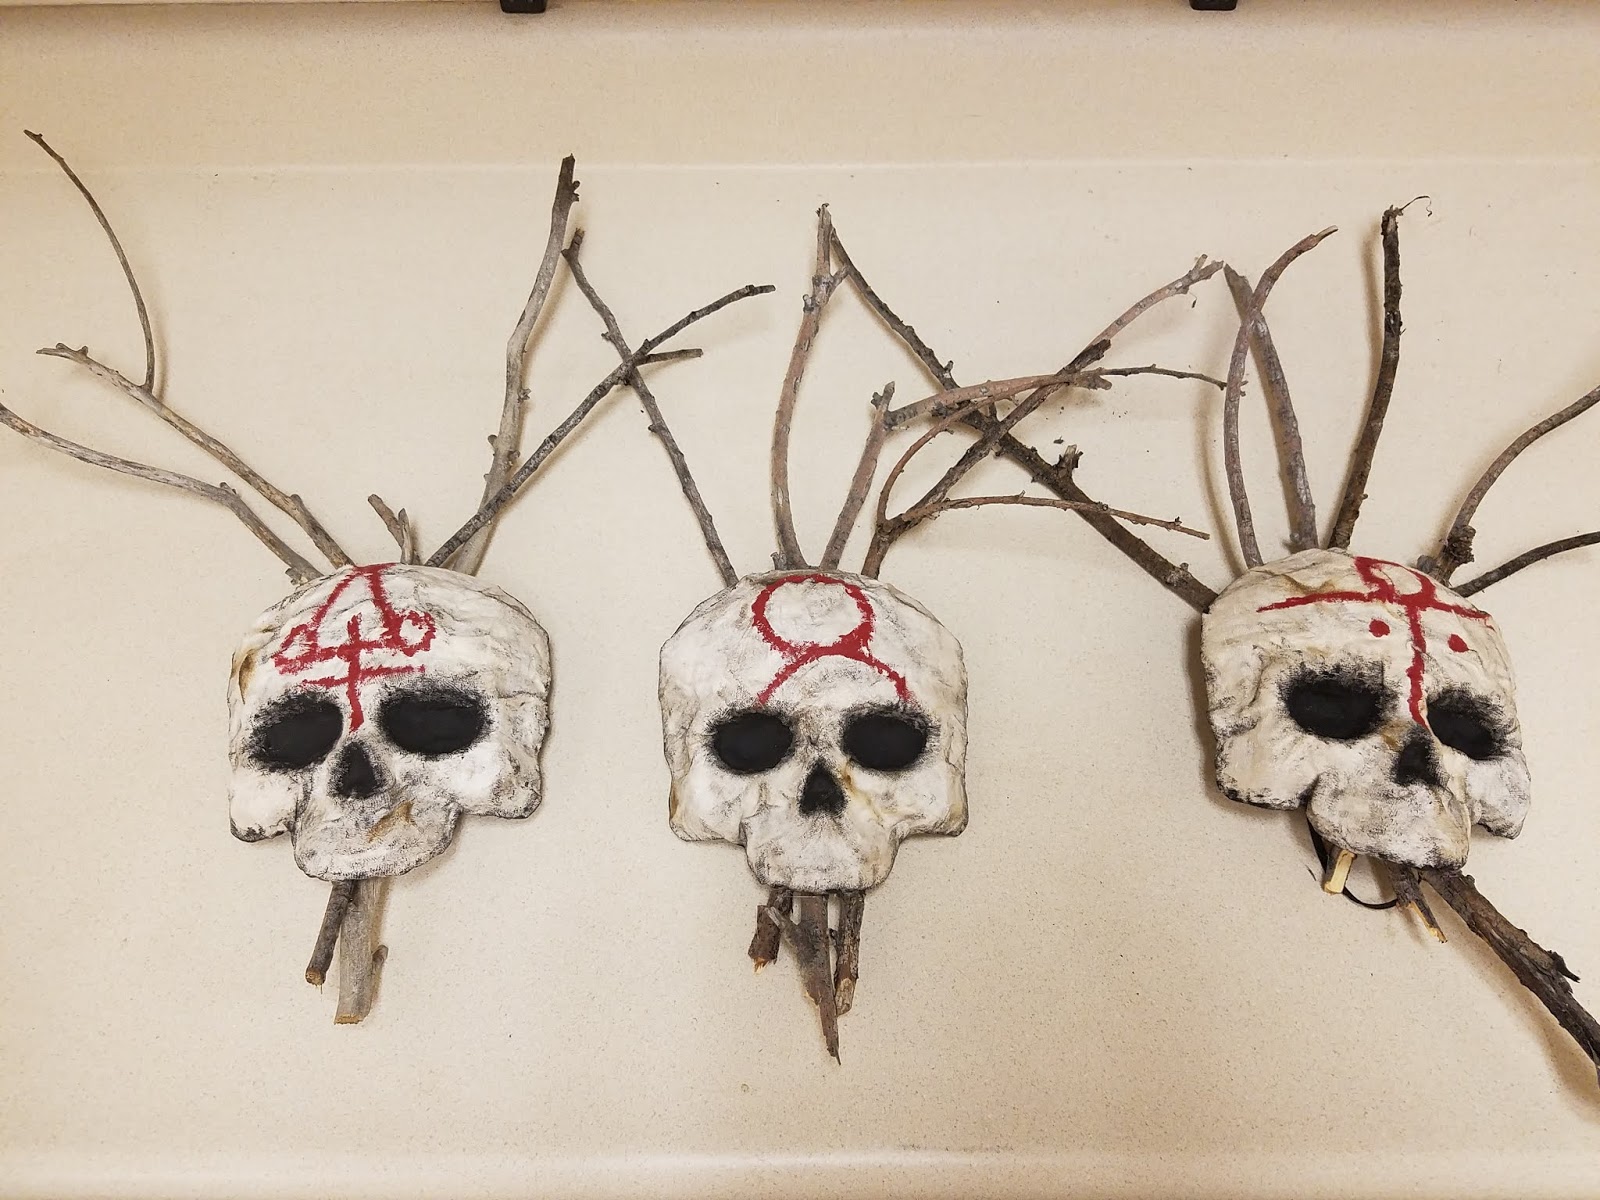
For the witch den, which was part of my office’s annual decorating competition, I unified the theme by incorporating alchemy symbols into many of the props. These skull talismans were part of this endeavor. Although I selected moderately sized sticks due to the height of the office’s ceiling, you could craft an impressive outdoor display by using larger pieces or constructing one massive stick bundle and adhering multiple masks in various spots.
  • Three plastic skull masks
  • One yard of white fabric
  • At least four tablespoons of dark roasted coffee grounds
  • One pan large enough to soak the fabric
  • One 4 oz. bottle of all-purpose tacky glue*
  • One 2 oz. bottle of acrylic paint in flat black*
  • One 2 oz. bottle of acrylic paint in cherry cobbler*
  • Nine gnarled sticks
  • Hot glue gun and glue sticks
1. Cut the mandibles off of the skull masks. For visual interest, you can create jagged edges; however, I elected for cleaner lines. To make this process easier, purchase masks made from thin plastic. If it helps, trace the outline of your cuts with a marker first.
2. Boil enough water to completely submerge the fabric and pour it into the pan. Add the coffee. The longer you allow the coffee to brew, the darker the stain will become. Likewise, greater amounts of coffee will produce a richer stain. Submerge the cloth in the coffee mixture and soak it until it reaches the color you desire. I soaked mine for four days and scattered the coffee grounds over the top of the fabric to add spots. Remove the fabric from the water and allow it to dry.
3. Cut the fabric into three evenly sized portions large enough to cover the masks and, starting at the front of the skulls, glue cloth to the masks. I found that this process works best if you move in stages: apply a layer of glue to one section, hold the fabric down until it sticks, and then repeat the process. 
4. Once the glue has dried, trim the excess fabric from the edges to give the props a cleaner appearance. Alternatively, you could leave the extra cloth, fraying an tattering it for a more unkempt look. 
5. Smudge black paint around the eyes and nose and along the edges of the masks to give them a smoky appearance. You may want to experiment with a scrap of leftover cloth before applying the paint to the fabric. 
6. Draw alchemy symbols onto the foreheads with red paint. You can add the markings randomly or put them in strategic places. While I elected to use alchemy symbols to unify the haunt’s theme, you could modify the prop by writing spells across the surfaces or using patterns of your own design. 
7. Gather about nine sticks (three for each mask). A simple ten-minute walk in the park or woods yields the best and cheapest results. Try to select pieces in varying sizes and shapes. Arrange the sticks in an interesting pattern and hot glue them together. For added support, you could lash them together with steel wire. Additionally, protect your hands during assembly by wearing heavy work gloves.
8. Center the masks on the stick bundles and glue them in place. Although hot glue provided a firm hold, you are free to use superglue or another industrial adhesive to provide a sturdier bond. Once this is done, repurpose the masks’ elastic bands to create hanging loops or, for a more rustic look, use rope or twine.
*You will not use the entire bottle’s content for this project.

Friday, November 15, 2019

Owl Wreath

$10 - $15 (based on 2018 prices)
Makes one wreath

In 2018, I participated in my office’s secret pal gift exchange, where we anonymously sent monthly gifts to a colleague. For November’s present, I decided to return to the act of wreath making (an experience soured by 2017’s haunt) and craft a fall-themed item. Although I decided to use an owl and pinecone, you can substitute the two for other fall-related decorations, such as a scarecrow and pumpkin or a crow and dried corn husk.
  • One nine-inch willow wreath
  • One yard of burlap ribbon
  • One yard of dark brown twine
  • Four four-foot garlands of fall leaves (roughly thirty-six leaves per garland)
  • One stuffed owl figure
  • One pinecone
  • Twelve inches of steel wire
  • Hot glue gun and glue sticks
1. Wrap half of the wreath in burlap ribbon and glue the bands in place. For visual interest, I chose to spiral the fabric outward; however, you could attached it vertically. You may want to play with the ribbon’s pattern before gluing it down.
2. Wrap twine around the ribbon to hide the seams and glue the strands in place. I elected to use a color darker than the burlap to create contrast, but you can match the colors to achieve a more unified appearance.
3. Separate the leaves from their garlands. Although you could do this while you glue them to the wreath, I found that performing this step beforehand made the following process much easier. Plus, it gives you a clear idea of exactly how many leaves you have.
4. Use hot glue to adhere the leaves to the wreath. For visual interest, build up layers and vary the color patterns so that leaves with the same hues and shapes are not concentrated in one area.
5. Glue the owl and pinecone to the lower portion of the wreath where the burlap and leaves meet. You could nestle the items among the foliage (like I did) or give them a more prominent display.
6. Bend the steel wire in half, clap the folded end with a pair of needle-nose plyers, and twist both strands around each other to fashion a hanging loop and glue it to the back of the wreath.
7. Give the wreath additional bulk by fluffing the leaves prior to display. You can also adhere additional leaves around the owl and pinecone to fill gaps and blend the items.

Friday, November 8, 2019

“Ode to a Nightingale” (A Poem)

Akin to his “La Belle Dame sans Merci,” John Keats’ “Ode to a Nightingale” involves the temptation of the narrator by supernatural forces. As the poem unfolds, the nightingale lures the narrator away from this world and into one of sensuous imagery and immortality. After tasting the marvels of this exquisite land, the narrator contemplates death to remain there forever; however, he reconsiders and returns to the human realm, where he begins to question which domain is more real. While the entity in “La Belle Dame sans Merci” is a vampiric vixen, the force embodied by the nightingale in “Ode to a Nightingale” can be interpreted as many things: artistic creation, idealized beauty, illicit substances, and even death itself.[1]

My heart aches, and a drowsy numbness pains
My sense, as though of hemlock I had drunk,
Or emptied some dull opiate to the drains
One minute past, and Lethe-wards had sunk:
'Tis not through envy of thy happy lot,

But being too happy in thine happiness, —
That thou, light-wingéd Dryad of the trees,
In some melodious plot
Of beechen green, and shadows numberless,
Singest of summer in full-throated ease.

O, for a draught of vintage! that hath been
Cool'd a long age in the deep-delvéd earth, 
Tasting of Flora and the country green,
Dance, and Provençal song, and sunburnt mirth!
O for a beaker full of the warm South,
Full of the true, the blushful Hippocrene,
With beaded bubbles winking at the brim,
And purple-stainéd mouth;
That I might drink, and leave the world unseen,
And with thee fade away into the forest dim:

Fade far away, dissolve, and quite forget
What thou among the leaves hast never known,
The weariness, the fever, and the fret
Here, where men sit and hear each other groan;
Where palsy shakes a few, sad, last gray hairs,
Where youth grows pale, and spectre-thin, and dies;
Where but to think is to be full of sorrow
And leaden-eyed despairs,
Where Beauty cannot keep her lustrous eyes,
Or new Love pine at them beyond to-morrow.

Away! away! for I will fly to thee,
Not charioted by Bacchus and his pards,
But on the viewless wings of Poesy,
Though the dull brain perplexes and retards:
Already with thee! tender is the night,
And haply the Queen-Moon is on her throne,
Cluster'd around by all her starry Fays;
But here there is no light,
Save what from heaven is with the breezes blown
Through verdurous glooms and winding mossy ways.

I cannot see what flowers are at my feet,
Nor what soft incense hangs upon the boughs,
But, in embalmed darkness, guess each sweet
Wherewith the seasonable month endows
The grass, the thicket, and the fruit-tree wild;
White hawthorn, and the pastoral eglantine;
Fast fading violets cover'd up in leaves;
And mid-May's eldest child,
The coming musk-rose, full of dewy wine,
The murmurous haunt of flies on summer eves.

Darkling I listen; and, for many a time
I have been half in love with easeful Death,
Call'd him soft names in many a muséd rhyme,
To take into the air my quiet breath;
Now more than ever seems it rich to die,
To cease upon the midnight with no pain,
While thou art pouring forth thy soul abroad
In such an ecstasy!
Still wouldst thou sing, and I have ears in vain —
To thy high requiem become a sod.

Thou wast not born for death, immortal Bird!
No hungry generations tread thee down;
The voice I hear this passing night was heard
In ancient days by emperor and clown:
Perhaps the self-same song that found a path
Through the sad heart of Ruth, when, sick for home,
She stood in tears amid the alien corn;
The same that oft-times hath
Charm'd magic casements, opening on the foam
Of perilous seas, in faery lands forlorn.

Forlorn! the very word is like a bell
To toil me back from thee to my sole self!
Adieu! the fancy cannot cheat so well
As she is fam'd to do, deceiving elf.
Adieu! adieu! thy plaintive anthem fades
Past the near meadows, over the still stream,
Up the hill-side; and now 'tis buried deep
In the next valley-glades:
Was it a vision, or a waking dream?
Fled is that music:—Do I wake or sleep?[2]

Works Referenced

Davis, Paul, Gary Harrison, David Johnson, Patricia Clark Smith, and John Crawford, eds. The Bedford Anthology of World Literature: The Nineteenth Century, 1800-1900. Vol. 5. Boston, MA: Bedford/St. Martin’s, 2003.

Keats, John. “Ode to a Nightingale.” John Keats: The Complete Poems. New York: Penguin, 1988. 346-347.
____________________ 

[1] Davis, Harrison, Johnson, Smith, and Crawford, 283-284.
[2] Keats, 346-347.

Friday, November 1, 2019

Haunted Portraits

$15 - $20 (based on 2018 prices)
Makes two portraits

For the ghost theme used in my office’s annual decorating competition, I decided to revisit a prop from 2014’s haunt and apply the lessons learned from four additional years of prop-building experience to fine-tune the item. Akin to the earlier piece, you can make a subtle statement with a small, cheap frame or a dramatic impression with something more massive and ornate. You can also create a series of portraits with several smaller window clings.
  • Two 16” x 20” frames
  • One 10 oz. can of interior/exterior, fast-drying spray paint in flat black
  • One 2 oz. bottle of acrylic paint in au natural*
  • One 2 oz. bottle of acrylic paint in flat black*
  • One 2 oz. bottle of acrylic paint in cherry cobbler*
  • One 2 oz. bottle of acrylic paint in hot cocoa*
  • One 2 oz. bottle of acrylic paint in spice brown*
  • Eight pieces of 8” x 11.5” copy paper
  • At least four tablespoons of black tea (e.g. Darjeeling, Earl Gary, English Breakfast, etc.)
  • One pan large enough to soak the copy paper
  • Two Halloween-themed window clings
  • One 4 oz. bottle of all-purpose tacky glue*
  • One bag of small spiders (roughly thirty spiders per bag)
1. Remove the backings and any glass from the frames and, on a newspaper-lined surface in a well-ventilated area, apply an even coat of black spray paint. Although I only used one coat, you may want more depending on your desired coverage. Keep in mind, though, that this is the base coat and much of the black paint will be covered up by lighter colors.
2. Use varying hues of brown to achieve an aged wood patina. I found that working from light to dark provided the deep tones I wanted to contrast with the lightness of the tea-stained paper; however, if you need brighter shades, work from dark to light.
3. Boil enough water to completely submerge the copy paper and pour it into the pan. Add the tea. The longer you allow the tea to brew, the darker the stain will become. Likewise, greater amounts of tea will produce a richer stain. I found that a combination of English and Irish Breakfast brewed for over ten minutes produces a nice, deep brown. Submerge the paper into the tea mixture and soak it until it reaches the color you desire. I soaked mine for eight hours and scattered the loose-leaf tea over the top of the paper to add spots. Remove the paper from the water and allow it to dry. Although it can be time consuming, this process works best if you stain each sheet of paper individually.
4. Glue the stained paper to the cardboard backings. To make it appear even more decrepit, crinkle the paper and create holes. Since the window clings will rest above these elements, preplan their location to prevent any odd placements that will interfere with the images.
5. Glue the window clings to the paper. For the best results, press the vinyl as smooth as possible, removing any bubbles and wrinkles. To assist in this process, use a firm piece of plastic, like a credit card.
6. With black and brown paint, create smears and spots on the paper. Play with the patterns until you reach the design you desire. You could also water down the paints and let the wash run downward from the top of the portrait. You may want to experiment with the consistency prior to doing this: the more water you add, the fainter/lighter the wash; the less water you add, the deeper/darker the wash.
7. Accent the portraits with a cluster of spiders crawling from a torn eye socket and bloody handprints. NOTE: The particular spiders I used were made with a slick plastic which did not adhere with hot glue. As a result, I used superglue gel to affix them to the prop.
8. Attach the frames to the backings. For added support, glue the backings in place, particularly if you plan to display these in windy conditions. If the frames did not come with hanging hooks, you can add store-bought items to the back or fashion your own with steel wire.
*You will not use the entire bottle’s content for this project.