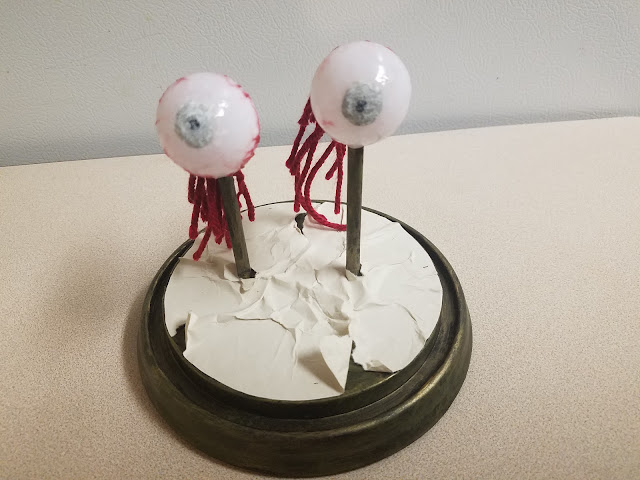
To fill the laboratory for 2020’s mad scientist theme, I created a bevy of specimens, such as these decomposing eyes. Using gray and white paint, I tried to emulate the corneal clouding which occurs a few hours after death as a loss of pressure prevents the cornea and pupil from reflexing.
- One plastic cloche with detachable base and handle (roughly eight inches tall)
- One 3/16” wooden dowel
- One 10 oz. can of interior/exterior, fast-drying spray paint in flat black
- One 2 oz. bottle of acrylic paint in metallic bronze*
- One 2 oz. bottle of acrylic paint in olive*
- One 2 oz. bottle of acrylic paint in flat gray*
- One 2 oz. bottle of acrylic paint in flat white*
- One blank piece of 8” x 11.5” copy paper
- At least four tablespoons of black tea (e.g. Darjeeling, Earl Gary, English Breakfast, etc.)
- One pan large enough to soak the copy paper
- One 4 oz. bottle of all-purpose tacky glue*
- Two small, white ping pong balls (1 3/8” in diameter)
- One to two feet of red yarn
- One 0.44 oz. bottle of clear nail polish*
- One pair of metal tweezers
- Two 1.5-inch T-pins
- One 0.3 fluid ounce bottle of red food coloring*
- One 4 oz. bottle of clear, all-purpose tacky glue gel*
- One 8 oz. can of oil-based interior wood stain in Jacobean*
2. On a newspaper-lined surface in a well-ventilated area, apply an even coat of black spray paint to the base and handle. Following this, gently brush bronze paint over the raised surfaces and a stippling of olive paint to make the prop look like worn metal.
3. Boil enough water to completely submerge the copy paper and pour it into the pan. Add the tea. The longer you allow the tea to brew, the darker the stain will become. Likewise, greater amounts of tea will produce a richer stain. I found that a combination of English and Irish Breakfast brewed for over ten minutes produces a nice, deep brown. Submerge the paper into the tea mixture and soak it until it reaches the color you desire. I soaked mine for eight hours and scattered the loose-leaf tea over the top of the paper to add spots. Remove the paper from the water and allow it to dry.
4. Once the paper has dried, trace the outline of the base onto the sheet, cut it out, and glue it in place. To make the paper appear even more decrepit, crinkle it and create holes before adhering it to the base.
5. Use ping pong balls, red yarn, and clear nail polish to make two fake eyes, utilizing gray and white paint to mimic the corneal clouding seen a few hours after death. For fuller instructions on this process, follow the steps outlined in the tutorial for the severed eye prop.
6. Use a 15/64 drill bit to make a hole in the bottom of each eye and use the opening to positions them on the dowels. Depending on the height of the cloche, you may need to adjust the eyes’ position so that they properly fit under the enclosure.
7. Detail the base with the metal tweezers or any other medical instruments to cater the prop to your haunt’s needs. For a simpler look, you can skip this step and make the eyes the main focus.
8. In a plastic container (because the food coloring will stain, use something disposable or that you won’t mind dying), pour in your desired amount of clear glue gel and slowly add red food coloring to the solution until it achieves the sanguine hue you desire. To give the blood further density, add blue food coloring and mix well.
9. On a newspaper-lined surface, apply the blood glue to the base and eyes, saturating the yarn and wrapping it around the dowels. You can use an old spoon or plastic utensil to dribble the liquid or pour it haphazardly for a gory mess. Then, add the T-pins to the sanguine mixture for extra detail.
10. On a newspaper-lined surface in a well-ventilated area, paint the cloche with the wood stain. I discovered that applying a thin coat and patting it with paper towels produces a hazed appearance. Likewise, brushing the rim with a swift downward motion creates the illusion of grime buildup.
11. Reattach the handle to the cloche and use the remaining blood glue to drizzle the liquid down the sides of the cloche. As with step nine, do this on a newspaper-lined surface to protect your counter or table from being stained.
12. Once the blood glue has dried, reattach the cloche to its base. If you plan for a more permanent display, you can glue the item down. You can also embellish the prop further with a specimen tag of biohazard label.


No comments:
Post a Comment