
$15 - $20 (based on 2019 prices)
Makes one mask
I normally craft my own mask and costume for each haunt to correspond with the theme; however, working on a haunted house in 2017 presented me with the chance to not only costume myself but also a collection of scare-actors with a series of doll masks. 2019’s haunt, in turn, provided me with the same opportunity and I fabricated this clown mask for the scare-actor at the end of the haunt to wear.
- One plastic skull mask
- One 10 oz. can of interior/exterior, fast-drying spray paint in flat black
- One 10 oz. can of interior/exterior, fast-drying spray paint in flat brown
- One 10 oz. can of interior/exterior, fast-drying spray paint in flat white
- One yard of white fabric
- At least four tablespoons of dark roasted coffee grounds
- One pan large enough to soak the fabric
- A random assortment of patches in varying colors and sizes
- One yard of brown twine
- One 4 oz. bottle of all-purpose tacky glue*
- One 2 oz. bottle of acrylic paint in flat black*
- One 2 oz. bottle of acrylic paint in flat brown*
- One 2 oz. bottle of acrylic paint in flat red*
- One 2 oz. bottle of acrylic paint in flat tan*
- One 0.44 oz. bottle of clear nail polish*
- One button (about one inch in diameter)
- One clear plastic Christmas ornament (two inches in diameter)
1. Remove the elastic band and any other accessories from the mask and, on a newspaper-lined surface in a well-ventilated area, give it two even coats of white spray paint. Although this step is optional, it gives the mask a uniform base in case portions of it show through the cloth.

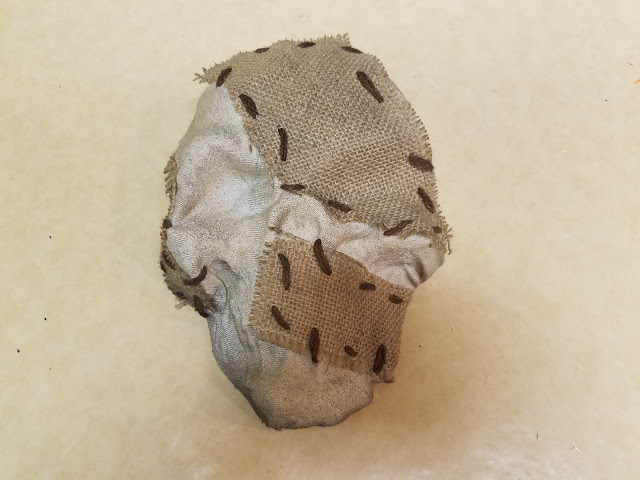
2. Boil enough water to completely submerge the fabric and pour it into the pan. Add the coffee. The longer you allow the coffee to brew, the darker the stain will become. Likewise, greater amounts of coffee will produce a richer stain. Submerge the cloth in the coffee mixture and soak it until it reaches the color you desire. I soaked mine for eight hours and scattered the coffee grounds over the top of the fabric to add spots. Remove the fabric from the water and allow it to dry.

3. Cut the fabric into a square large enough to cover the masks (mine was 15” x 15”) and haphazardly sew patches to its surface. You want the needlework to look messy and uneven.

4. Starting at the front of the skull, glue the cloth to the mask. I found that this process works best if you move in stages: apply a layer of glue to one section, hold the fabric down until it sticks, and then repeat the process.

5. Once the glue has dried, trim the excess fabric from the edges to give the prop a cleaner appearance. Alternatively, you could leave the extra cloth, fraying and tattering it for a more unkempt look.
6. Add a level of age and distress by dusting the cloth with a light coat of black and brown spray paint. To give the appearance of dirt, hold the can over twelve inches away from the mask’s surface and make quick flicking motions. You can also apply a flecking of black paint and smears of brown to enhance the weathered appearance.
7. Detail the eyes with black and red paint. For the black eye, smudge paint around its edges to give a smoky appearance. For the red eye, give the illusion of blood seeping from the opening. It works best to fill in the deepest recesses first and then spread the paint outward, following the course that the flow would naturally take as it drips downward. After the paint dries, give it a coat or two of clear nail polish to make it appear wet.

8. Beginning with a base coat of black, build up layers of brown and tan paint on the button to make it look like an old, wooden piece and then sew it into the opening of the blackened eye.

9. Remove the hanging hoop from the back of the ornament and, on a newspaper-lined surface in a well-ventilated area, give it two even coats of black spray paint. Once the paint has dried, glue a couple patches to its surface and repeat the process on step six to give it an aged appearance.

10. After the paint dries, glue the portion of the ornament where the hanging hoop once was to the mask to fashion a nose. For a sturdier hold, especially if the scare-actor plans to be highly active, use superglue.

*You will not use the entire bottle’s content for this project.
No comments:
Post a Comment