$10 - $15 (based on 2020 prices)
Makes two frames
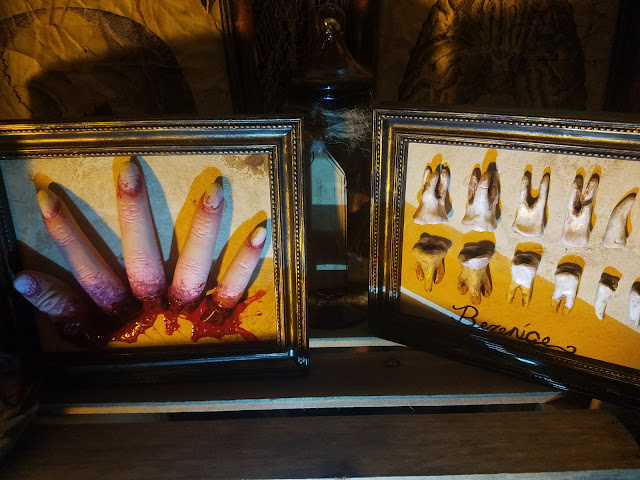
I wanted to accent 2020’s mad scientist theme with a collection of smaller framed body parts to accompany larger props like the framed torso and skinned lab monster. For this, I used a handful of the rotten teeth and severed fingers created en mass for the haunt. I also wanted to include a subtle nod to Edgar Allan Poe, with the teeth labeled Berenice as a reference to his short story of the same name (I’ll let you read the tell to determine what it references).
- Two 5” x 7” picture frames
- One 10 oz. can of interior/exterior, fast-drying spray paint in flat black*
- One 2 oz. bottle of acrylic paint in metallic copper*
- One 2 oz. bottle of acrylic paint in flat olive*
- One blank sheet of white copy paper
- At least four tablespoons of black tea (e.g. Darjeeling, Earl Gary, English Breakfast, etc.)
- One pan large enough to soak the paper
- One 4 oz. bottle of all-purpose tacky glue*
- Twelve rotten teeth (learn how to make them here)
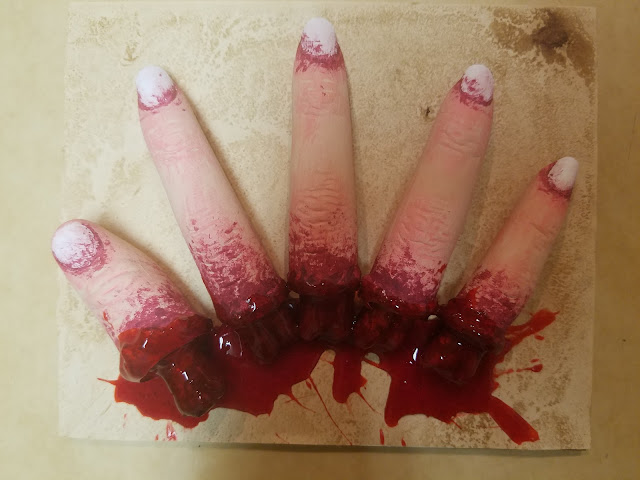
- Five severed fingers (learn how to make them here)
- One 0.3 fluid ounce bottle of red food coloring*
- One 4 oz. bottle of clear, all-purpose tacky glue gel*
2. Once the paint dries, apply a layer of metallic copper. You want to give the illusion of worn metal, so gently brush the paint along the raised surfaces. It may work best to experiment with a scrap of cardboard first. To enhance the patina, you can also randomly smudge olive paint with either a paper towel or sponge.
3. Boil enough water to completely submerge the paper and pour it into the pan. Add the tea. The longer you allow the tea to brew, the darker the stain will become. Likewise, greater amounts of tea will produce a richer stain. I found that a combination of English and Irish Breakfast brewed for over ten minutes produces a nice, deep brown. Submerge the paper into the tea mixture and soak it until it reaches the color you desire. I soaked mine for eight hours and scattered the loose-leaf tea over the top of the paper to add spots. Remove the paper from the water and allow it to dry.
4. Coat the backings with a light layer of glue and adhere the paper, pressing it down as smooth as possible to prevent bubbles and wrinkles. Once the glue dries, trim the excess. You can also use olive or vegetable oil to add further stains, applying a small amount of oil to your finger and patting it on the paper.
5. Position the fingers and teeth onto the backings, arrange them so they are visually appealing, and then glue them in place. You may need to replace the frames before doing so to ensure the items are perfectly centered once the props are assembled.
6. In a plastic container (because the food coloring will stain, use something disposable or that you won’t mind dying), pour in your desired amount of clear glue gel and slowly add red food coloring to the solution until it achieves the sanguine hue you desire. To give the blood further density, add blue food coloring and mix well.
7. Use an old spoon or plastic utensil to create pools of blood around the severed ends of the finger, spreading the blood slightly upward along their surfaces to blend the painted blood with the blood glue.
8. As the blood glue dries on the fingers, use black paint or a black pen to write Berenice or a name of your choosing below the teeth. You could also print identifying labels and use them instead.
9. Reattach the backings to the frames. If you plan to display the prop outside in windy conditions, consider gluing the backings in place for additional support. You can also fabricate a loop with steel wire or utilize a store-bought version to hang the props on a wall.
*You will not use the entire bottle’s content for this project.


No comments:
Post a Comment