Friday, December 30, 2022

Deathbed Prophesies: A Mini-Essay

      Deathbed prophesies are a longstanding tradition, particularly among those who are wrongfully executed or feel the need to utilize their final breaths to express their contentions with uncaring relatives, insufferable friends, or just the cruelty of life in general. In his survey of British and Irish hauntings, Richard Jones highlights several instances where forewarnings uttered by the dying have achieved a peculiar air of relevance, including that by a Sadducean women and a falsely accused man. In the first case, eighteenth-century heretic Lady Anne Grimston, who refused to consign to the prospects of an afterlife, boldly asserted to the priest who had come to administer her last rites: “If, indeed, there is life thereafter, seven trees will render asunder my tomb.”[1] Following her death in November of 1780, Lady Grimston was buried at St. Peter’s Church in Tewin, England, where, over the course of time, several trees began to sprout through her grave in an act which can be described as either proof of life after death, a mere coincidence, or simply “the machinations of an opportunist clergyman.”[2] Although the true nature of Lady Grimston’s prophecy is contestable, the details surrounding the second case are more difficult to explicate. In 1819, John Davies became the caretaker of the Morris farm, occupied by the widow Morris and her young daughter Jane, where he clashed with Thomas Pearce, who endeavored to steal the farmstead away from the widow, and Robert Parker, Jane’s fiancĂ©.[3] As animosities between the three men intensified, Parker and Pearce staged a violent robbery and planted evidence that indicted Davies.[4] Despite his pleas of innocence, Davies was hanged, with his last words professing: “If I am innocent, the grass, for one generation at least, will not cover my grave.”[5] Following his death, Parker was killed in a blasting accident, Pearce wasted away, and grass refused to grow around the simple robber’s grave where Davies was interred.[6]
 
Works Referenced
 
Jones, Richard. Haunted Britain and Ireland. New York: Barnes and Noble, 2002.
____________________
[1] Jones, 55.
[2] Jones, 55.
[3] Jones, 111.
[4] Jones, 111.
[5] Jones, 111.
[6] Jones, 111.

Friday, December 23, 2022

“Good Eats” and “Killing Booth” Signs

$20 - $25 (based on 2019 prices)
Makes two signs
 
For 2019’s creepy carnival, I wanted to return to a few props I made in 2017 as part of my office’s decorating competition. Building on the knowledge I gained from making the “Fun House” and “Tickets” signs, I refined the process for these “Good Eats” and “Killing Booth” signs which hung above the concessions stand and game table at the haunt.
  • One 20” x 30” foam board
  • One 10 oz. can of interior/exterior, fast-drying spray paint in flat black*
  • One 10 oz. can of interior/exterior, fast-drying spray paint in flat brown*
  • One 10 oz. can of interior/exterior, fast-drying spray paint in metallic silver*
  • Two rolls of colorful wrapping paper (roughly seventeen square feet per roll)
  • One 4 oz. bottle of all-purpose tacky glue*
  • Twelve clear plastic Christmas ornaments (two inches in diameter)
  • One deck of standard-size playing cards
  • One package of two-inch letterboard letters
  • One 2 oz. bottle of acrylic paint in flat black*
  • One 2 oz. bottle of acrylic paint in flat brown*
  • One 2 oz. bottle of acrylic paint in flat gray*
  • One 2 oz. bottle of acrylic paint in flat red*
  • One 2 oz. bottle of acrylic paint in flat white*
  • One rotten tooth (learn how to make it here)
  • One severed eye (learn how to make it here)
  • One 0.3 fluid ounce bottle of red food coloring*
  • One 4 oz. bottle of clear, all-purpose tacky glue gel*
1. Cut the board in half widthwise to create two 15” x 20” signs. You can keep their design a simple rectangle or engineer more elaborate patterns like arches or scalloped edges.
2. Trim one-inch strips from all four sides or each sign to form a border and, on a newspaper-lined surface in a well-ventilated area, give each one an even coat of silver spray paint. Although I used a metallic color to match other props in the haunt, you can use an alternate hue to correspond with your haunt’s color scheme.
3. Brush a light layer of glue onto each sign and cover them with wrapping paper. For visual interest, I decided to use two different patterns. You, though, are free to use one or many based on your preferences. To make the paper appear worn, crumple it up prior to adhering it to the boards and tear holes into it.
4. Glue the borders to the signs. To assist in this process, consider marking the backs during step two to note which sign and which side the strips belong to.
5. Remove the hanging hoops from the backs of the ornaments and glue them to the borders of the signs to imitate light bulbs. Their positioning depends entirely on your chosen appearance for the props. You can also use smaller bulbs for an alternate look.
6. Glue the playing cards to the signs. You will want each card to represent one letter in the words you would like displayed. It helps to plan this out ahead of time and play with their positioning beforehand. For visual interest, do not center each card on the sign and switch between using the fronts and backs.
7. To add a uniform level of additional age and distress, dust the signs with a light coat of black and brown spray paint. To give the appearance of dirt, hold the can over twelve inches away from the sign’s surface and make quick flicking motions. You can also apply a flecking of black paint and smears of brown paint to enhance the weathered appearance.
8. On a newspaper-lined surface in a well-ventilated area, give the letterboard letters an even coat of black spray paint. Although I only used one coat, you may want more depending on your desired coverage. Keep in mind, though, this is the base coat and much of the paint will be covered up by other colors. Once the paint has dried, give the letters an aged patina by gently brushing brown, gray, and white paint over their surfaces. Try not to overthink your application. A random pattern will produce the best results.
9. Arrange the letters on the cards and glue them in place. Akin to step six, it might work best to pre-position everything on the signs to determine their desired placement before permanently affixing them.
10. For additional detail, do not use the letterboard letters to spell out every word or all words in full. Rather, emphasize certain words or parts of words by using red paint to write these elements. In the case of the “Killing Booth” sign, for instance, I used did this with the two ls and the h.
11. Likewise, you can use severed ears, eyes, fingers, or teeth to stand for certain letters. With the “Good Eats” sign, for example, I used an eye to replace the second o in good.
12. In a plastic container (because the food coloring will stain, use something disposable or that you won’t mind dying), pour in your desired amount of clear glue gel and slowly add red food coloring to the solution until it achieves the sanguine hue you desire. To give the blood further density, add blue food coloring and mix well.
13. On a newspaper-lined surface, apply the blood glue to the prop and allow it to fully dry. You can use an old spoon or plastic utensil to strategically dribble the liquid along chosen areas or pour it haphazardly for a gory mess. For these props, I decided to be conservative with the application, only saturating the yarn attached to the eyeball and creating a splatter behind the tooth.
14. If you plan to display these props on a wall or other surface, consider making hanging loops with steel wire on the backs. You can also embellish the props further with clusters of insects crawling across their surfaces. 
*You will not use the entire bottle’s content for this project.

Friday, December 16, 2022

Finger Jars

$15 - $20 (based on 2019 prices)
Makes three jars
 
To begin 2019’s building season, I decided to kickstart the creative juices by crafting two props that I had intended to make for 2018’s witch den (which was part of my office’s annual decorating competition) but ran out of time. In the first version, I fabricated an old marinara jar into an insect-filled container to serve as ingredients for a witch’s brew. In the second, I repurposed three salsa jars and leftover cockroaches from 2016’s farm theme to add a few severed fingers to the witch’s pantry.
  • Three sixteen-ounce glass jars
  • One 2 oz. bottle of acrylic paint in flat black*
  • One 2 oz. bottle of acrylic paint in flat brown*
  • One bag of plastic cockroaches (roughly two dozen bugs per bag)
  • One 0.14 oz. bottle of superglue gel
  • Two corpse fingers (learn how to make them here)
  • Two decomposing fingers (learn how to make them here)
  • Two severed fingers (learn how to make them here)
  • One 18” x 18” square of white fabric
  • Four tablespoons of black tea (e.g. Darjeeling, Earl Gary, English Breakfast)
  • One pan large enough to soak the fabric
  • One 4 oz. bottle of all-purpose tacky glue*
  • One yard of brown twine
1. Thoroughly wash and dry the jars. If there is any sticker residue, use rubbing alcohol to remove it (soak a paper towel in the solution, let it sit over the area for a few minutes, and wipe away the remaining glue). After cleaning the jars, roughen their surfaces with coarse sandpaper to help the paint adhere.
2. Give the jars a grimy appearance by watering down brown paint and brushing it over their exteriors (you can also use a spray bottle for the application). Allow the mixture to sit for a few minutes and then wipe it clean. You may want to experiment with the consistency prior to doing this: the more water you add, the fainter/lighter the wash; the less water you add, the deeper/darker the wash. Continue the process until you reach the level of distress you desire.
3. Complete the aged patina by applying a flecking of black paint. You can do this by either quickly flicking a paintbrush or using an old toothbrush and strumming your finger across the bristles. Since this process flings paint everywhere, it’s best to perform it outside. If you plan to display the props outdoors for an extended period of time, consider applying a sealer to prevent the weather from damaging the paint.
4. Glue cockroaches to the jars’ bottoms and sides. As you do so, try not to over think your application, since a random pattern produces the best results. NOTE: The particular cockroaches I used were made with a slick plastic which did not adhere to hot glue. As a result, I used superglue gel to affix them to the glass.
5. Evenly divide the fingers and place them inside the jars, positioning them so they are as visible as possible. You can also glue cockroaches to their surfaces for extra creepiness. Although I paired them together (two corpse fingers in one jar, two decomposing fingers in another, and two severed fingers in the last), you can mix them up for more visual interest.
6. Boil enough water to completely submerge the fabric and pour it into the pan. Add the tea. The longer you allow the tea to brew, the darker the stain will become. Likewise, greater amounts of tea will produce a richer stain. Submerge the cloth in the tea mixture and soak it until it reaches the color you desire. I soaked mine for four days and scattered the tea leaves over the top of the fabric to add spots. Remove the cloth from the water and allow it to dry. Once it has dried, cut the fabric into three 6” x 6” squares, center them on the openings of the jars, and glue them in place.
7. Cut the twine into three twelve-inch sections, wrap the mouths of the jars with it, and knot the ends. Also, shred the edges of the cloth to create a messy and uneven appearance.
8. To make the fabric look even dirtier, water down brown paint and brush it over the cloth. Akin to step two, you might want to play with the mixture before applying it to the props.
9. Using a sharp pair of scissors, rip holes in the tops of the cloth and glue cockroaches to the openings and along the exterior of the jars to make it appear they are swarming the containers.
10. The props can be enhanced further with additional details to cater them to your haunt’s needs, such as tea-stained labels or strands of voodoo beads.
*You will not use the entire bottle’s content for this project.

Friday, December 9, 2022

"Raising the Devil" (A Poem)

For clergyman Richard Harris Barham, poetry became a means to mock the Devil and the writer often depicted the figure as a buffoon or a mild threat which was more ludicrous than dangerous. In “Raising the Devil,” a youth attempts to summon the dark entity and is met with only disappointment and an empty purse.[1]
 
'And hast thou nerve enough?' he said,
That Grey old Man, above whose head
Unnumber'd years had roll'd,—
'And hast thou nerve to view,' he cried,
'The incarnate Fiend that Heaven defied!
— Art thou indeed so bold?'
 
'Say, canst Thou, with unshrinking gaze,
Sustain, rash youth, the withering blaze
Of that unearthly eye,
That blasts where'er it lights,— the breath
That, like the Simoom, scatters death
On all that yet can die!
 
—'Darest thou confront that fearful form,
That rides the whirlwind, and the storm,
In wild unholy revel!
The terrors of that blasted brow,
Archangel's once,— though ruin'd now —
— Ay,— dar'st thou face THE DEVIL?'—
 
'I dare!' the desperate Youth replied,
And placed him by that Old Man's side,
In fierce and frantic glee,
Unblench'd his cheek, and firm his limb
—'No paltry juggling Fiend, but HIM!
— THE DEVIL!— I fain would see!—
 
'In all his Gorgon terrors clad,
His worst, his fellest shape!' the Lad
Rejoined in reckless tone.—
—'Have then thy wish!' Agrippa said,
And sigh'd and shook his hoary head,
With many a bitter groan.
 
He drew the mystic circle's bound,
With skull and cross-bones fenc'd around;
He traced full many a sigil there;
He mutter'd many a backward pray'r,
That sounded like a curse—
'He comes!'— he cried with wild grimace,
'The fellest of Apollyon's race!'—
— Then in his startled pupil's face
He dash'd — an EMPTY PURSE!![2]
 
Works Referenced
 
Barham, Richard Harris. “Raising the Devil: A Legend of Cornelius Agrippa.” The Ingoldsby Legends or Mirth and Marvels. London: Richard Bentley and Son, 1885. 166.
 
Bartles, Sarah. The Devil and the Victorians: Supernatural Evil in Nineteenth-Century English Culture. London: Routledge, 2021.
____________________
[1] Bartles, 206.
[2] Barham, 166.

Friday, December 2, 2022

Patient Charts

$15 - $20 (based on 2020 prices)
Makes sixteen charts
 
I liked how the ghost photographs for my office’s annual decorating competition turned out when I made them in 2018, so I decided to expand the project to create over a dozen patient charts to stock the mad scientist’s laboratory. I initially intended to scatter them among the containers of body parts and towers of equipment; however, after covering the walls in newspapers, I elected to pin the charts to the walls instead.
  • Thirteen sheets of cream-colored copy paper
  • Thirteen sheets of brown cardstock
  • One 4 oz. bottle of all-purpose tacky glue
  • Sixteen sheets of 8” x 11.5” gray copy paper with triages printed on them
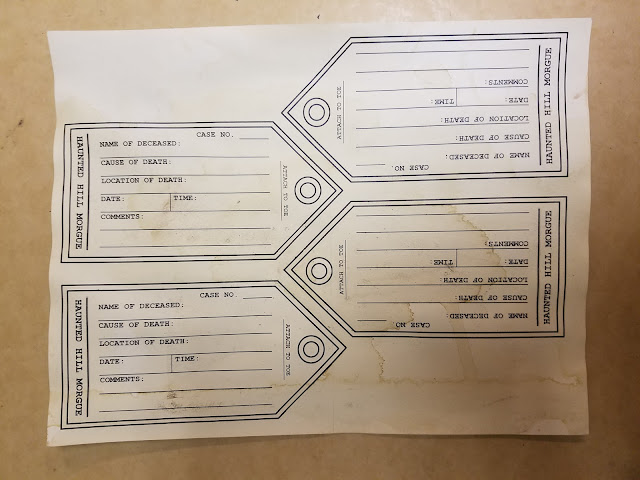
  • Two sheets of 8” x 11.5” white cardstock with toe tags printed on them
  • At least four tablespoons of dark roasted coffee grounds
  • One pan large enough to soak the cardstock, copy paper, and photographs
  • Sixteen Manila file folder
  • One 10 oz. can of interior/exterior, fast-drying spray paint in flat black*
  • One 10 oz. can of interior/exterior, fast-drying spray paint in flat brown*
  • One 10 oz. can of interior/exterior, fast-drying spray paint in flat green*
  • Fifty metal paperclips
  • Eight 1.5-inch T-pins
  • One 2 oz. bottle of acrylic paint in glossy red*
1. Gather a collection of fifty-two vintage photographs from the internet, print them on the cream-colored paper, and cut them out. For visual interest, I selected an assortment of nineteenth-century female and male mugshots to serve as the patients and a variety of medical images to accompany them. To save paper and provide the photographic scale I desired, I printed four images per page.
2. Cut backings for the photographs from the brown cardstock and adhere the two elements together. For aesthetic purposes, I fashioned a quarter-inch border and rounded the corners.
3. Boil roughly twelve cups of water and add the coffee. The longer you allow the coffee to brew, the darker the stain will become. Likewise, greater amounts of coffee will produce a richer stain. Since I wanted uneven spots rather than a unified discoloration, I placed about three triages and seventeen photographs at a time on a baking sheet, splashed coffee and grounds onto their surfaces, allowed the liquid to sit for a few minutes, and then moved them to a large space to dry. Although this process took a while, it provided an interesting aging effect that greatly enhanced the prop.
4. As the photographs and triages dry, repeat step three with the toe tags, boiling a strong pot of coffee, spreading the cardstock across the baking sheet, and splashing its surface with the coffee and grounds. Here, too, working with just one or two sheets at a time produces the best results.
5. Cut out the toe tags, complete them to correspond with the information on the triages, and then distress their surface with sandpaper, creating frayed edges and tears. You can also use olive or vegetable oil for more stains (rub the oil onto the tips of your fingers and gently pat them on random spots across the paper’s surface).
6. In a well-ventilated area, open the folders and spread them across a newspaper-lined surface. Then, give both sides a light dusting of black, brown, and green spray paint, concentrating the colors along the edges.
7. Assemble the charts, adding a triage and patient photograph to every folder and clipping the medical images and toe tags to the appropriate files. For visual interest, I used paper clips to attached the photographs and triages and T-pins to skewer the toe tags (glue everything in place to prevent the props from falling apart).
8. To enhance the folders, use a lighter to burn their edges (do this in a well-ventilated area and near either a sink or pan of water), create bloody drips and handprints with the glossy red paint, and stamp confidential on the triages (you can purchase one of these stamps at an office supply store).
9. Since they were hung on walls, I did not want anything too significant protruding from them; however, if you plan to display these on a desk or atop piles of books and papers, you can add more significant details like rotten teeth, strands of fake hair, or other mementos.
*You will not use the entire bottle’s content for this project.