$15 - $20 (based on 2020 prices)
Makes sixteen charts
I liked how the ghost photographs for my office’s annual decorating competition turned out when I made them in 2018, so I decided to expand the project to create over a dozen patient charts to stock the mad scientist’s laboratory. I initially intended to scatter them among the containers of body parts and towers of equipment; however, after covering the walls in newspapers, I elected to pin the charts to the walls instead.
- Thirteen sheets of cream-colored copy paper
- Thirteen sheets of brown cardstock
- One 4 oz. bottle of all-purpose tacky glue
- Sixteen sheets of 8” x 11.5” gray copy paper with triages printed on them
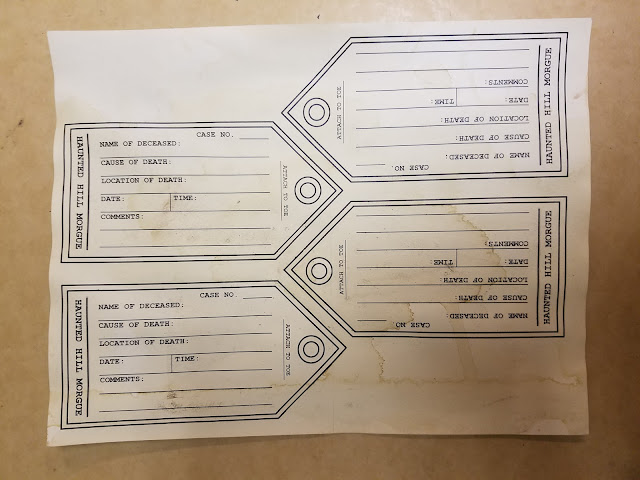
- Two sheets of 8” x 11.5” white cardstock with toe tags printed on them
- At least four tablespoons of dark roasted coffee grounds
- One pan large enough to soak the cardstock, copy paper, and photographs
- Sixteen Manila file folder
- One 10 oz. can of interior/exterior, fast-drying spray paint in flat black*
- One 10 oz. can of interior/exterior, fast-drying spray paint in flat brown*
- One 10 oz. can of interior/exterior, fast-drying spray paint in flat green*
- Fifty metal paperclips
- Eight 1.5-inch T-pins
- One 2 oz. bottle of acrylic paint in glossy red*
1. Gather a collection of fifty-two vintage photographs from the internet, print them on the cream-colored paper, and cut them out. For visual interest, I selected an assortment of nineteenth-century female and male mugshots to serve as the patients and a variety of medical images to accompany them. To save paper and provide the photographic scale I desired, I printed four images per page.
2. Cut backings for the photographs from the brown cardstock and adhere the two elements together. For aesthetic purposes, I fashioned a quarter-inch border and rounded the corners.
3. Boil roughly twelve cups of water and add the coffee. The longer you allow the coffee to brew, the darker the stain will become. Likewise, greater amounts of coffee will produce a richer stain. Since I wanted uneven spots rather than a unified discoloration, I placed about three triages and seventeen photographs at a time on a baking sheet, splashed coffee and grounds onto their surfaces, allowed the liquid to sit for a few minutes, and then moved them to a large space to dry. Although this process took a while, it provided an interesting aging effect that greatly enhanced the prop.
4. As the photographs and triages dry, repeat step three with the toe tags, boiling a strong pot of coffee, spreading the cardstock across the baking sheet, and splashing its surface with the coffee and grounds. Here, too, working with just one or two sheets at a time produces the best results.
5. Cut out the toe tags, complete them to correspond with the information on the triages, and then distress their surface with sandpaper, creating frayed edges and tears. You can also use olive or vegetable oil for more stains (rub the oil onto the tips of your fingers and gently pat them on random spots across the paper’s surface).
6. In a well-ventilated area, open the folders and spread them across a newspaper-lined surface. Then, give both sides a light dusting of black, brown, and green spray paint, concentrating the colors along the edges.
7. Assemble the charts, adding a triage and patient photograph to every folder and clipping the medical images and toe tags to the appropriate files. For visual interest, I used paper clips to attached the photographs and triages and T-pins to skewer the toe tags (glue everything in place to prevent the props from falling apart).
8. To enhance the folders, use a lighter to burn their edges (do this in a well-ventilated area and near either a sink or pan of water), create bloody drips and handprints with the glossy red paint, and stamp confidential on the triages (you can purchase one of these stamps at an office supply store).
9. Since they were hung on walls, I did not want anything too significant protruding from them; however, if you plan to display these on a desk or atop piles of books and papers, you can add more significant details like rotten teeth, strands of fake hair, or other mementos.
*You will not use the entire bottle’s content for this project.


No comments:
Post a Comment