Friday, July 28, 2023

Human Sacrifices of the Moche: A Mini-Essay

     As Jan Bremmer explains, the minimization of emotional and financial burdens is a primary focus for the civilizations that practice human sacrifices, with the society striving to reduce the number of victims whose deaths would cause extended periods of grief and negatively impact daily functions. Hence, most civilizations, Bremmer claims, tackle this concern in one of two ways: victims from the community are either extremely old or gathered from the outside in the forms or war captives or slaves.[1] A prime example of this is the warrior society of the Moche who thrived along the Peruvian coast between 200 C.E. and 750 C.E. and became known for their complex sacrifices of conquered soldiers.[2] During the practice, captives were stripped and brought before a panel of priests wearing anthropozoomorphic masks who slit the victim's throat, poured their blood into a cup, and distributed the container among attendants to drink (some depictions on Moche pottery also show the victim being dismembered).[3] In fact, some portrayals of the event show women, sporting long braided tresses, participated in the practice by carrying the goblet that housed the victim's blood.[4] As Steve Bourget contends, though, much of our modern understanding of the Moche's human sacrifices are limited to interpretations of archeological evidence, which means the full story has been lost with time and what is known is an educated guess cobbled together by archeological discoveries.[5]
 
Works Referenced
 
Benson, Elizabeth. "Iconography Meets Archaeology." The Art and Archaeology of the Moche: An Ancient Andean Society of the Peruvian North Coast. Eds. Steve Bourget and Kimberly Jones. Austin, TX: University of Texas Press, 2008. 1-22. 
 
Bourget, Steve. Sacrifice, Violence, and Ideology Among the Moche: The Rise of Social Complexity in Ancient Peru. Austin, TX: University of Texas Press, 2016.
 
Bremmer, Jan. "Human Sacrifice: A Brief Introduction." The Strange World of Human Sacrifice. Ed. Jan Bremmer. Paris: Peeters, 2007. 1-8.
 
Bruhns, Karen Olsen, and Karen Stothert. Women in Ancient America. Norman, OK: University of Oklahoma Press, 1999.
 
MacGregor, Neil. A History of the World in 100 Objects. New York: Viking, 2011. 
____________________
[1] Bremmer, 3-4.
[2] MacGregor, 307-312.
[3] Benson, 11.
[4] Bruhns and Stothert, 183.
[5] Bourget, 6.

Friday, July 21, 2023

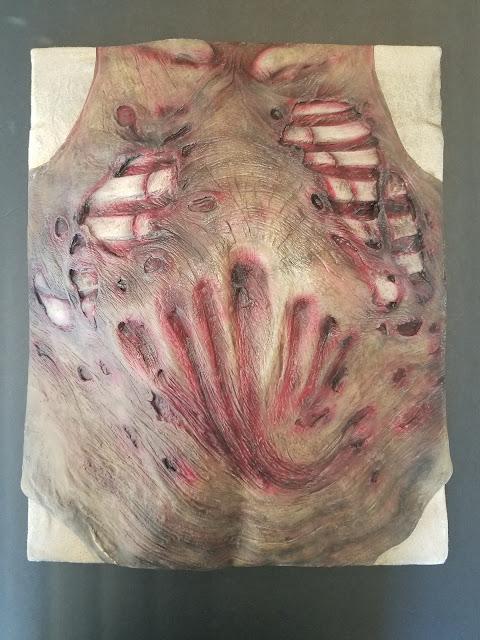
Framed Torso

$40 - $50 (based on 2020 prices)
Makes one frame 
 
To accompany props like the skinned lab monster, I built this framed torso to hang in the laboratory and add to the mad scientist’s bevy of maniacal experiments. Since the latex chest plate proved rather expensive, I reduced the prop’s costs by purchasing the frame from a secondhand store, salvaging an old shipping box, and using two large scraps of white fabric leftover from previous builds. 
  • One 16” x 20” picture frame
  • One 10 oz. can of interior/exterior, fast-drying spray paint in flat black*
  • One 10 oz. can of interior/exterior, fast-drying spray paint in flat brown*
  • One 10 oz. can of interior/exterior, fast-drying spray paint in metallic silver*
  • One 2 oz. bottle of acrylic paint in flat black*
  • One 2 oz. bottle of acrylic paint in flat brown*
  • Two to three yards of white fabric
  • At least four tablespoons of dark roasted coffee grounds
  • One pan large enough to soak the cloth
  • One 4 oz. bottle of all-purpose tacky glue*
  • One cardboard box (roughly 7” x 5” x 3”)
  • One latex chest plate
  • Three to four yards of twine
  • One 0.3 fluid ounce bottle of red food coloring*
  • One 4 oz. bottle of clear, all-purpose tacky glue gel*
1. Remove the backing and any glass from the frame and, on a newspaper-lined surface in a well-ventilated area, apply two even coats of silver spray paint. Although I used two coats, you may want more or less depending on your desired coverage.
2. To give the frame a filthy appearance, water down brown paint and brush it over the surface, ensuring the liquid settles into all the fissures (you can also use a spray bottle for the application). Allow the mixture to sit for a few minutes and then wipe it clean. You may want to experiment with the consistency prior to doing this: the more water you add, the fainter/lighter the wash; the less water you add, the deeper/darker the wash. Once you have achieved the look you desire, apply a slight flecking of black paint. You can do this by either quickly flicking a paintbrush or using an old toothbrush and strumming your finger across the bristles. Since this process flings paint everywhere, it’s best to perform it outside.
3. Boil enough water to completely submerge the cloth and pour it into the pan. Add the coffee. The longer you allow the coffee to brew, the darker the stain will become. Likewise, greater amounts of coffee will produce a richer stain. Submerge the fabric in the coffee mixture and soak it until it reaches the color you desire. I soaked mine for eight hours (long enough to give it a slight tint) and scattered the coffee grounds over the top to add spots. Remove the cloth from the water and allow it to dry.
4. Trim the fabric to 18” x 22”, stretch it across the frame’s backing, and glue it in place. I found it works best to glue one side to serve as an anchor and then work the fabric from there, ensuring the surface is as smooth as possible. Although I gave myself a one-inch border to work with, you may want to leave additional fabric to give you more leeway.
5. To add a uniform level of age and distress, dust the fabric with a light coat of black and brown spray paint. You can also apply a flecking of black paint and smears of brown to enhance the weathered appearance.
6. Determine where you want the chest to sit on the backing and position the box where the sternum will be. Then, glue it in that spot. This will serve as support for the chest plate to prevent it from drooping.
7. Remove the elastic band from the chest plate, position it over the box so its sternum rests along the center, and glue it in place. For visual appeal, you can create jagged edges along the plate to make it appear as though it was haphazardly cut from the body.
8. Thread the twine through the chest. You want to give the illusion that it is lashed to the backing with the strands. Do not overthink your process (a chaotic web of strings will only enhance the creepiness). I found a darning needle works best, since the latex is too thick for a regular needle.
9. Reattach the frame to the backing and, for added support, glue it down. Depending on the chest’s position, you may need to trim portions of it to allow the frame to sit securely on the backing.
10. In a plastic container (because the food coloring will stain, use something disposable or that you won’t mind dying), pour in your desired amount of clear glue gel and slowly add red food coloring to the solution until it achieves the sanguine hue you desire. To give the blood further density, add blue food coloring and mix well.
11. Apply the blood glue to the prop. You can use an old spoon or plastic utensil to strategically dribble the liquid along chosen areas (around the edges of chest) or pour it haphazardly for a gory mess.
12. If the frame did not come with a hanging hook, you can attach a store-bought version or fashion your own with steel wire. Also, the prop can be enhanced with additional details, like swarms of maggots or a specimen tag, to cater it to your haunt’s theme.
*You will not use the entire bottle’s content for this project.

Friday, July 14, 2023

"Betrayed" (A Poem)

In “The Death Potion,” Lizette Woodworth Reese explores the role of the jilted lover, telling a tale where the narrator creates a potion to take the life of the woman who stole her beloved. In “Betrayed,” the author continues the theme, calling upon Death to console her broken heart. 
 
She is false, O Death, she is fair!
Let me hide my head on thy knee;
Blind mine eyes, dull mine ears, O Death!
She hath broken my heart for me!
 
Give me a perfect dream;
Find me a rare, dim place;
But let not her voice come nigh,
And keep out her face – her face![1] 
 
Works Referenced 
 
Reese, Lizette Woodworth. “Betrayed.” A Handful of Lavender. Boston, MA: Houghton, Mufflin, and Company, 1891. 11
____________________
[1] Reese, 11.

Friday, July 7, 2023

Heart Tray

$15 - $20 (based on 2020 prices)
Makes one tray 
 
I wanted to litter the laboratory of 2020’s haunt with trays of fresh medical experiments, so I made three versions: one with a brain, another with a face, and a third with a heart. This variation – the one with the heart – incorporated the old pill bottles and bloody syringes used for many of the haunt’s props to create a unified theme.
  • One 9” x 13” metal baking sheet
  • One 10 oz. can of interior/exterior, fast-drying spray paint in metallic silver*
  • One plastic syringe
  • One plastic prescription bottle
  • One 8 oz. can of oil-based interior wood stain in Jacobean*
  • One 8 oz. can of oil-based interior wood stain in red chestnut*
  • One plastic heart
  • One pair of metal scissors
  • One pair of silver tweezers
  • Two crochet hooks
  • One 0.3 fluid ounce bottle of red food coloring*
  • One 4 oz. bottle of clear, all-purpose tacky glue gel*
  • Six cotton swabs
  • Two 1.5-inch T-pins
1. Thoroughly wash and dry the tray. If there is any sticker residue, use rubbing alcohol to remove it (soak a paper towel in the solution, let it sit over the area for a few minutes, and wipe away the remaining glue). After cleaning the tray, roughen its surfaces with coarse sandpaper to help the paint adhere and then give the tray one or two even coats of metallic silver spray paint. This step is entirely optional; however, if the tray has a non-stick coating, you want to cover it so the blood has something to firmly adhere to (otherwise, it will peel off after drying).
2. On a newspaper-lined surface in a well-ventilated area, paint the syringe and prescription bottle with the Jacobean wood stain. I discovered that applying a thin coat and patting it with paper towels produces a hazed appearance. Then, dab their surfaces with the red chestnut wood stain to create spots of dried blood.
3. Position the heart, prescription bottle, scissors, syringe, and tweezers on the tray and glue them in place. You can arrange the items however you like and can substitute the scissors or tweezers for other types of medical-looking instruments. For the best hold, I highly recommend using superglue for all of these elements.
4. Cut two holes into the top of the heart and insert the crochet hooks into the openings, gluing them in place. Akin to step three, you can replace these items with other surgical tools like forceps or scalpels to cater the prop to your haunt’s needs.
5. In a plastic container (because the food coloring will stain, use something disposable or that you won’t mind dying), pour in your desired amount of clear glue gel and slowly add red food coloring to the solution until it achieves the sanguine hue you desire. To give the blood further density, add blue food coloring and mix well.
6. Apply the blood glue to the prop and allow it to fully dry. You can use an old spoon or plastic utensil to strategically dribble the liquid along chosen areas or pour it haphazardly for a gory mess. During this step, add cotton swabs and T-pins to the sanguine pool for extra detail.
7. Depending on your haunt’s theme, you can embellish the prop further with swarms of maggots crawling across the heart’s surface or attach a specimen tag to the tray’s side.
*You will not use the entire bottle’s content for this project.