$40 - $50 (based on 2016 prices)
Makes three posts
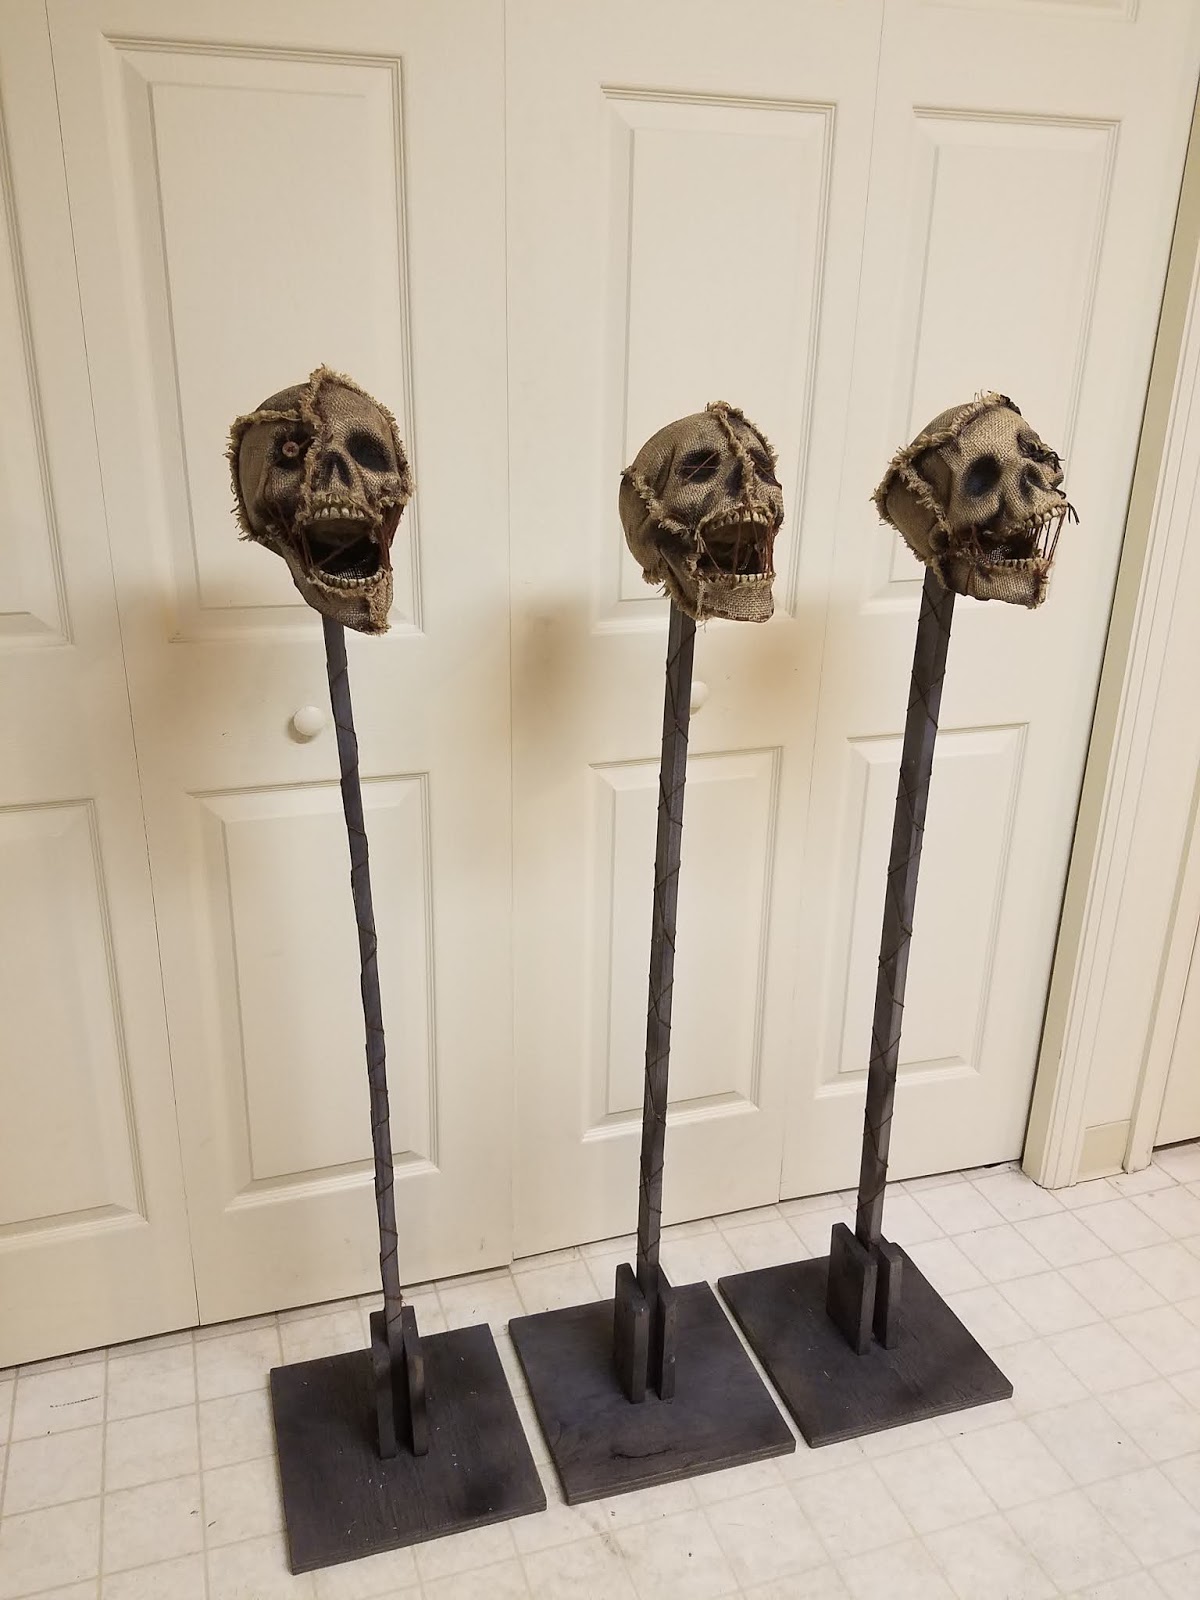
Like every haunt, I begin the process with grand ambitions that the realities of energy, money, and time slowly reduce. For 2016’s haunted farm, I wanted to create dozens of these skull posts to line the walkways; however, because props such as the fake corn stalks, rotten pumpkins, and scarecrow consumed excessive amounts of time, my goals were reduced to three, which were scattered randomly throughout the haunt as accents. Despite this factor, these props became one of my favorite builds and have remained with me since the farm – even though I have no intentions of reusing them (they haven’t fit in any other theme since 2016).
- Three human-size plastic skulls
- Two to three yards of burlap
- One 4 oz. bottle of clear, all-purpose tacky glue*
- Four to five yards of twine
- One 2 oz. bottle of acrylic paint in flat black*
- One 8 oz. can of oil-based interior wood stain in Jacobean*
- Three plastic spiders
- Six buttons
- Two 1” x 2” x 8’ wooden posts
- One 2’ x 2’ square board
- One 1” x 4” x 8’ wooden board
- Fifteen sturdy wood screws
- One 8 oz. bottle of wood glue*
- One 8 oz. can of oil-based interior wood stain in Classic Gray*
- One 10 oz. cans of interior/exterior, fast-drying spray paint in flat black*
1. Remove the mandibles from the skulls and hot glue them agape to create screaming faces. To aid the process, use a sturdy object – a glass jar or tin can – to support the skulls as the glue dries. You may need to apply multiple coats to ensure a firm hold.
2. Cut a square of fabric from the burlap, cover an area on the skull with glue, and press the cloth down to conform to the item’s contours. Leave about a one-inch boarder free for the following step. Repeat the process until all three skulls are covered in patches of burlap.
3. Once the glue has fully dried, sew the patches’ boarders together with the twine. While I found one inch enough, you may want to leave additional fabric during the previous step to give you more to work with.
4. Trim and fray the seams. I found that a sheet of sandpaper helped create the level of distress I wanted.
5. Smudge black paint along the seams and within the eyes and noses to give the skulls a smoky appearance. You may want to experiment with a scrap of burlap before applying the paint to the fabric.
6. On a newspaper-lined surface in a well-ventilated area, age the teeth and any other exposed bone with wood stain. I began by giving each one a light, even coat with a foam brush. After that, I applied heavy amounts of stain and patted away the excess with paper towels. You want the color to build up in the cracks and fissures. Although you may use whatever color of stain you desire, I chose Jacobean because it gives the items a rotted appearance. Once you have achieved your intended look, allow the skulls to dry. I let mine sit outside in the sun for three days. To save time, I only stained the exposed areas; however, you could stain all of the skulls before beginning step two.
7. Detail the skulls by threading twine across the openings of their eyes and mouths, attaching random buttons or gluing clusters of insects to their surfaces. You can aim for a more uniform appearance by applying the same embellishments to each or, as I did, make each one unique.
8. Measure, mark, and cut both of the 1” x 2” x 8’ posts into four four-foot sections and smooth their surfaces with sandpaper. This will form poles on which the heads will rest. Depending on your preferred height for the props, you may cut these posts longer or shorter. Since I wanted something manageable, I elected for four feet.
9. Measure, mark, and cut the 2’ x 2’ square board into four 1’ x 1’ sections and smooth their surfaces with sandpaper. This will form the bases for the posts. Akin to the poles, you may make these larger or smaller based on your haunt’s needs.
10. Measure, mark, and cut the 1” x 4” x 8’ board into six six-inch sections and smooth their surfaces with sandpaper. This will form the supports for the posts. Similar to the bases and poles, you can adjust their sizes to fit your desired dimensions.
11. Measure, mark, and predrill a hole in the center of each 1’ x 1’ board and do the same for one end of each post. Once this is done, use a sturdy wood screw to join the pieces together. For added support, apply a modest coat of wood glue to the posts before connecting them to the boards.
12. Measure, mark, and predrill two holes in the center of each six-inch board and perform the same task on both sides of the posts, ensuring the holes match up. Using wood screws, join all the pieces together. For added support, apply a modest coat of wood glue to the post and base before connecting the supports.
13. On a newspaper-lined surface in a well-ventilated area, stain the wooden frames with Classic Gray wood stain. You want the props to appear worn, so do not worry if your coverage is not entirely pristine. Once you have achieved your intended look, allow the frames to completely dry. I let mine sit outside in the sun for three days. After the stain dries, complete the weathering process by dusting the frames with a coat of black spray paint.
14. Wrap twine around the posts. I discovered that starting at the base and working upward works best. Try not to overthink the patterns. A more haphazard design will look scarier. To help the string remain adhered to the wood, glue portions at various spot, namely around the corners.
15. Cut an opening in the bottom of each skull and use this to slide the heads onto the tops of the posts. You can glue the items in place, but I left mine detachable for storage purposes.
16. To enhance the props’ visual impact, consider placing LED tea lights in their mouths and using them as lights to line walkways.
*You will not use the entire bottle’s content for this project.


No comments:
Post a Comment