Friday, April 26, 2019

The Anatomical Exploration of Leonardo da Vinci: A Mini-Essay

     There is no question that Leonardo da Vinci was a revolutionary man, from his redoubtable artwork to his drafting of helicopter and submarine prototypes centuries before their actual inventions. In 1503, the great thinker added an additional element to his vast repertoire of innovations: exploration of the human anatomy.[1] Allowed access to the unclaimed corpses at a Florentine hospital, da Vinci began a long process of dissecting and artistically cataloguing the inner workings of the body. It was an arduous and unpleasant task, especially in an era without electric lights and refrigeration, and one which held significant consequences if his surreptitious contract with the hospital was discovered by the Catholic Church and its notorious Inquisition. Because the human body was considered a sacred entity by religious standards, the process of scientifically dismembering and scrutinizing it organs was a blasphemous deed and grounds for trial and persecution.[2] Although da Vinci was no stranger to religious prosecution – in 1476, he was accused of sexual relations with the male prostitute Jacopo Saltarelli – the potential for punishment did not diminish his natural curiosity and the artist utilized his efforts to craft a detailed sketchbook of the human body.[3] In fact, historian Sherwin Nuland reveals that this text, despite it somewhat flawed understandings in comparison to our current medical knowledge, was the first to show anatomy in a purely realistic stance, rather than the diagrammatic and symbolic renditions in centuries prior.[4]

Works Referenced

Friedman, David. A Mind of Its Own: A Cultural History of the Penis. New York: The Free Press, 2001.

Nuland, Sherwin. Leonardo da Vinci. New York: Penguin Books, 2005.

O’Malley, Charles. Introduction. Leonardo on the Human Body. New York: Dover Publications, 1983. 13-35.
____________________ 

[1] O’Malley, 21-24.
[2] O’Malley, 22-23.
[3] Friedman, 59-64.
[4] Nuland, 165-66.

Friday, April 19, 2019

Doll Head Candlestick

$15 - $20 (based on 2017 prices)
Makes one candlestick

While building the pumpkin dolls for 2017’s haunt, I purposefully reserved one of the heads for this project. I had seen several concepts for old dolls used as candle holders and decided to fabricate my own version to incorporate into the theme. Since using fire in a haunt is never a wise idea, I substituted a real candle with an LED one.
  • One candlestick
  • One 10 oz. can of interior/exterior, fast-drying spray paint in metallic silver
  • One small vinyl doll head
  • One 2 oz. bottle of acrylic paint in flat black*
  • One 2 oz. bottle of acrylic paint in flat brown*
  • One 2 oz. bottle of acrylic paint in flat gray*
  • One 2 oz. bottle of acrylic paint in steel gray*
  • One 2 oz. bottle of acrylic paint in hot cocoa*
  • One 2 oz. bottle of acrylic paint in flat red*
  • One 8 oz. bottle of wood glue*
  • One battery-operated LED candle
  • One hot glue gun and glue sticks
  • One 0.44 oz. bottle of clear nail polish*
1. On a newspaper-lined surface in a well-ventilated area, apply a few even coats of metallic spray paint to the candlestick. I used two, but you may apply more or less depending on your desired coverage. If you use a glass holder, roughen its surface with sandpaper to help the spray paint adhere.
2. Use a brush with splayed bristles to create an aging effect around the base and stem of the holder. I found that working from dark to light (i.e. black to steel gray to flat gray) produces the best results.
3. Insert the LED candle into the candlestick and use a permanent marker to indicate where the top of the holder rests. This will serve as a guide for the process in step five.
4. On a newspaper-lined surface in a well-ventilated area, crackle paint the doll’s head. To do this, begin with a base coat of black paint and, once that has dried, use a thick brush to smear a smattering of wood glue onto the prop. Try not to over think your application (a random pattern produces the best results). Let the glue sit for a minute to become tacky and then cover the head with a coat of hot cocoa paint. As the glue and paint dry, they will form cracks. To further the aging process, give the prop a light smudging of brown paint to simulate dirt. If you want an additional level of creepiness, sew the doll’s eyes and mouth with black thread.
5. Use a sharp knife to cut a hole in the top of the head large enough to accommodate the candle. You may have to gradually trim the opening until the candle passes easily through it. Once this is done, feed the candle through the hole and ensure the base of the head sits flush with the mark from step three.
6. Using hot glue, give the candle extra girth by building up layers and piping drips of wax down the sides and onto the head. I found that pumping the glue along the top of the candle and allowing it to naturally run downward creates the best results.
7. Apply three coats of red paint to the candle. I used three because I wanted a deep, vibrant red to contrast with the dull blacks and browns of the head. You, of course, are free to use fewer (or more) coats based on your chosen appearance for the prop.
8. To make the candle look waxy, cover the red paint with a layer of clear nail polish. If you want the candle to seem old and unused rather than freshly melted, do not add the nail polish, but give the candle a light brushing of brown paint to mimic dust.
9. Insert the remaining portion of the LED candle into the holder. Since the prop separates at this junction, you can easily access the on/off switch and battery compartment.
*You will not use the entire bottle’s content for this project.

Friday, April 12, 2019

“A Baby’s Cradle with No Baby in It” (A Poem)

In 1893, the British poetess Christina Rossetti released an illustrated collection of rhymes focused on the wonders of childbirth and infant rearing. Like so many versions before and after it, Rossetti’s text is filled with tender depictions of children and romanticized presentations of parenthood. Unlike many of its peers, the work also presents darker entries which explore the pains of loss. Two such pieces, “Baby Lies So Fast Asleep” and “A Baby’s Cradle with No Baby in It,” comment on the high infant mortality rate which marred Victorian society and present a poignant glimpse into the era’s mourning process.

A baby’s cradle with no baby in it,
A baby’s grave where autumn leaves drop sere;
The sweet soul gathered home to Paradise,
The body waiting here.[1]

Works Referenced

Rossetti, Christina. “A Baby’s Cradle with No Baby in It.” Sing-Song: A Nursery Rhyme Book. London. MacMillan and Company, 1893. 15.
____________________ 
[1] Rossetti, 15.

Friday, April 5, 2019

“Dolly” Mask

$10 - $15 (based on 2017 prices)
Makes one mask

I normally craft my own mask and costume for each haunt to correspond with the theme. Working on a haunted house in 2017 presented me with the opportunity to costume not only myself, but a collection of scare-actors. To achieve this, I made several doll masks for each one to wear and help unify the motif.
  • One plastic doll mask
  • One 2 oz. bottle of acrylic paint in au natural*
  • One 2 oz. bottle of acrylic paint in flat black*
  • One 2 oz. bottle of acrylic paint in cherry cobbler*
  • One 2 oz. bottle of acrylic paint in flat gray*
  • One 2 oz. bottle of acrylic paint in spice brown*
  • One 2 oz. bottle of acrylic paint in steel gray*
  • One yard of brown yarn
  • One yard of burlap
  • One 4 oz. bottle of all-purpose tacky glue*
1. On a newspaper-lined surface in a well-ventilated area, give the mask three coats of gray paint. I used three coats, but you may want more or less depending on your desired coverage.
2. Detail the mask by building up layers of smudged steel gray, au natural, and spice brown paint around the eyes, mouth, nose, and along the edges of the cracks. To enhance the mask’s visual impact, move from light to dark. Finish the initial painting process by applying a flecking of black. You can do this by either quickly flicking a paintbrush or using an old toothbrush and strumming your finger across the bristles. Since this process flings paint everywhere, it’s best to perform it outside.
3. Accentuate the features with black paint. You want to trace the lines of the cracks. If the mask you purchased has preformed marks in it, use these as a starting point to create your own patterns and achieve the amount of breakage you desire.
4. Use a sharp knife to cut the jaw off the mask. For visual interest, create jagged edges. To make this process easier, trace the outline of your cut with a marker first.
5. Using a darning needle, sew the jaw onto the mask with the yarn. You want the needlework to look messy and uneven. Likewise, you do not want the edges to match-up exactly, so skew the jaw and trim portions.
6. Cut a swatch of burlap large enough to cover the back of the mouth area and glue it in place. If you want further detail, distress the fabric with black and brown paint or adhere plastic insects to the cloth so they faintly show through the mouth’s opening.
7. Use cherry cobbler paint to write dolly across the mask’s forehead. You want the wording to be haphazard. To achieve this, exaggerate curves, create sharp points, and elongate certain aspects. You could also write letters backwards and deliberately misspell the word. Keep in mind, though, that the word needs to be readable, so try not to overdo your artistic flairs.
8. If the mask did not come with tie strings, you can fabricate some with extra yarn or replace the existing elastic band with a makeshift twine version for additional creepiness.
*You will not use the entire bottle’s content for this project.

Friday, March 29, 2019

Robert Donston Stephenson and Jack the Ripper: A Mini-Essay

     The true identity of Jack the Ripper has been a subject of debate and controversy since the first victim, Mary Nichols, was found on August 31, 1888. Since then, a ceaseless throng of theories have emerged which propose the infamous killer was everyone from a simple London butcher to Prince Albert Victor, Duke of Clarence and Avondale.[1] One of the more intriguing conjectures comes from William T. Stead, the famed journalist and spiritualist. In the April 1896 issue of his journal Borderland, Stead disclosed that the illustrious serial killer was not a crazed doctor or misogynistic leatherworker, but a writer much like himself and an individual which he knew personally from years of friendship.[2] Although Stead never outwardly named the suspect, members of his closest set understood that he was speaking of Robert Donston Stephenson, also known as Dr. Roslyn D’Onston, who had contributed multiple articles to the Pall Mall Gazette commenting on the Ripper murders.[3] In fact, talk of Stephenson’s identity as the murderer had been circling through his group of acquaintances years before and years after Stead’s claim, with rumors circulating that he possessed a collection of bloody neckties which once held the stolen body parts of his victims.[4] More damning was the fact that Stephenson had been a subject in the case after accusing a doctor at the London Hospital, where he had checked himself in for neurasthenia, of being the notorious killer.[5] Although Stephenson was dismissed as an eccentric artist whose wild claims held no validity, Stead and others familiar with the individual maintained that he had faked his nervous exhaustion and institutionalization as an alibi, slipping out of the London Hospital at night to butcher the prostitutes and using their body parts to engage in black magic rituals.[6] On the morning of April 15, 1912, any truth behind Stead’s assertion was lost as the gentleman, along with 1,522 other individuals, perished during the sinking of Titanic.

Works Referenced

Dimolianis, Spiro. Jack the Ripper and Black Magic: Victorian Conspiracy Theories, Secret Societies and the Supernatural Mystique of the Whitechapel Murders. Jefferson, NC: McFarland and Company, 2011.

Monaghan, David and Nigel Cawthrone. Jack the Ripper’s Secret Confession: The Hidden Testimony of Britain’s First Serial Killer. New York: Skyhorse Publishing, 2010.

Stonewall, Thomas. “Jack the Ripper: A Solution?” The Criminologist 5 (1970): 40-51.
____________________ 

[1] Stonewall, 40-51.
[2] Dimolianis, 107.
[3] Dimolianis, 107.
[4] Monaghan and Cawthrone, 276.
[5] Monaghan and Cawthrone, 277. 
[6] Monaghan and Cawthrone, 227.

Friday, March 22, 2019

Scarecrow

$80 - $100 (based on 2016 prices)
Makes one scarecrow

The crowning prop for 2016’s haunted farm was the massive scarecrow that dominated the display (to this day, it is the largest item I have made). Although I crafted a head for the piece, I was rather dissatisfied with the final result and ended up using a steer skull during the haunt, which gave the scarecrow a satanic tone. After each season, most of my builds are sold or given to friends; however, this prop has remained with me since the farm and, although I have no intentions of reusing it (it hasn’t fit in any other theme since 2016), I thoroughly enjoy its presence and the menacing gaze it gives from its corner in my home office.
  • A whole or partial plastic skeleton
  • One 8 oz. can of oil-based interior wood stain in Jacobean
  • One 8 oz. bottle of wood glue
  • Fifteen sturdy wood screws
  • One 2” x 2” x 8’ wooden post
  • One 1’ x 1’ square board
  • One 1” x 4” x 8’ wooden board
  • One 2’ x 2’ square board
  • One 1” x 2” x 4’ wooden post
  • One 8 oz. can of oil-based interior wood stain in Classic Gray
  • One 10 oz. cans of interior/exterior, fast-drying spray paint in flat black
  • Two sheets of black creepy cloth
  • Two picture hangers with nails
  • Two to three yards of steel wire
  • Two to three yards of jute rope
  • One to two yards of dark brown twine
  • One scarecrow skull (learn how to make it here)
1. On a newspaper-lined surface in a well-ventilated area, stain the bones with Jacobian wood stain. I began by giving each one a light, even coat with a foam brush. After that, I applied heavier amounts of stain to the ends and patted away the excess with paper towels. You want the color to build up in the cracks and fissures. Once you have achieved your intended look, allow the bones to completely dry. I let mine sit outside in the sun for three days.
2. Cut the 2” x 2” x 8’ post into a seven-foot section and smoothen its surface with sandpaper. This will form the portion of the T-shaped stand where the head and torso will rest. Depending on your chosen height for the prop, you may cut this post shorter or keep it the full eight feet. Since I wanted something rather imposing (yet still manageable), I elected for seven feet.
3. Measure, mark, and predrill a hole in the center of a 1’ x 1’ plywood sheet and do the same for one end of the seven-foot post. Once this is done, use a sturdy wood screw to join the pieces together. For added support, apply a modest coat of wood glue to the post before connecting it to the board.
4. Cut two six-inch sections from the 1” x 4” x 8’ wooden board and smoothen their surface with sandpaper. These will serve as braces to support the base and post. Measure, mark, and predrill two holes in the center of each board and perform the same task on both sides of the post, ensuring the holes match up. Repeat the process with the plywood base and the sides of the braces and, using wood screws, join all the pieces together. For added support, apply a modest coat of wood glue to the post and base before connecting the supports.
5. Center the 1’ x 1’ base on a 2’ x 2’ sheet of plywood. Measure, mark, and predrill four holes in each quadrant of the smaller board and perform the same task on the larger board, ensuring that the holes match up. Using wood screws, join the boards together. For added support, apply a modest coat of wood glue to the bottom of the smaller board before connecting it to its larger counterpart.
6. Center a 1” x 2” x 4” post on the seven-foot post six feet up from the base. This will form the portion of the T-shaped form where the shoulders and arms will rest. Akin to the seven-foot section, the length of this post will depend on your desired size of the prop. Once you have measured, marked, and predrilled two holes in the center of the post and performed the same task on the seven-foot post (ensuring the holes match up), use wood screws to join the posts together. For added support, apply a modest coat of wood glue to the back of the smaller post before connecting it to its larger counterpart.
7. On a newspaper-lined surface in a well-ventilated area, stain the wooden frame with Classic Gray wood stain. You want the prop to appear worn, so do not worry if your coverage is not entirely pristine. Once you have achieved your intended look, allow the frame to completely dry. I let mine sit outside in the sun for three days. After the stain dries, complete the weathering process by dusting the frame with a coat of black spray paint.
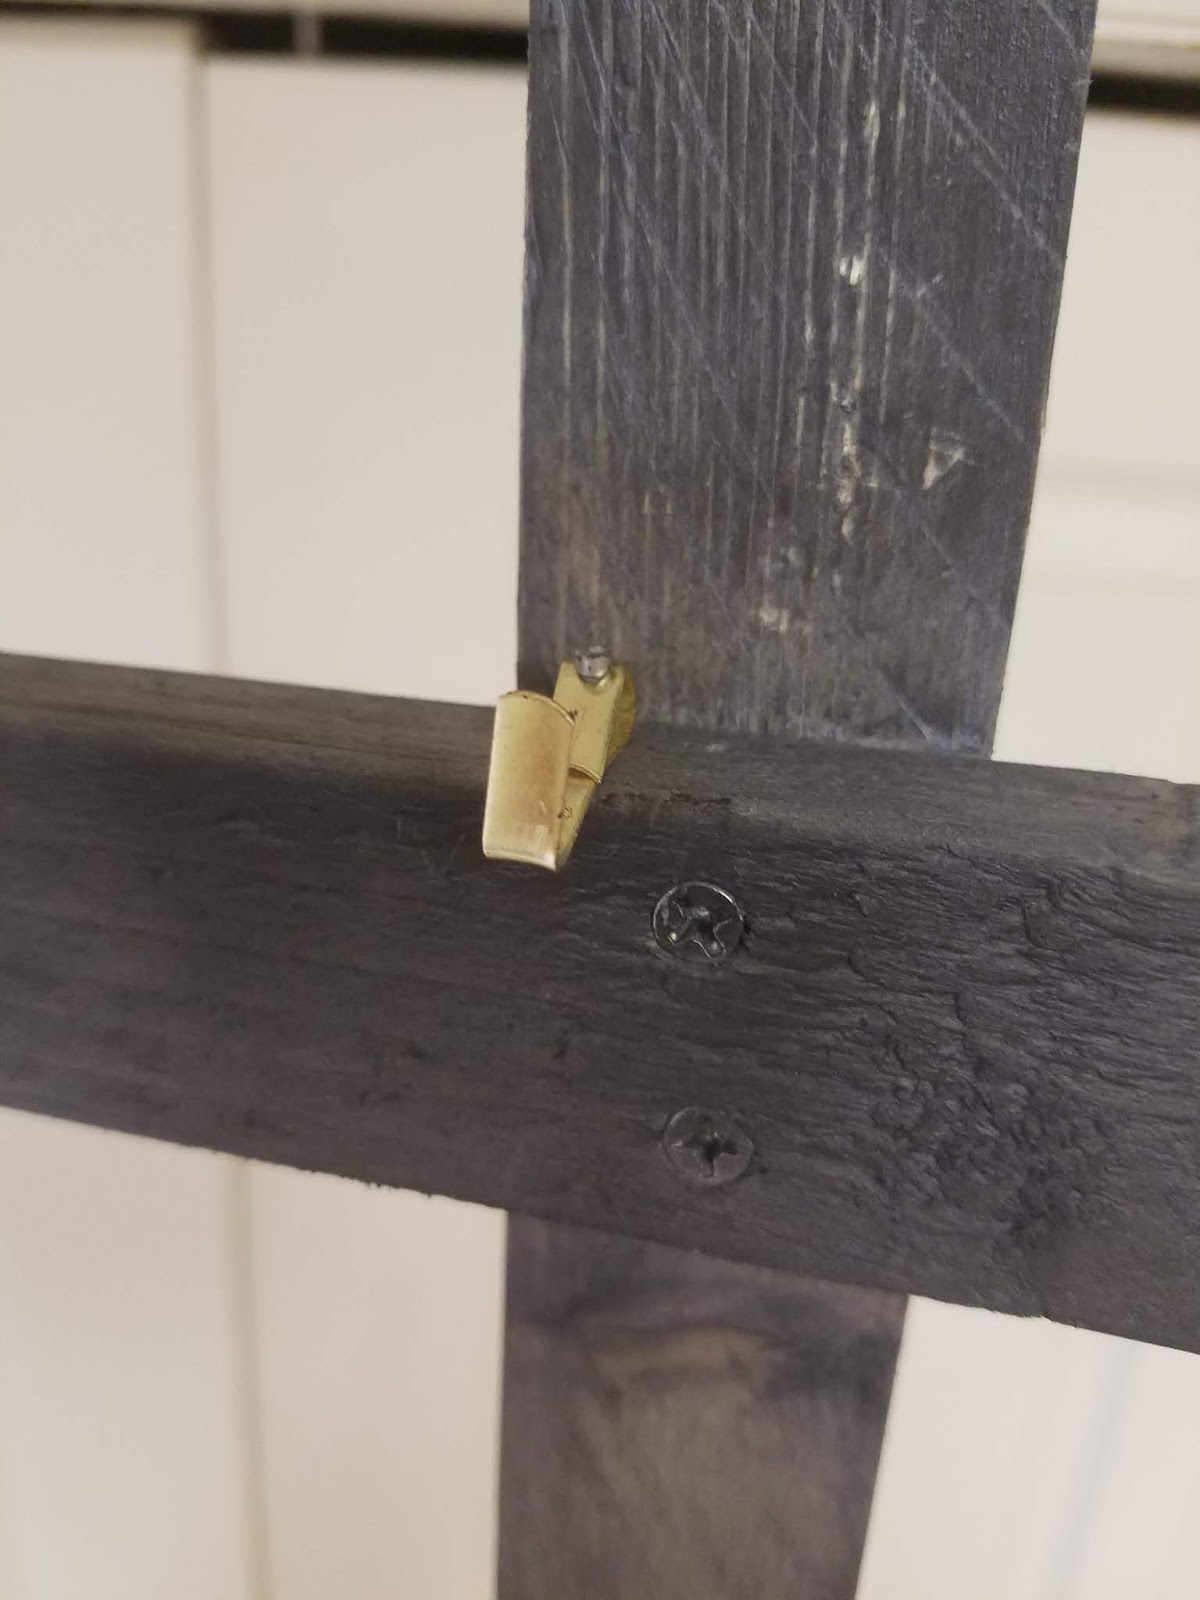
8. Hammer one of the picture hangers in the center of the cross section. This will provide a supporting hook for the skeleton to hang on. Since I used a skeleton made of light plastic, a strong hook was sufficient to hold the prop; however, if you use a heavier body, you will need a tougher item.
9. Glue the creepy cloth along the full length of the four-foot post. Do not aim for a uniform draping (there is nothing scary about that). Rather, vary its length and use a pair of scissors to shape the fabric for a ghastly look.
10. Use the picture hook to hang the spine and secure it to the post with steel wire. You want to do this in several places to ensure the item is properly lashed to the frame and entirely immobile, particularly if you plan to display the prop in windy conditions.
11. Once the spine is completely secured, cover the wires with rope. This will give the illusion the body is primitively lashed to the frame (the wire will hold it in place). Trim the excess and glue the knots to reinforce them.
12. Position the arms along the four-foot post and, once their placement is to your liking, repeat steps ten and eleven to fasten them to the frame and hide the wire with rope.
13. Connect the femurs to the pelvis, gluing the ball into the socket (for a sturdier hold, consider superglue), and situate the bones along the sides of the seven-foot post. As with the arms and spine, use the wire to firmly tie the items in place and mask the steel with rope.
14. Wrap twine around the clavicle of the ribcage and string it up by binding it to the four-foot post. I elected to use twine rather than the rope to give the impression the figure had been piecemealed together. For a more unified look, you can employ the rope for this step.
15. Hammer the second picture hanger into the top of the T-shaped frame. This will provide a supporting hook for the skull to hang on. Here, as well, you may want an industrial version if your head is rather heavy.
16. For further detail, you can affix strands of weathered fabric to the bones, perch disheveled crows on the frame and ribs, wrap razor wire around the legs and torso, or randomly superglue plastic insects along the surface of the entire prop.

Friday, March 15, 2019

Scarecrow Skull

$15 - $20 (based on 2016 prices)
Makes one skull

The crowning prop for 2016’s haunted farm was the massive scarecrow that dominated the display (to this day, it is the largest item I have made). To complete the prop, I made this head; however, I was thoroughly displeased with the final result. Due to this factor, I replaced the head with a steer skull, which gave the scarecrow a demonic appearance, and situated this item among the mound of pumpkins and dried corn by the tub of apples.
  • One human-size plastic skull
  • One yard of tan burlap
  • One 4 oz. bottle of all-purpose tacky glue*
  • One 10 oz. cans of interior/exterior, fast-drying spray paint in nutmeg
  • One 2 oz. bottle of acrylic paint in cherry cobbler*
  • One 0.44 oz. bottle of clear nail polish*
  • Seven fake corn leaves (learn how to make them here)
  • One 1.75 oz. bundle of tan raffia
  • One yard of jute rope
  • Three plastic cockroaches
  • One 2 oz. bottle of acrylic paint in flat black*
  • One 2 oz. bottle of acrylic paint in flat brown*
1. Remove the mandible from the skull and hot glue it agape to create a screaming face. To aid the process, use a sturdy object – a glass jar or tin can – to support the skull as the glue dries. You may need to apply multiple coats to ensure a firm hold.
2. Cut a 2’ x 2’ square of burlap. You want the fabric to be large enough to cover the entire skull with excess around the neck. I found it easier to cut the material slightly larger than I needed to give me additional length for error.
3. Starting at the front of the skull, glue burlap to the prop. I found that this step works best if you move in stages: apply a layer of glue to one section, hold the fabric down until it sticks, and then repeat the process. You may need to apply ample amounts of glue in the eye sockets and nasal cavities to get the fabric to hold their forms.
4. Once the glue has fully dried, give the burlap a light dusting of nutmeg spray paint to simulate dirt. To achieve this, hold the can roughly twelve inches away from the surface and make quick flicking motions.
5. Use cherry cobbler paint to give the illusion of blood seeping from the eyes and nose. It works best to fill in the deepest recesses first and then spread the paint outward, following the course that the flow would naturally take as it drips downward.
6. After the paint has dried, give it a coat or two of clear nail polish to make it appear wet. Akin to step five, start with the depressions made by the eyes and nose and move outward.
7. Glue a ruff of fake corn leaves around the collar and add clusters of raffia to provide further depth. You may find it easier to add the raffia first and then lay the leaves above it. Complete the ruff with a band of rope. If you want a more macabre tone, use a thicker rope and tie it into a noose which hangs tightly around the neck.
8. Glue cockroaches onto the leaves. Try not to over think your application (a random pattern produces the best results). NOTE: The cockroaches I used were made with a slick plastic which did not adhere with hot glue. As a result, I used superglue gel to affix them to the prop.
9. Apply washes of blacks and browns to mute the colors of the leaves and raffia. To accomplish this, water down the paint and brush it over the items, ensuring the liquid settles into all the cracks and fissures (you can also use a spray bottle for the application). Allow the mixture to sit for a few minutes and then wipe it clean. You may want to experiment with the consistency prior to doing this: the more water you add, the fainter/lighter the wash; the less water you add, the deeper/darker the wash.
10. Continue the aging process by using a pair of sharp scissors to tatter the edges of the burlap and create random holes throughout the fabric. You can add further levels of distress by fraying strands with sandpaper and burning portions with a lighter.
11. Finish weathering the prop with washes of black paint brushed onto the burlap’s surface. During this step, accentuate the screaming mouth by darkening the opening with the wash.
12. If you plan to display the prop on a wall or crowning a scarecrow, create a hanging loop with steel wire and hot glue it to the back of the skull.
*You will not use the entire bottle’s content for this project.