Friday, November 25, 2022

The Corpse as a Confessor: A Mini-Essay

     From a symbolic warning to a talisman, the corpse has held several connotations in society. One such factor, in turn, involves the act of post-mortem bleeding, known as cruentation. Although not a common occurrence, the process has been documented for centuries and, up until the nineteenth century, was believed to be a posthumous means for victims of murder to identify their killer, since superstition maintained the corpse would bleed whenever in the assailant’s presence.[1] In fact, the belief has been featured within several famous literary works, including William Shakespeare’s Richard III (1597), Walter Scott’s Fair Maid of Perth (1828), and Mark Twain’s The Adventures of Tom Sawyer (1876).[2]
 
Works Referenced
 
Davies, Owen, and Francesca Matteoni. “‘A Virtue Beyond All Medicine:’ The Hanged Man’s Hand, Gallows Tradition and Healing in Eighteenth- and Nineteenth-Century England.” Social History of Medicine 28.4 (2015): 686-705.
 
Tarlow, Sarah, and Emma Battell Lowman. Harnessing the Power of the Criminal Corpse. London: Palgrave Macmillan, 2018.
____________________
[1] Tarlow and Lowman, 224.
[2] Davies and Matteoni, 686-705.

Friday, November 18, 2022

Skull Book

$30 - $40 (based on 2020 prices)
Makes one book
 
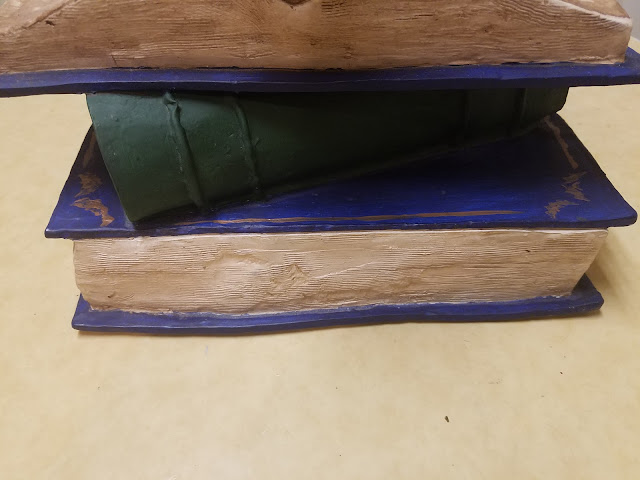
I purchased this prop several years ago on clearance during an after-Halloween sale and was never too impressed with its appearance, so, for 2020’s mad scientist theme, I decided to give it a makeover to fit in with the stacks of books and papers littering the doctor’s laboratory. You do not need this exact prop to achieve the same results. In fact, the entire build can be accomplished with three fake books purchased from a home decor store and a cheap skull.
  • One cheap Halloween prop
  • One 8 oz. bottle of wood glue
  • One 8 oz. bottle of all-purpose tacky glue
  • One newspaper (roughly twenty pages)
  • One 2 oz. bottle of acrylic paint in flat black*
  • One 2 oz. bottle of acrylic paint in flat blue*
  • One 2 oz. bottle of acrylic paint in flat brown*
  • One 2 oz. bottle of acrylic paint in flat green*
  • One 2 oz. bottle of acrylic paint in flat white
  • One 2 oz. bottle of acrylic paint in metallic gold*
  • One sheet of 8” x 11.5” white copy paper with incantations printed on it
1. Make the papier mache paste by mixing ½ cup of glue and ½ cup of water in a bowl. Try to use a sealable container. This gives you the ability to store the mixture for a day or two between applications. Also, to give the paste added support, use a combination of all-purpose glue and wood glue (stay away from school glue because it is washable and will dissolve in the water).
2. Cut the newspaper into strips, soak them in the paste, and apply them to the skull. To make the process more manageable, keep the strips at a reasonable size (mine were roughly six inches long and two inches wide). Similarly, only apply a few layers at a time and allow each layer to fully dry before adding more (I did one layer during each application and let it dry for twenty-four hours). As you do so, build up the facial features, adding mangled flesh around the mouth and nose, creating eyelids, fashioning a wound or two along the cranium, and thickening the jawline and neck.
3. Once the final layer dries, give the newspaper two to three even coats of white paint. This will cover the print and give the prop a uniform base coat. Although I used acrylic paint for this process, the time-pressed haunted can utilize white spray paint for a quicker application.
4. To make the skin appear mummified, begin with three washes of brown paint, slowly increasing the tint until you reach the colorization you desire. You may want to experiment with the consistency prior to doing this: the more water you add, the fainter/lighter the wash; the less water you add, the deeper/darker the wash.
5. Continue the process in step four by using two washes of black paint to darken the skin, ensuring the liquid settles into all the cracks and fissures (you can also use a spray bottle for the application).
6. Paint the insides of the eyes and nose black. As you do so, refrain from painting the perpendicular plate and vomer bone, since you want these portions of the anatomy to remain visible.
7. Apply a light wash of brown to the teeth and, once that has dried, paint the gums brown and the deeper recesses of the mouth black. For added emphasis, you can detail the space between the teeth with a thin line of black paint.
8. Use lines of hot glue to create raised bands on the spines of the books. You want them to look like old, leather-bound tomes, so it might be beneficial to keep one in front of you as a reference to mimic its appearance.
9. Give the entire stack of books two to three even coats of white paint. Akin to step three, this will provide the prop with a uniform base coat. For the time-pressed haunter, a few quick coats of white spray paint can help reduce the amount of effort and time.
10. Paint the books’ covers blue and green (or alternate hues to cater the prop to your haunt’s specific color scheme).
11. Trim the incantations printout to fit the open book. Then, apply a light coat of glue to the prop and affix the paper. You want it as smooth as possible, so use a firm piece of plastic like a credit card to remove any bubbles and wrinkles.
12. After the glue dries, use a wash or two of brown paint to age the printout and the other pages of the book. As with steps four and five, you wan to slowly increase the tint with each layer to prevent it from overpowering the prop.
13. Accent the covers’ edges and spines with designs drawn in metallic gold paint. Here, too, you can cater the embellishments to your haunt’s scheme by using different colors and titles that correspond with your theme.
14. The prop can be enhanced further with additional details, such as cloth bookmarks sticking out of the pages or a couple of bookworms gnawing through the covers. 
*You will not use the entire bottle’s content for this project.

Friday, November 11, 2022

"The Death Coach" (A Poem)

Thomas Crofton Croker’s The Legends and Traditions of the South of Ireland (1825) is considered one of the most influential texts in shaping mainstream society’s perceptions of Irish folklore, impacting everything from the fairy to the leprechaun.[1] In “The Death Coach,” the author builds on the myth of the Dullahan and its cóiste-bodhar, a coach drawn by headless horses which serves as a harbinger of misfortune.[2]
 
'Tis midnight! — how gloomy and dark!
By Jupiter there ‘s not a star! —
‘T is fearful! — ‘t is awful! — and hark!
What sound is that comes from afar?
 
Still rolling and rumbling, that sound
Makes nearer and nearer approach;
Do I tremble, or is it the ground? —
Lord save us! — what is it? — a coach! —
 
A coach! — but that coach has no head;
And the horses are headless as it:
Of the driver the same may be said,
And the passengers inside who sit.
 
See the wheels! how they fly o’er the stones!
And whirl, as the whip it goes crack:
Their spokes are of dead men’s thigh bones,
And the pole is the spine of the back!
 
The hammer-cloth, shabby display,
Is a pall rather mildew’d by damps;
And to light this strange coach on its way,
Two hollow sculls hang up for lamps!
 
From the gloom of Rathcooney church-yard,
They dash down the hill of Glanmire;
Pass Lota in gallop as hard
As if horses were never to tire!
 
With people thus headless ‘t is fun
To drive in such furious career;
Since headlong their horses can’t run,
Nor coachman be headdy from beer.
 
Very steep is the Tivoli lane,
But up-hill to them is as down;
Nor the charms of Woodhill can detain
These Dullahans rushing to town.
 
Could they feel as I’ve felt — in a song —
A spell that forbade them depart;
They’d a lingering visit prolong,
And after their head lose their heart!
 
No matter! — ‘t is past twelve o’clock;
Through the streets they sweep on like the wind,
And, taking the road to Blackrock,
Cork city is soon left behind.
 
Should they hurry thus reckless along,
To supper instead of to bed,
The landlord will surely be wrong,
If he charge it at so much a head!
 
Yet mine host may suppose them too poor
To bring to his wealth an increase;
As till now, all who drove to his door,
Possess’d at least one crown a-piece.
 
Up the Deadwoman’s hill they are roll’d;
Boreenmannah is quite out of sight;
Ballintemple they reach, and behold!
At its church-yard they stop and alight.
 
“Who ‘s there?” said a voice from the ground
“We’ve no room, for the place is quite full.”
“O! room must be speedily found,
For we come from the parish of Skull.
 
“Though Murphys and Crowleys appear
On headstones of deep-letter’d pride;
Though Scannels and Murleys lie here,
Fitzgeralds and Toomies beside;
 
Yet here for the night we lie down,
To-morrow we speed on the gale;
For having no heads of our own,
We seek the Old Head of Kinsale.”[3]
 
Works Referenced
 
Croker, Thomas Crofton. Fairy Legends and Traditions of the South of Ireland. London: John Murray, 1825. 133-136.
 
Jaros, Michael. “Leprechaun.” The Ashgate Encyclopedia of Literary and Cinematic Monsters. Ed. Jeffrey Andrew Weinstock. Burlington, VT: Ashgate Publishing Company, 2014. 372-375.
 
Yeats, William Butler, ed. A Treasury of Irish Fairy and Folk Tales. 1888. New York: Barnes and Noble, 2015.
____________________
[1] Jaros, 373-374.
[2] Yeats, 288.
[3] Croker, 133-136.

Friday, November 4, 2022

Face Tray

$15 - $20 (based on 2020 prices)
Makes one tray
 
I wanted to litter the laboratory of 2020’s haunt with trays of fresh medical experiments, so I made three versions: one with a brain, another with a face, and a third with a heart. This variation - the one with the face - utilized a bloody mask purchased on clearance the year before. To cater the prop to your haunt’s thematic needs, you can use whatever style of mask you desire (or have sitting around).
  • One 9” x 13” metal baking sheet
  • One 10 oz. can of interior/exterior, fast-drying spray paint in flat black*
  • One 10 oz. can of interior/exterior, fast-drying spray paint in metallic silver*
  • One small plastic bowl (roughly five inches in diameter)
  • One plastic syringe
  • One 8 oz. can of oil-based interior wood stain in Jacobean*
  • One 8 oz. can of oil-based interior wood stain in red chestnut*
  • One latex mask
  • One pair of metal cuticle scissors
  • One pair of silver tweezers
  • One 0.3 fluid ounce bottle of red food coloring*
  • One 4 oz. bottle of clear, all-purpose tacky glue gel*
  • Three 1.5-inch T-pins
  • Two cotton swabs
1. Thoroughly wash and dry the sheet. If there is any sticker residue, use rubbing alcohol to remove it (soak a paper towel in the solution, let it sit over the area for a few minutes, and wipe away the remaining glue). After cleaning the sheet, roughen its surfaces with coarse sandpaper to help the paint adhere and then give it one or two even coats of metallic silver spray paint. This step is entirely optional; however, if the sheet has a non-stick coating, you want to cover it so the blood has something to firmly adhere to (otherwise, it will peal off after drying).
2. Turn the bowl upside down and, on a newspaper-lined surface in a well-ventilated area, give it a coat or two of black spray paint. This will give it a darkened surface in case portions of it show through the openings of the mask (you can always bypass this step by purchasing a black bowl). Once the paint has dried, determine where you want the face to sit on the sheet and glue the bowl in that spot. This will serve as support for the mask to prevent it from drooping.
3. On a newspaper-lined surface in a well ventilated area, paint the syringe with the Jacobean wood stain. I discovered that applying a thin coat and patting it with paper towels produces a hazed appearance. Then, dab the surface with the red chestnut wood stain to create spots of dried blood.
4. Position the mask, scissors, syringe, and tweezers on the sheet and glue them in place. You can arrange the items however you like and can substitute the scissors, syringe, and tweezers for other types of medical-looking instruments. For the best hold, I highly recommend using superglue for all of these elements.
5. In a plastic container (because the food coloring will stain, use something disposable or that you won’t mind dying), pour in your desired amount of clear glue gel and slowly add red food coloring to the solution until it achieves the sanguine hue you desire. To give the blood further density, add blue food coloring and mix well.
6. Apply the blood glue to the prop and allow it to fully dry. You can use an old spoon or plastic utensil to strategically dribble the liquid along chosen areas or pour it haphazardly for a gory mess. During this step, add cotton swabs and T-pins to the sanguine pool for extra detail.
7. Depending on your haunt’s theme, you can embellish the prop further with swarms of maggots crawling across the face’s surface or attach a specimen tag to the sheet’s side. 
*You will not use the entire bottle’s content for this project.