Friday, July 19, 2019

Framed Doll Faces

$25 - $30 (based on 2018 prices)
Makes three frames

In addition to the witch den for my office’s annual decorating contest, we also selected a ghost motif, complete with hanging phantoms and haunted portraits. I saw this concept on several crafting sites and decided to give the project a scarier look and incorporate it into the theme. Although I made each face unique, you can stick with a more uniformed design to provide consistency.
  • Three ornate picture frames (roughly 13” x 9”)
  • One 10 oz. can of interior/exterior, fast-drying spray paint in flat black
  • One 2 oz. bottle of acrylic paint in flat black*
  • One 2 oz. bottle of acrylic paint in flat brown*
  • One 2 oz. bottle of acrylic paint in cherry cobbler*
  • One 2 oz. bottle of acrylic paint in flat gray*
  • One 2 oz. bottle of acrylic paint in flat white*
  • Three twelve-inch vinyl dolls
  • One yard of white fabric
  • At least four tablespoons of dark roasted coffee grounds
  • One pan large enough to soak the fabric
  • One 4 oz. bottle of all-purpose tacky glue*
  • Ten plastic spiders
1. Remove the backings and any glass from the frames and, on a newspaper-lined surface in a well-ventilated area, apply an even coat of black spray paint. Although I only used one coat, you may want more depending on your desired coverage. Keep in mind, though, that this is the base coat and much of the black paint will be covered up by lighter colors.
2. Dry brush the frames with a layer of white paint and, once that has dried, a layer of gray. Concentrate your application on the raised surfaces and leave the deep lines black to give the illusion of grime. If you want to enhance the distressed finish even further, smudge brown paint in random places to mimic dirt.
3. Remove the dolls’ clothing and dismember them. On a newspaper-lined surface in a well-ventilated area, give their heads and limbs an even coat of black spray paint (you will only use the heads for this project; the limbs will be utilized for a different prop). Since the heads will be covered, this step is entirely optional; however, it unifies the prop and prevents bright tones from appearing through the fabric.
4. Once the paint has dried, center the heads on the backings and glue them in place. For a sturdier hold, us superglue. As with step three, you can elect to apply a coat of black paint to the backings to create unity and avoid any unnecessary colors from showing.
5. Boil enough water to completely submerge the fabric and pour it into the pan. Add the coffee. The longer you allow the coffee to brew, the darker the stain will become. Likewise, greater amounts of coffee will produce a richer stain. Submerge the fabric in the coffee mixture and soak it until it reaches the color you desire. I soaked mine for four days and scattered the coffee grounds over the top to add spots. Remove the cloth from the water and allow it to dry.
6. Cut the fabric into squares large enough to thoroughly cover the heads and backing (I cut mine into 12” x 12” sections). Center the cloth on the prop and, starting at the face, glue it in place. I found that this step works best if you move in stages: apply a layer of glue to one section, hold the fabric down until it sticks, and then repeat the process. You may need to apply ample amounts of glue in the eye sockets and nasal cavities to get the fabric to hold their forms. Once this is done, fan the fabric out along the edges of the backing and glue it down.
7. Detail the faces with various materials. For one face, I used cherry cobbler paint to give the illusion of blood seeping from the eyes and mouth (a coat of clear nail polish makes the paint appear wet). For another, I adhered eight plastic spiders and accented the face’s features with a dry brushing of brown paint. And, for the third face, I cut out the eyes and mouth and darkened their openings with black paint (apply a heavy amount of paint along the edges and quickly swipe the brush outward).
8. Attach the backings to the frames and, if you would like, finish the props with additional elements, such as spiders crawling along the surfaces, a few blood splatters, or some clusters of aged bones.
*You will not use the entire bottle’s content for this project.

Friday, July 12, 2019

"The Vampire" (A Poem)

In 1897, the same year Bram Stoker published Dracula, English artist Philip Burne-Jones unveiled his salacious painting The Vampire, which depicts an undead seductress straddling the body of an unconscious man, at London's the New Gallery.[1] Interestingly, it was not the artwork's sexually charged imagery which prompted public backlash, but rumors the actress Mrs. Patrick Campbell, with whom Burne-Jones was believed to be having a torrid affair, had posed as the vixen which sparked scandal.[2] Despite the disgrace, the painting did motivate Burne-Jones' cousin, the famed author Rudyard Kipling, to compose a poem inspired by the work of art.[3]

A Fool there was and he made his prayer
(Even as you and I!)
To a rag and a bone and a hank of hair
(We called her the woman who did not care)
But the fool he called her his lady fair -
(Even as you and I!) 

Oh, the years we waste and the tears we waste
And the work of our head and hand,
Belong to the woman who did not know 
(And now we know that she never could know) 
And did not understand! 

A fool there was and his goods he spent
(Even as you and I!) 
Honour and faith and a sure intent 
(And it wasn't the least what the lady meant)
But a fool must follow his natural bent 
(Even as you and I!) 

Oh, the toil we lost and the spoil we lost 
And the excellent things we planned 
Belong to the woman who didn't know why 
(And now we know that she never knew why) 
And did not understand! 

The fool was stripped to his foolish hide
(Even as you and I!) 
Which she might have seen when she threw him aside - 
(But it isn't on record the lady tried) 
So some of him lived but the most of him died - 
(Even as you and I!) 

And it isn't the shame and it isn't the blame
That stings like a white-hot brand.
It's coming to know that she never knew why
(Seeing at last she could never know why)
And never could understand.[4]

Works Referenced

Kipling, Rudyard. The Vampire: A Poem. Washington: Woodward and Lothrop, 1898.

Skal, David. Hollywood Gothic: The Tangled Web of Dracula from Novel to Stage to Screen. New York: W.W. Norton and Company, 1990.
____________________

[1] Skal, 28-29.
[2] Skal, 28-29.
[3] Skal, 28-29.
[4] Kipling, 7-9.

Friday, July 5, 2019

Black and White Potion Bottles

$10 - $15 (based on 2018 prices)
Makes five bottles

For the witch den, which was part of my office’s annual decorating competition, I unified the theme by incorporating alchemy symbols into many of the props. These potion bottles were part of this endeavor and I created two versions to accent the altar: the version featured here with twine wrapped around the bottles’ necks and a version with fake candles (which will be presented on a later date).
  • Five glass bottles in varying sizes
  • One pack of forty- to sixty-grit sandpaper
  • One 10 oz. can of interior/exterior, fast-drying spray paint in flat black
  • One 2 oz. bottle of acrylic paint in flat black*
  • One 2 oz. bottle of acrylic paint in flat white*
  • Three to four yards of light brown twine
  • Five small plastic skull beads
1. Thoroughly wash and dry the bottles. If there is any sticker residue, use rubbing alcohol to remove it (soak a paper towel in the solution, let it sit over the area for a few minutes, and wipe away the remaining glue). After cleaning the bottles, roughen their surfaces with coarse sandpaper to help the paint adhere.
2. On a newspaper-lined surface in a well-ventilated area, give the bottles an even coat of black spray paint. I used one coat, but you can apply more based on your desired coverage.
3. Draw alchemy symbols onto the bottles with white paint. You can add the markings randomly or put them in strategic places. While I elected to use alchemy symbols to unify the haunt’s theme, you could modify the prop by writing spells across the surfaces or using patterns of your own design.
4. Wrap the necks of the bottles with twine and knot the ends, trimming one and leaving the other with a two- or three-inch excess. Thread the beads onto the excess strand. It may help to use a needle and pliers during this process, utilizing the needle to guide the twine through the beads’ holes and the pliers to pull the twine through. Tuck the excess strand into the bulk of the wrapping and glue it in place.
5. Age the corks by giving them a wash of black. To achieve this, water down black paint and brush it over their surfaces, ensuring the liquid settles into all the cracks and fissures (you can also use a spray bottle for the application). Allow the mixture to sit for a few minutes and then wipe it clean. You may want to experiment with the consistency prior to doing this: the more water you add, the fainter/lighter the wash; the less water you add, the deeper/darker the wash.
6. You can enhance the props by incorporating additional elements, such as aged bones, feathers, or drips of candle wax.
*You will not use the entire bottle’s content for this project.

Friday, June 28, 2019

The Changeling: A Mini-Essay

     From Jacob and Wilhelm Grimm’s short story “The Elves” (1812) and Maurice Sendak’s picture book Outside Over There (1981) to Jim Henson’s cinematic fantasy Labyrinth (1986) and the anthology film A Christmas Horror Story (2015), the mythological changeling has been featured in art and literature for centuries. Although its name (enfant changé in French, Wechselbag in German, and fairy child in certain English dialects) and other minor aspects vary with each cultural region and historical period, the majority of the legend remains relatively universal: evil entities – often elves, fairies, goblins, or spirits – confiscate a human infant in the dead of night and replace it with an imposter that brings disaster and harm to the parents.[1] Thin, with a big head and blank, staring eyes, changelings torment their human caregivers with incessant bouts of crying, an insatiable hunger, and a series of unfortunate incidents.[2] To rid themselves of this unpleasantness, parents trick the evil entities into retrieving their offspring by mistreating it with violent acts, including dipping it in boiling water, strapping it to a coal shovel and thrusting it into the fire, and abandoning it in the forest.[3] Panged by this cruelty, the entities will return under the cover of darkness to rescue their progeny and return the human infant. Furthermore, because the changeling is not a real child, the parents, in the eyes of many superstitious societies, are absolved of their abusive actions.[4] Although documentation of these supposed switches can be found as early as 1405 in Nicolas of Jawor’s Treatise of Superstitions, belief in their existence continued well into the late nineteenth century, with reports showing that, between 1850 and 1895, eight judicial inquiries in Ireland, Schleswig-Holstein, Scotland, Posen, and West Prussia (and one New York case in 1877 involving an Irish immigrant family) investigated child abuse and death resulting from suspected changeling presences.[5] Recently, anthropologists such as Sarah Hrdy and Nancy Scheper-Hughes have argued that the vast majority of changeling cases throughout history can be attributed to misunderstandings regarding the symptoms of dehydration and malnourishment from illness, diarrhea, and neglect, not supernatural occurrences.[6]

Works Referenced

A Christmas Horror Story. Dir. Grant Harvey, Steven Hoban, and Brett Sullivan. Perf. William Shatner, Zoé De Grand Maison, and Adrian Holmes. Copperheart, 2015.

Grimm, Jacob and Wilhelm Grimm. “The Elves.” Children’s and Household Tales. 1812. Trans. Margaret Hunt. London: George Bell and Sons, 1905. 161-164.

Haffter, Carl. “The Changeling: History and Psychodynamics of Attitudes to Handicapped Children in European Folklore.” Journal of the History of Behavioral Science 4.1 (1968): 55-61.

Hrdy, Sarah Blaffer. Mother Nature: A History of Mothers, Infants, and Natural Selection. New York: Pantheon Books, 1999.

Labyrinth. Dir. Jim Henson. Perf. David Bowie and Jennifer Connelly. TriStar, 1986.

Scheper-Hughes, Nancy. Death Without Weeping: The Violence of Everyday Life in Brazil. Berkeley, CA: University of California Press, 1992.

Sendak, Maurice. Outside Over There. 1981. New York: HarperCollins, 1989.
____________________ 

[1] Hrdy, 462-468.
[2] Hrdy, 462-468.
[3] Haffter, 57.
[4] Haffter, 57.
[5] Haffter, 60.
[6] Scheper-Hughes, 364-373.

Friday, June 21, 2019

Horned Tribal Mask

$25 - $30 (based on 2018 prices)
Makes one mask

In the summer of 2018, I was asked to make a small collection of props for a theatrical troupe performing a traveling variety show in my town. One of the skits required a cannibal mask for a humors cooking-show segment. I ended up making two versions: one with feathers, which was used for the performances, and one with horns, which was not.
  • One large latex balloon
  • One roll of painters masking tape
  • One 4 oz. bottle of wood glue
  • One 4 oz. bottle of all-purpose tacky glue
  • One standard-size newspaper
  • Two twenty-four-inch foam swords
  • Two to three yards of steel wire
  • One roll of one-ply, white paper towels
  • One 10 oz. can of interior/exterior, fast-drying spray paint in flat black
  • One 10 oz. can of interior/exterior, fast-drying spray paint in hammered bronze
  • Three to four yards of light brown twine
  • One 2 oz. bottle of acrylic paint in flat black*
  • One 2 oz. bottle of acrylic paint in flat brown*
  • One 2 oz. bottle of acrylic paint in cherry cobbler*
  • One 2 oz. bottle of acrylic paint in flat gray*
  • One 2 oz. bottle of acrylic paint in flat white*
  • Two raffia grass skirts (with a 32” waist and 30” length)
1. Inflate the balloon to your desired size for the mask and use tape to give it a skull-like appearance. You will want to gently wrap the tape around the surface and refrain from pulling strips off and reattaching them, since this will increase your chances of popping the balloon. Once you have attained your chosen look, stand the balloon on a sturdy base.
2. Make the papier mache paste by mixing ½ cup of glue and ½ cup of water in a bowl. Try to use a sealable container. This gives you the ability to store the mixture for a day or two between applications. Also, to give the paste added support, use a combination of all-purpose glue and wood glue (stay away from school glue because it is washable and will dissolve in the water).
3. Cut the newspaper into strips, soak them in the paste, and apply them to the balloon. To make the process more manageable, keep the strips at a reasonable size (mine were roughly six inches long and two inches wide). Similarly, only apply a few layers at a time and allow each layer to completely dry before adding more (I did two layers during each application and let them dry for twenty-four hours). Keep in mind that this prop will be carved and worn. So, you want it as sturdy as possible. A minimum of six to seven layers will suffice, but more is always better.
4. Once you have reached your desired thickness, cut the balloon and remove it from the papier mache shell. Be gentle during this process and gradually work the balloon out.
5. Use a sharp knife to cut the shell in half lengthwise. If it helps, measure and mark your cut first. This will provide you with two separate masks. I used one for this project and the other for the feathered tribal mask which will be featured in a later post. 
6. Remove the handles from the foam swords. These will become the horns. I used these particular items because they already possessed the length and general shape that I wanted; however, you can use pool noodles or other foam products and mold them into your desired shapes.
7. Cut steel wire into four seventeen-inch sections and attach them to both sides of the swords. This will provide a wire armature that will allow you to bend the horns and give them more of a curvature.
8. Trim the tops of the swords to give the horns pointed tips and glue them to the mask. I used hot glue, but you can use superglue for a sturdier hold.
9. Tear paper towels into strips and, after soaking them in papier mache paste, cover the horns with one or two layers, creating wrinkles to texture them. If you cannot find one-ply paper towels, simply separate the plies of multi-ply sheets.
10. After the layers have dried, measure and mark the horns into two-inch sections and, using hot glue, create the fluting which naturally occurs as the horns grow over the course of the animal’s life.
11. On a newspaper-lined surface in a well-ventilated area, give the entire prop two even coats of black spray paint and the horns a light dusting of hammered bronze. Although I used two coats, you are free to apply as many coats as you feel necessary.
12. Wrap twine around the horns. I found that starting at the base and working upward works best. Try not to overthink the patterns. A more haphazard design will look more primitive. If you like, you can string wooden beads onto the twine before twisting it around the horns. To help the string remain adhered to the horns, glue portions at various spot, namely around the curves.
13. Water down white acrylic paint and brush it over the mask’s surface, ensuring the liquid settles into all the wrinkles (you can also use a spray bottle for the application). Allow the mixture to sit for a minute and then wipe it clean. You may want to experiment with the consistency prior to doing this: the more water you add, the fainter/lighter the wash; the less water you add, the deeper/darker the wash.
14. Add further detail to the mask by stippling gray paint around the edges and randomly along the surface. You could use a brush with splayed bristles, a stippling sponge, or crumpled paper towels for this application. Also, apply a slight flecking of black paint. You can do this by either quickly flicking a paintbrush or using an old toothbrush and strumming your finger across the bristles. Since this process flings paint everywhere, it’s best to perform it outside.
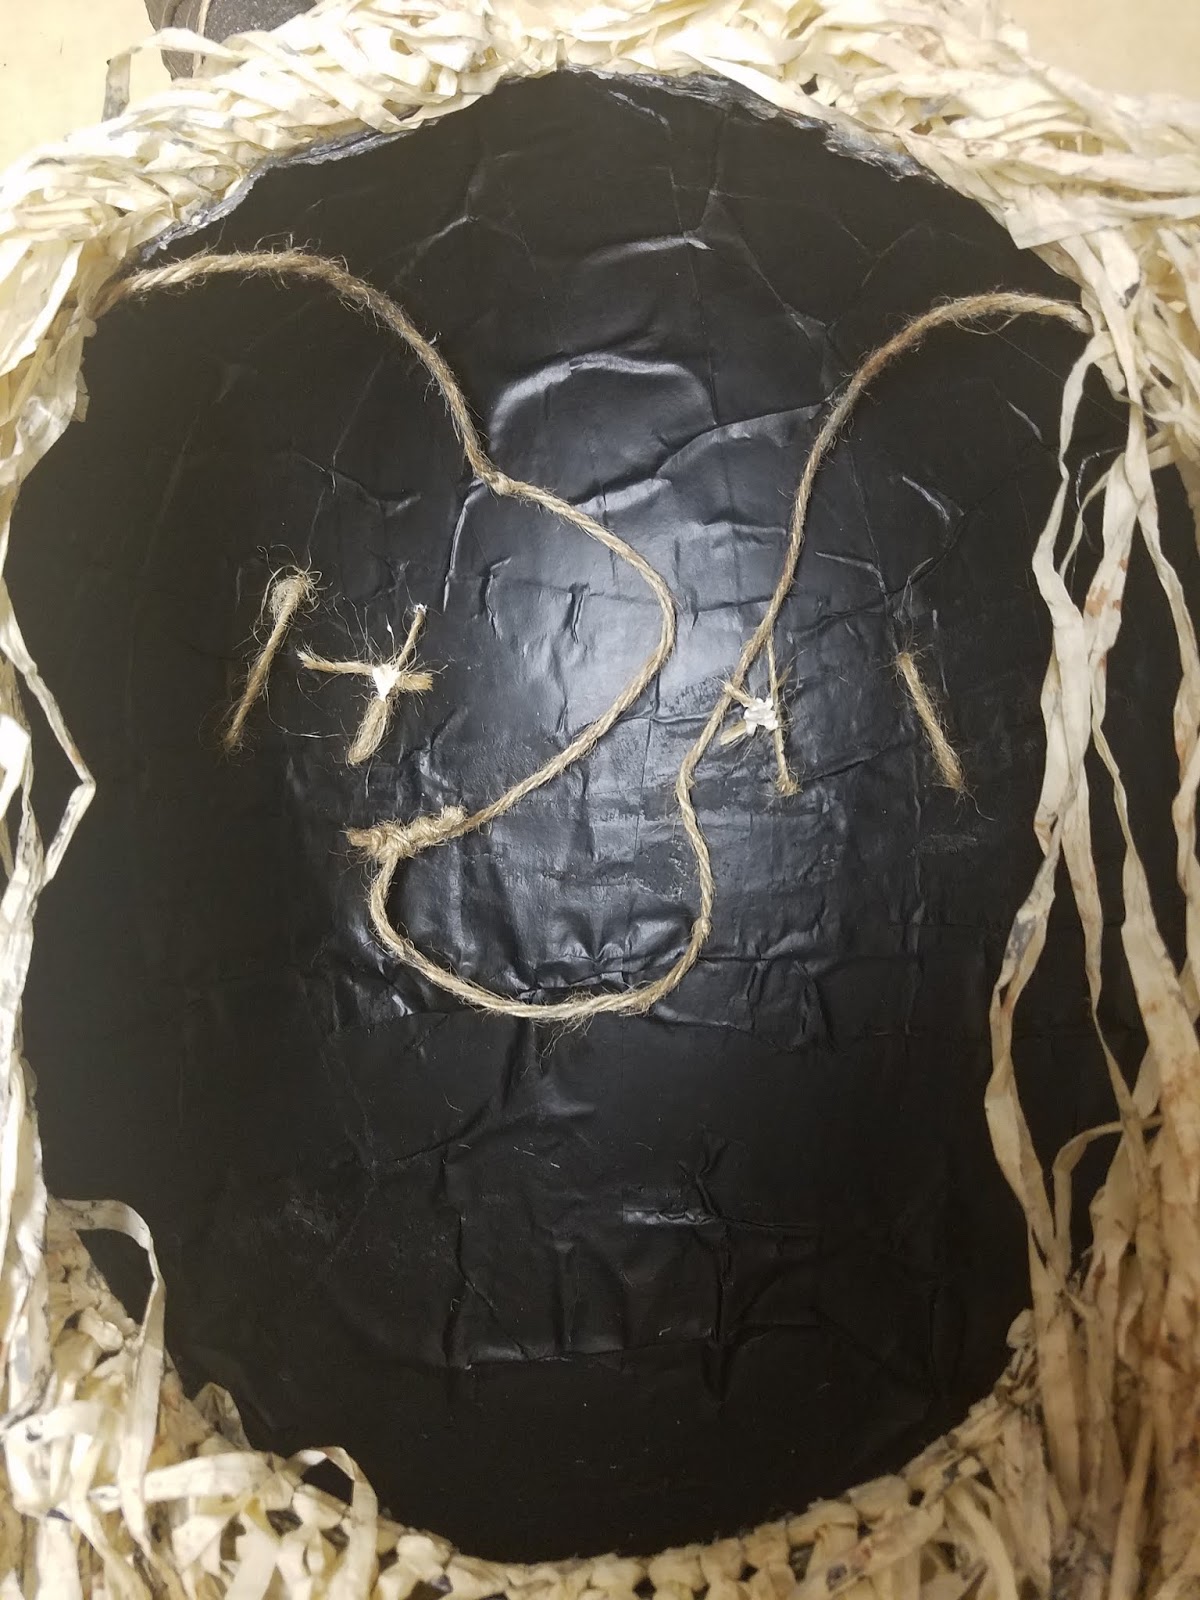
15. Fashion a face with two bloody handprints. Pour generous amounts of cherry cobbler paint onto the palm of one hand, rub both hands together, and firmly press them against the surface of the mask. It may help to preplan the positioning beforehand, since redoing the application will require repainting the mask. 
16. Detail the face by sewing twine on the palms of the bloody handprints to form eyes. Like step twelve, you could string wooden beads onto the twine to add additional interest to the prop. 
17. Weather the grass skirts with black and brown paint. If you don’t mind the mess, spread the paint onto the palms of your hands and use your fingers to brush it into the tuffs. Do not worry too much if the strands become matted and tangled during this process (it will only enhance the appearance). 
18. Glue the skirts around the inner circumference of the mask and repurpose the draw strings for the skirts as the draw strings for the mask.
19. You could embellish the mask with strands of colorful wooden beads, clusters of feathers, strings of rotten teeth, collections of sea shells, or bunches of severed ears and fingers.
*You will not use the entire bottle’s content for this project.

Friday, June 14, 2019

"The Giaour" (A Poem Excerpt)

Before the Romantic Movement of the early nineteenth century, European representations of the vampire commonly portrayed the mythological being as a beastly predator whose insatiable thirst for human blood was matched by its hideous appearance.[1] In 1813, Lord Byron published his epic poem The Giaour chronicling the tribulations of the giaour, who is punished for murdering the abusive Hassan in the name of justice. Part of his punishment is to become a vampire and live forever feasting on the blood of his heirs. Although a minor element within the entirety of the work, the concept of the tormented undead, jilted in life and love, set a new standard for images of the vampire which consumed Romanticist literature and the Parisian Théâtre des Vampires.[2] Presented below is the passage from The Giaour (lines 757-768) which details the character's fate and establishes, as scholars such as David Skal attest, the notion of the brooding vampire.

But first, on earth as Vampyre sent,
Thy corse shall from its tomb be rent;
Then ghastly haunt thy native place,
And suck the blood of all thy race;
There from thy daughter, sister, wife,
At midnight drain the stream of life;
Yet loathe the banquet, which perforce
Must feed thy livid, living corse,
Thy victims, ere they yet expire,
Shall know the demon for their sire;
As cursing thee, thou cursing them,
Thy flowers are withered on the stem.[3]


Works Referenced

Bryon, George Gordon. The Giaour, A Fragment of a Turkish Tale. 1813. London: Thomas Davidson, 1814.

Skal, David. Hollywood Gothic: The Tangled Web of Dracula from Novel to Stage to Screen. New York: W.W. Norton and Company, 1990.
____________________

[1] Skal, 13.
[2] Skal, 13.
[3] Byron, 37-38.

Friday, June 7, 2019

Poisoned Candy Apples

$5 - $10 (based on 2018 prices)
Makes three apples

The farm theme for 2016’s haunt left me with numerous apples and I have spent the last few years finding ways to repurpose them. For the witch den, part of my office’s annual decorating competition, I decided to use the entire allotment to bring into fruition two ideas for poisoned apples which have been swimming around in my creative conscious for years. The first one – which is featured in this week’s post – involved the notorious fruit fabricated into a candied apple. The second – which will be presented on a later date – involved glass display bowls.
  • Three artificial apples
  • One 10 oz. can of interior/exterior, fast-drying spray paint in fire orange
  • One 2 oz. bottle of acrylic paint in flat black*
  • One 2 oz. bottle of acrylic paint in hot cocoa*
  • Three gnarled tree sticks
  • One 0.44 oz. bottle of glossy black nail polish
1. On a newspaper-lined surface in a well-ventilated area give the apples two even coats of orange spray paint. The number of coats is based on your desired coverage for the props, so you may use more or less depending on your preferences.
2. To give the apples a rotten appearance, water down black acrylic paint and brush it over their surfaces (you can also use a spray bottle for the application). Allow the mixture to sit for a minute and then wipe it clean. Repeat this process with additional coats if you want a more muted tone. You may want to experiment with the consistency prior to doing this: the more water you add, the fainter/lighter the wash; the less water you add, the deeper/darker the wash. To enhance the decay, pat hot cocoa paint in random spots to creates bruises.
3. Cut holes in the tops of the apples large enough to accommodate the sticks and insert them into the openings. For additional support, push the sticks at least an inch into the foam cores of the apples.
4. Use hot glue to create a poisonous drip on the tops of the apples. You can fashion a simple puddle around the sticks or an elaborate dribble that trickles far down the sides.
5. Paint the drip with a coat or two of glossy black nail polish. Although I chose black, you can utilize an alternate color to cater the props to your specific theme.
6. To enhance the props even further, considered gluing insects to the sides or drilling holes into their surfaces and inserting rubber worms in them.
*You will not use the entire bottle’s content for this project.