Friday, November 26, 2021

The Ghostly Handprint at the Royal Stag: A Mini-Essay

     Situated on a corner next to Saint Mary’s Church in Datchet, England, the Royal Stag, formerly the Five Bells and the High Flyer, opened in 1796 and, during the following century, acquired a legend which has haunted the alehouse since. During a cold, nineteenth-century winter’s day, a local laborer stopped by the pub for a few drinks and allowed his young son to play in the snow-draped cemetery next door. As the afternoon progressed and the temperature dropped, the child ventured back to the bar and attempted to gain his father’s attention through the window; however, his efforts proved futile and, after firmly pressing his hand against the windowpane, he dropped to the ground and froze to death.[1] Although no information exists regarding the date of the incident or the names of the father and son, the youngster’s ghostly handprint, which frequently appears on the glass, has been photographically documented in 1979 and again in February of 2000.[2]

Works Referenced

Jones, Richard. Haunted Britain and Ireland. New York: Barnes and Noble, 2002. 


[1] Jones, 53.
[2] Jones, 53.

Friday, November 19, 2021

Brain Tray

$15 - $20 (based on 2020 prices)
Makes one tray
 
I wanted to litter the laboratory of 2020’s haunt with trays of fresh medical experiments, so I made three versions: one with a brain, another with a face, and a third with a heart. This variation - the one with the brain - was the simplest; however, you can enhance it in a multitude of ways to cater the prop to your haunt’s thematic needs.
  • One 11” x 7” metal brownie pan
  • One 10 oz. can of interior/exterior, fast-drying spray paint in metallic silver*
  • One plastic brain
  • Three silver crochet hooks
  • One pair of silver tweezers
  • One 0.3 fluid ounce bottle of red food coloring*
  • One 4 oz. bottle of clear, all-purpose tacky glue gel*
  • Three cotton swabs
  • Two 1.5-inch T-pins
1. Thoroughly wash and dry the pan. If there is any sticker residue, use rubbing alcohol to remove it (soak a paper towel in the solution, let it sit over the area for a few minutes, and wipe away the remaining glue). After cleaning the tray, roughen its surfaces with coarse sandpaper to help the paint adhere and then give the tray one or two even coats of metallic silver spray paint. This step is entirely optional; however, if the pan has a non-stick coating, you want to cover it so the blood has something to firmly adhere to (otherwise, it will peal off after drying).
2. Once the paint has dried, position the brain, one of the crochet hooks, and the tweezers on the tray and glue them in place. You can arrange the items however you like and can substitute the hook and tweezers for other types of medical-looking instruments. For the best hold, I highly recommend using superglue for all of these elements.
3. Cut two holes into the top of the brain and insert the remaining two crochet hooks into the openings, gluing them in place. Akin to step two, you can replace these items with other surgical tools like forceps or scalpels to cater the prop to your haunt’s needs.
4. In a plastic container (because the food coloring will stain, use something disposable or that you won’t mind dying), pour in your desired amount of clear glue gel and slowly add red food coloring to the solution until it achieves the sanguine hue you desire. To give the blood further density, add blue food coloring and mix well.
5. Apply the blood glue to the prop and allow it to fully dry. You can use an old spoon or plastic utensil to strategically dripple the liquid along chosen areas or pour it haphazardly for a gory mess. During this step, add cotton swabs and T-pins to the sanguine pool for extra detail.
6. Depending on your haunt’s theme, you can embellish the prop further with swarms of maggots crawling across the brain’s surface or attach a specimen tag to the tray’s side.
*You will not use the entire bottle’s content for this project.

Friday, November 12, 2021

"The Spell-Struck" (A Poem)

Like William Butler Yeats, with whom he clashed several times during his life, Thomas William Hazen Rolleston spent much of his literary career championing and preserving Irish culture and folklore, with his poems
The Lament of Queen Maev and The Spell-Struck being considered among his finest pieces.[1] In The Spell-Struck, the poet draws from fairy mythology to fabricate a tale where the ethereal being spends the summer dancing and feasting before, in the chilled months of autumn, succumbing to her death as she reminisces over her summertime joys.[2]

She walks as she were moving
Some mystic dance to tread,
So falls her gliding footsteps,
So leans her listening head:

For once to Faery harping
She danced upon a hill,
And through her brain and bosom
The music pulses still.

Her eyes are bright and tearless,
But wide with yearning pain;
She longs for nothing earthly,
But O, to hear again,

The sound that held her listening
Upon her moonlit path!
The rippling Faery music
That filled the lonely rath.

Her lips, that once have tasted
The Faery banquets bliss,
Shall glad no mortal lover
With maiden smile or kiss.

Shes dead to all things living
Since that November Eve;
And when she dies in autumn
No living thing will grieve.[3]
 
Works Referenced

DEsterre-Keeling, Elsa. Four Irish Books. The Academy 1199 (1895): 349-351.
 
Marcus, Phillip. Yeats and the Beginning of the Irish Renaissance. 2nd ed. Syracuse, NY: Syracuse University Press, 1986.

Rolleston, Thomas William Hazon. The Spell-Struck. Sea Spray: Verses and Translations by T.W. Rolleston. 1909. Germany: Outlook Verlag, 2018. 8-9.
____________________
[1] D’Esterre-Keelintg, 350.
[2] Marcus, 132.
[3] Rolleston, 8-9.

Friday, November 5, 2021

Performers’ Sign

$15 - $20 (based on 2019 prices)
Makes one sign
 
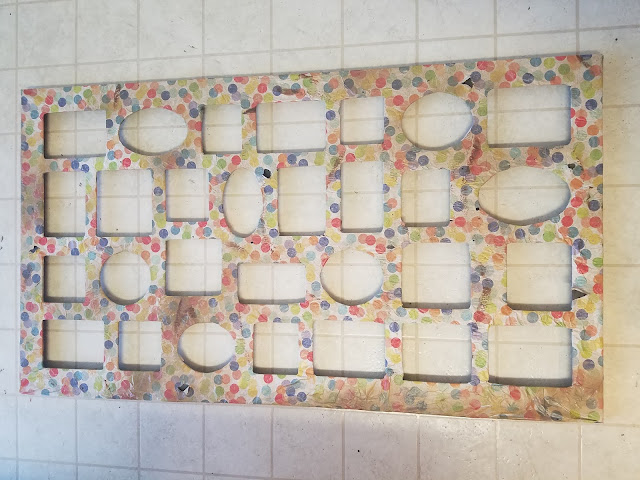
I wanted to emphasize the turn-of-the-century-travelling-show aspect of 2019’s haunt, so I created a lot of little details, from circus pins to a megaphone, to subtly reinforce this concept. The performers’ sign, in turn, was part of the process. Utilizing an old collage picture frame, I crafted a large sign showcasing all of the carnival’s twisted entertainers. While I used vintage sideshow images, you can easily substitute photos of the haunt’s scare-actors to make the prop more personal.
  • One collage picture frame with twenty-nine openings (roughly 22” x 38”)
  • Fifteen sheets of cream-colored copy paper
  • At least four tablespoons of dark roasted coffee grounds
  • One or two pans large enough to soak the photographs
  • One 10 oz. can of interior/exterior, fast-drying spray paint in flat black*
  • One 10 oz. can of interior/exterior, fast-drying spray paint in flat brown*
  • One roll of colorful wrapping paper (roughly seventeen square feet)
  • One 4 oz. bottle of all-purpose tacky glue*
  • One package of two-inch letterboard letters
  • One 2 oz. bottle of acrylic paint in flat black*
  • One 2 oz. bottle of acrylic paint in flat brown*
  • One 2 oz. bottle of acrylic paint in flat red*
  • One 2 oz. bottle of acrylic paint in flat gray*
  • One 2 oz. bottle of acrylic paint in flat white*
1. Gather a collection of twenty-nine vintage sideshow photographs, print them on the cream-colored paper, and cut them out. For visual interest, I selected an assortment of children, men, and women; however, you can cater this variety to fit your haunt’s needs. Also, I printed two images per page, which saved paper and provided the photographic scale I desired.
2. Boil roughly twelve cups of water and add the coffee. The longer you allow the coffee to brew, the darker the stain will become. Likewise, greater amounts of coffee will produce a richer stain. Since I wanted uneven spots rather than a unified discoloration, I placed about a dozen photographs at a time on a baking sheet, splashed coffee and grounds onto their surfaces, allowed the liquid to sit for a few minutes, and then moved the photographs to a large space to dry. Although this process took a while, it provided an interesting effect.
3. As the photographs dry, remove the backing and glass from the collage and, on a newspaper-lined surface in a well-ventilated area, give the frame one or two even coats of black spray paint. Although the paint is optional, it provides a dark color to show beneath the holes made in the wrapping paper.
4. Brush a light layer of glue onto the frame and cover it with the wrapping paper. To make the paper appear worn, crumple it up prior to adhering it to the collage and tear holes into it. After the glue has dried, cut out the openings of the pictures, leaving a slight excess to fold over the edges and glue in place.
5. Add additional age and distress by dusting the frame with a light coat of brown spray paint. To give the appearance of dirt, hold the can over twelve inches away from the collage’s surface and make quick flicking motions. You can also apply a flecking of black paint and smears of brown to enhance the weathered appearance.
6. Arrange the pictures in the frame’s openings and, once you have achieved your desired placement, glue them in place. Depending on the size of the holes, you may need to trim some of the pictures.
7. On a newspaper-lined surface in a well-ventilated area, give the letterboard letters and even coat of black spray paint. After this coat dries, give the letters an aged patina by gently brushing brown, gray, and white paint over their surfaces. Try not to overthink your application. A random pattern will produce the best result.
8. Use the letterboard letters and other materials like red paint, screws, and twine to write the word family at the top of the frame. Akin to all elements of this prop, you can alter the word, its placement, and the materials used to cater the item to your haunt’s needs.
9. For additional creepiness, smear bloody handprints across the frame, scratch out faces with black paint, burn holes in the photographs with a lighter, and punch out the eyes certain performers with a thumbtack.
10. The prop can be enhanced further, especially if placed in a dimly lit setting, by stringing small LED lights along the inside of the frame and using them to backlight the images.
*You will not use the entire bottle’s content for this project.