$15 - $20 (based on 2017 prices)
Makes one sign
For this project, I employed the years of experience my brother and I gained crafting tombstones out of insulation foam and created a themed sign to greet visitors and set the haunt’s tone. In 2020, the haunt focused on a twisted carnival (a concept, due to its hackneyed nature, I am not very fond of). To overcome this distaste, I decided to draw inspiration from turn-of-the-century travelling shows. I wanted something that looked vintage and did not relying too heavily on clowns.
- One 2’ x 2’ board of foam insulation
- One 10 oz. can of interior/exterior, fast-drying spray paint in nutmeg*
- One 2 oz. bottle of acrylic paint in flat black*
- One 2 oz. bottle of acrylic paint in flat brown*
- One 2 oz. bottle of acrylic paint in flat gray*
- One 2 oz. bottle of acrylic paint in flat green*
- One 2 oz. bottle of acrylic paint in flat navy blue*
- One 2 oz. bottle of acrylic paint in flat orange*
- One 2 oz. bottle of acrylic paint in flat pink*
- One 2 oz. bottle of acrylic paint in flat purple*
- One 2 oz. bottle of acrylic paint in flat red*
- One 2 oz. bottle of acrylic paint in flat turquoise*
- One 2 oz. bottle of acrylic paint in flat white*
- One 2 oz. bottle of acrylic paint in flat yellow*
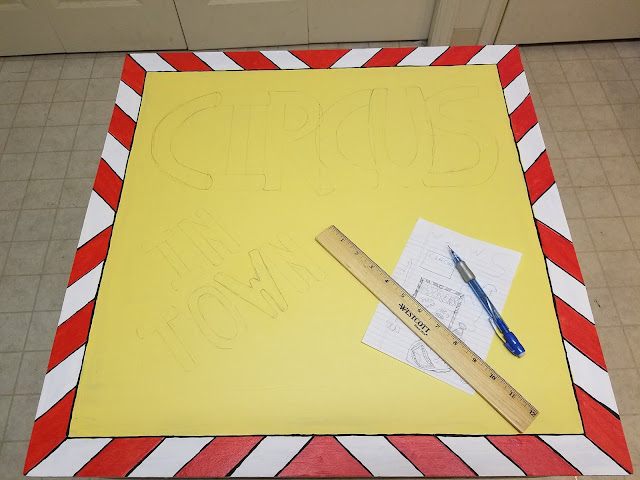
2. On a newspaper-lined surface in a well-ventilated area, give both sides of the sign three even coats of paint. To maintain the travelling show motif, I used traditional red-and-white stripes for the border and a warm yellow for the sign’s face; however, you may utilize the colors which work best for your haunt’s theme.
3. Use black paint to outline the stripes. This will both enhance the colors and mask any uneven lines.
4. Sketch the lettering onto the sign. As with step one, you can free hand the design or create a pattern using paper. Since I wanted to experiment with the text’s layout, I created a pattern which allowed me to do this and then transferred it onto the sign.
5. With a fine-tipped brush, paint over your markings using your chosen colors. To perpetuate the carnival theme, I used bright hues, including green and turquoise, but you can utilize muted shades to correspond with your color scheme. Once the paint has dried, outline the lettering in black to highlight the colors.
6. You can embellish the sign with further details, such as an elephant or other circus-related elements. For this specific version, I picked a laughing clown. As with the sign’s pattern and the lettering, you can free hand the image or trace it from a pattern. To complete the graphic, begin by filling the entire shape with white paint to provide a basic background. Then, trace its outline in black. Lastly, use paints of your choosing to provide the facial features.
7. If you want the sign to have a clean appearance, stop at this point. If you want to give it a grimy appearance, dust the sign with a light coat of nutmeg spray paint. To give the appearance of dirt, hold the can over twelve inches away from the surface and make quick flicking motions. You can also apply a flecking of black paint and smears of brown paint to enhance the weathered patina. To cater the prop to your haunt’s theme, you can incorporate additional factors, such as bloody handprints or swarms of cockroaches.
*You will not use the entire bottle’s content for this project.


No comments:
Post a Comment