$25 - $30 (based on 2015 prices)
Makes four bottles
These props were made for 2015’s haunt as part of its voodoo theme. I saw the idea in a local Italian restaurant – old wine bottles serving as candleholders – and decided to give it a touch of the macabre: old potion bottles repurposed by a voodoo priestess to hold her candles during incantations. Surprisingly, the props have proven rather versatile: later that year, they were used as centerpieces for a gothic wedding; in 2016, they were borrowed by a haunted house to detail their sets; and, this year, I plan to employ them in the haunt’s mad scientist theme. For this version, I used battery-operated candles to add extra light to the haunt (see the unlighted version here).
- Four glass bottles of varying sizes (you can decrease or increase this number)
- One 8 oz. can of oil-based interior wood stain in Jacobean*
- At least four tablespoons of black tea (e.g. Darjeeling, Earl Gray, English Breakfast, etc.)
- One piece of 8” x 11.5” copy paper with potion labels printed on it
- One pan large enough to soak the copy paper
- One 4 oz. bottle of all-purpose tacky glue*
- One hot glue gun and glue sticks
- Four battery-operated LED candles
- Two to three yards of aluminum foil
- One 2 oz. bottle of acrylic paint in flat red*
- One 0.44 oz. bottle of clear nail polish*
2. Boil enough water to completely submerge the copy paper and pour it into the pan. Add the tea. The longer you allow the tea to brew, the darker the stain will become. Likewise, greater amounts of tea will produce a richer stain. I found that a combination of English and Irish Breakfast brewed for over ten minutes produces a nice, deep brown. Submerge the paper into the tea mixture and soak it until it reaches the color you desire. I soaked mine for eight hours and scattered the loose-leaf tea over the top of the paper to add spots. Remove the paper from the water and allow it to dry.
3. After the paper has dried, cut out the labels, leaving a small boarder around their edges. To roughen the labels’ appearance, use sandpaper to fray their sides and create holes. You can also crumple the paper to produce creases. Once you have achieved your desired level of distress, glue the labels to the sides of the bottles. You can use olive or vegetable oil to add further stains. I discovered that applying a small amount of oil to your index finger and patting it on the paper works well.
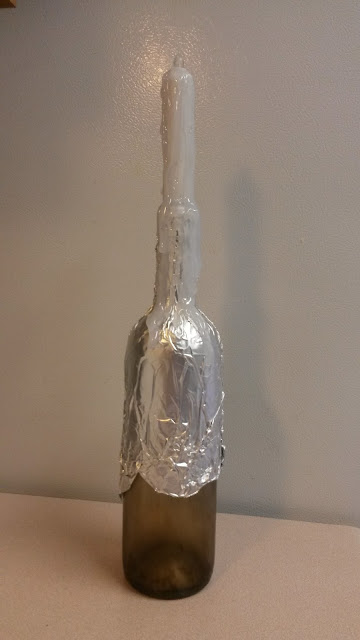
4. Wrap the top of the bottle with aluminum foil, ensuring it is tightly pressed against the glass and as smooth as possible. This will create a surface for the hot glue to cling to as you create the fake candle.
5. Insert the LED candle into the opening of the bottle (to make the process more manageable, select bottles with openings large enough for the candles to easily rest within them) and, using hot glue, give it additional girth. To do this, build up layers and pipe drips of glue down the sides and onto the bottle. The process works best if you move in stages, applying one layer at a time and allowing the glue to cool between each application. Also, I found that pumping the glue along the top of the candle and allowing it to naturally run downward creates the best results.
6. Once the hot glue has cooled, remove the candle from the bottle and peel off the aluminum foil. Do not worry too much if pieces remain in some of the grooves. These will be covered up with the red paint.
7. Apply four coats of red paint to the candle. I used four because I wanted a deep, vibrant red. You, of course, are free to use fewer (or more) coats based on your chosen appearance for the prop.
8. To make the candle look waxy, cover the red paint with a layer of clear nail polish. If you want the candle to seem old and unused rather than freshly melted, do not add the nail polish, but give the candle a light brushing of brown paint to simulate dirt and dust.
9. If you plan to display these props outdoors in windy conditions, give them additional weight by pouring colored sand or rocks into the base. You could also insert plastics insects or other critters into the bottles to correspond with the labels and add extra detail.
*You will not use the entire bottle’s content for this project.


No comments:
Post a Comment