Thursday, March 30, 2017

The Land of Eternal Youth and Beauty: A Mini-Essay

     The search for everlasting youth has consumed the thoughts and actions of numerous individuals throughout the annals of human history. From the bloody baths of Elizabeth Báthory to the tireless escapades of Juan Ponce de León, mankind has repeatedly sought the means to thwart age and prolong mortality. While some of these means, such as Báthory’s macabre soaks, involve the practice of bizarre rituals, others, like Ponce de León’s intangible fountain, entail the discovery of a hidden location which holds the coveted secret to immortality. One such mythical realm is the legendary island Tír-na-n-Og. Although its spelling, as Dáithí Ó hÓgáin explains, has varied over time, the mythology encompassing the fabled land has remained rather consistent. Masked by shady boscage, Tír-na-n-Og – reportedly the dwelling of fairies – has proven an elusive destination for all of mankind, with the exception of one individual. According to legend, the great Irish poet Oisen stumbled upon the mythical realm and lived there for three years (the equivalent of three-hundred years for humans). After returning to the world of man, Oisen was immediately ravished by old age and, before succumbing to the brutal passage of time, the poet related the wonders of Tír-na-n-Og: an untouched region of youth and beauty which does not know sorrow, violence, or death. Since then, the island has remained an obscure location, tantalizing passing ships with fleeting glimpses before vanishing into the horizon or wrecking vessels which have travelled too close with sudden and inexplicable storms. In fact, William Butler Yeats recounts a tale told to M. De La Boullage Le Cong by a Dutch pilot in 1614 about a mysterious island – believed to be Tír-na-n-Og – off the coast of Greenland which haunted their voyage, lingering just out of reach and summoning a wild tempest which nearly destroyed the ship when it sailed closer to its mysterious shore.

Works Referenced

Ó hÓgáin, Dáithí. Irish Superstitions: Irish Spells, Old Wives’ Tales and Folk Beliefs. Park West, Ireland: Gill and Macmillan, Ltd., 2002.

Yeats, William Butler, ed. A Treasury of Irish Fairy and Folk Tales. New York: Barnes and Noble, 2015.

Friday, March 24, 2017

Lighted Witch Bottles

$25 - $30 (based on 2015 prices)
Makes four bottles

These props were made for 2015’s haunt as part of its voodoo theme. I saw the idea in a local Italian restaurant – old wine bottles serving as candleholders – and decided to give it a touch of the macabre: old potion bottles repurposed by a voodoo priestess to hold her candles during incantations. Surprisingly, the props have proven rather versatile: later that year, they were used as centerpieces for a gothic wedding; in 2016, they were borrowed by a haunted house to detail their sets; and, this year, I plan to employ them in the haunt’s mad scientist theme. For this version, I used battery-operated candles to add extra light to the haunt (see the unlighted version here).
  • Four glass bottles of varying sizes (you can decrease or increase this number)
  • One 8 oz. can of oil-based interior wood stain in Jacobean*
  • At least four tablespoons of black tea (e.g. Darjeeling, Earl Gray, English Breakfast, etc.)
  • One piece of 8” x 11.5” copy paper with potion labels printed on it
  • One pan large enough to soak the copy paper
  • One 4 oz. bottle of all-purpose tacky glue*
  • One hot glue gun and glue sticks
  • Four battery-operated LED candles
  • Two to three yards of aluminum foil
  • One 2 oz. bottle of acrylic paint in flat red*
  • One 0.44 oz. bottle of clear nail polish*
1. On a newspaper-lined surface in a well-ventilated area, paint the bottles with the stain. I discovered that applying a thin coat and patting it with paper towels produces a hazed appearance. Likewise, brushing the rim and base with a swift downward motion creates the illusion of grime buildup. To help the stain adhere, roughen the glass with sandpaper.
2. Boil enough water to completely submerge the copy paper and pour it into the pan. Add the tea. The longer you allow the tea to brew, the darker the stain will become. Likewise, greater amounts of tea will produce a richer stain. I found that a combination of English and Irish Breakfast brewed for over ten minutes produces a nice, deep brown. Submerge the paper into the tea mixture and soak it until it reaches the color you desire. I soaked mine for eight hours and scattered the loose-leaf tea over the top of the paper to add spots. Remove the paper from the water and allow it to dry.
3. After the paper has dried, cut out the labels, leaving a small boarder around their edges. To roughen the labels’ appearance, use sandpaper to fray their sides and create holes. You can also crumple the paper to produce creases. Once you have achieved your desired level of distress, glue the labels to the sides of the bottles. You can use olive or vegetable oil to add further stains. I discovered that applying a small amount of oil to your index finger and patting it on the paper works well.
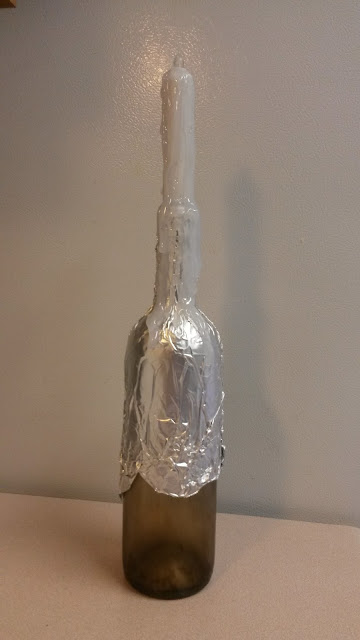
4. Wrap the top of the bottle with aluminum foil, ensuring it is tightly pressed against the glass and as smooth as possible. This will create a surface for the hot glue to cling to as you create the fake candle.
5. Insert the LED candle into the opening of the bottle (to make the process more manageable, select bottles with openings large enough for the candles to easily rest within them) and, using hot glue, give it additional girth. To do this, build up layers and pipe drips of glue down the sides and onto the bottle. The process works best if you move in stages, applying one layer at a time and allowing the glue to cool between each application. Also, I found that pumping the glue along the top of the candle and allowing it to naturally run downward creates the best results.
6. Once the hot glue has cooled, remove the candle from the bottle and peel off the aluminum foil. Do not worry too much if pieces remain in some of the grooves. These will be covered up with the red paint.
7. Apply four coats of red paint to the candle. I used four because I wanted a deep, vibrant red. You, of course, are free to use fewer (or more) coats based on your chosen appearance for the prop.
8. To make the candle look waxy, cover the red paint with a layer of clear nail polish. If you want the candle to seem old and unused rather than freshly melted, do not add the nail polish, but give the candle a light brushing of brown paint to simulate dirt and dust.
9. If you plan to display these props outdoors in windy conditions, give them additional weight by pouring colored sand or rocks into the base. You could also insert plastics insects or other critters into the bottles to correspond with the labels and add extra detail.


*You will not use the entire bottle’s content for this project.

Thursday, March 16, 2017

Stick Bundles

$2 - $5 (based on 2016 prices)
Makes one bundle

I fashioned together this simple bundle of sticks to give an apothecary display more interest. The project was surprisingly easy and quick to produce (I created four bundles in less than an hour). Because this was exhibited indoors, I chose pieces without any dried leaves; however, you can give the prop more character by selecting branches with ample amounts of foliage.
  • A dozen dried sticks in varying sizes
  • Two to three yards of steel wire
  • Two to three yards of dark-brown twine
1. Gather about a dozen sticks. A simple ten-minute walk in the park or woods yields the best (and cheapest) results. Try to select pieces in varying sizes and shapes.
2. Arrange the sticks in an interesting pattern and lash them together with steel wire. This process works best if you create a sturdy base by putting the larger sticks at the bottom and utilize the smaller pieces to construct your design. Additionally, protect your hands during assembly by wearing heavy work gloves.
3. Use rope, twine, or yarn to hide the wire and give the illusion that the sticks are primitively bound with some form of simple lashing. This also masks the wire’s sharp edges and creates a protective guard for walls.
4. Use wire to fashion a hanging loop on the back of the bundle.
5. To contrast the bundle against the wall (and provide additional protection) create a backdrop with creepy cloth and drape strands along the outreaching branches. You can achieve further depth by using cloth in varying colors.
6. For additional detail, add bats, disheveled crows, or snakes. Likewise, try inverting the bundle so the branches hang downward.

Thursday, March 9, 2017

"The Stolen Child" (A Poem)

Akin to many of William Butler Yeats' earlier works, "The Stolen Child" presents a melancholy image of Irish folklore. Originally published in Irish Monthly in 1886, the poem, as David Ross highlights, expands on the mythology of the Sidhe: a fairy who seduces children and abducts them into her dreamy world. In Yeats' rendition, the Sidhe lures the child away with promises of a gentler life removed from the ceaseless sorrow of humanity. In fact, for many scholars, including Matt McGuire, Yeats' world filled with weeping is a commentary on the horrors and injustices induced by modern society.

Of Sleuth Wood in the lake, 
There lies a leafy island 
Where flapping herons wake 
The drowsy water rats; 
There we've hid our faery vats
Full of berrys 
And of reddest stolen cherries. 
Come away, O human child! 
To the waters and the wild,
With a faery, hand in hand, 
For the world's more full of weeping than you can understand.

Where the wave of moonlight glosses 
The dim gray sands with light, 
Far off by furthest Rosses 
We foot it all the night, 
Weaving olden dances,
Mingling hands and mingling glances 
Till the moon has taken flight; 
To and fro we leap,
And chase the frothy bubbles, 
While the world is full of troubles 
And anxious in its sleep. 
Come away, O human child! 
To the waters and the wild,
With a faery, hand in hand, 
For the world's more full of weeping than you can understand.

Where the wandering water gushes 
From the hills above Glen-Car, 
In pools among the rushes, 
That scarce could bathe a star, 
We seek for slumbering trout 
And whispering in their ears; 
We give them evil dreams, 
Leaning softly out 
From ferns that drop their tears 
Of dew on the young streams. 
Come! O, human child! 
To the woods and waters wild, 
With a faery, hand in hand, 
For the world's more full of weeping than you can understand.

Away with us, he's going, 
The solemn-eyed; 
He'll hear no more the lowing 
Of the calves on the warm hill-side. 
Or the kettle on the hob 
Sing peace into his breast; 
Or see the brown mice bob 
Round and round the oatmeal chest,
For he comes, the human child, 
To the woods and waters wild, 
With a faery hand in hand, 
For the world's more full of weeping than he can understand.

Works Referenced

McGuire, Matt. Contemporary Scottish Literature. New York: Palgrave McMillan, 2008.

Ross, David. Critical Companion to William Butler Yeats: A Literary Reference to His Life and Work. New York: Facts on File, 2009.

Yeats, William Butler. "The Stolen Child." William Butler Yeats: Early Poems. New York: Dover Publications, 1993. Pages 12-13.

Thursday, March 2, 2017

Witch Bottles

$25 - $30 (based on 2015 prices) 
Makes five bottles

These props were made for 2015’s haunt as part of its voodoo theme. I saw the idea in a local Italian restaurant – old wine bottles serving as candleholders – and decided to give it a touch of the macabre: old potion bottles repurposed by a voodoo priestess to hold her candles during incantations. Surprisingly, the props have proven rather versatile: later that year, they were used as centerpieces for a gothic wedding; in 2016, they were borrowed by a haunted house to detail their sets; and, this year, I plan to employ them in the haunt’s mad scientist theme.
  • Five glass bottles of varying sizes (you can decrease or increase this number)
  • One 8 oz. can of oil-based interior wood stain in Jacobean*
  • At least four tablespoons of black tea (e.g. Darjeeling, Earl Gary, English Breakfast, etc.)
  • One piece of 8” x 11.5” copy paper with potion labels printed on it
  • One pan large enough to soak the copy paper
  • One 4 oz. bottle of all-purpose tacky glue*
  • One 2 oz. bottle of acrylic paint in flat black*
  • One 2 oz. bottle of acrylic paint in flat red*
  • One hot glue gun and glue sticks
  • Five wooden toothpicks
  • One 0.44 oz. bottle of clear nail polish*
1. On a newspaper-lined surface in a well-ventilated area, paint the bottles with the stain. I discovered that applying a thin coat and patting it with paper towels produces a hazed appearance. Likewise, brushing the rim and base with a swift downward motion creates the illusion of grime buildup. To help the stain adhere, roughen the glass with sandpaper.
2. Boil enough water to completely submerge the copy paper and pour it into the pan. Add the tea. The longer you allow the tea to brew, the darker the stain will become. Likewise, greater amounts of tea will produce a richer stain. I found that a combination of English and Irish Breakfast brewed for over ten minutes produces a nice, deep brown. Submerge the paper into the tea mixture and soak it until it reaches the color you desire. I soaked mine for eight hours and scattered the loose-leaf tea over the top of the paper to add spots. Remove the paper from the water and allow it to dry.
3. After the paper has dried, cut out the labels, leaving a small boarder around their edges. To roughen the labels’ appearance, use sandpaper to fray their sides and create holes. You can also crumple the paper to produce creases. Once you have achieved your desired level of distress, glue the labels to the sides of the bottles. You can use olive or vegetable oil to add further stains. I discovered that applying a small amount of oil to your index finger and patting it on the paper works well.
4. Using hot glue, fashion a fake candle on the top of the bottle. To create this, build up layers and pipe drips of glue down the sides and onto the bottle. The process works best if you move in stages, applying one layer at a time and allowing the glue to cool between each application. Also, I found that pumping the glue along the top of the candle and allowing it to naturally run downward creates the best results. If you want the candle to have a wick, insert a toothpick into the glue while it is still hot and build up layers around it.
5. Apply four coats of red paint to the candle. I used four because I wanted a deep, vibrant red. You, of course, are free to use fewer (or more) coats based on your chosen appearance for the prop.
6. To make the candle look waxy, cover the red paint with a layer of clear nail polish. If you want the candle to seem old and unused rather than freshly melted, do not add the nail polish, but give the candle a light brushing of brown paint to simulate dirt and dust.
7. If you have chosen to incorporate the wick, cut the toothpick at an angle and give it a few even coats of black paint.
8. If you plan to display these props outdoors in windy conditions, give them additional weight by pouring colored sand or rocks into the base before creating the fake candles. You could also insert plastics insects or other critters into the bottles to correspond with the labels and add extra detail.


*You will not use the entire bottle’s content for this project.