$35 - $40 (based on 2020 prices)
Makes one display
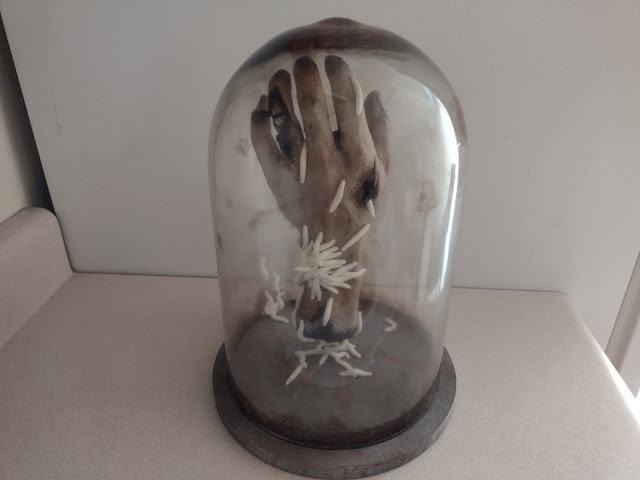
I was impressed with the rotten patina of the decomposing fingers, so I decided to apply the paint job to larger items, specifically severed limbs. To achieve this goal, I created two props: one with a rotting hand (featured here) and one with a decomposing leg. To further enhance their ickiness, I covered the limbs in maggots, just as I did the maggot doll for 2017’s haunt. - One vinyl severed hand small enough to fit within the cloche
- One glass cloche with detachable wooden base (roughly twelve inches tall)
- One 2 oz. bottle of acrylic paint in flat black*
- One 2 oz. bottle of acrylic paint in flat brown*
- One 2 oz. bottle of acrylic paint in dark gray*
- One 2 oz. bottle of acrylic paint in light gray*
- One 2 oz. bottle of acrylic paint in khaki*
- One bag of maggots (roughly one-hundred insects per bag)
- One 0.14 oz. bottle of superglue gel
- One six-inch wooden dowel
- One 10 oz. can of interior/exterior, fast-drying spray paint in flat black*
- One 10 oz. can of interior/exterior, fast-drying spray paint in metallic silver*
- One 8 oz. can of oil-based interior wood stain in Jacobean*
1. On a newspaper-lined surface, give the hand three even coats of khaki paint. Although I used three, you may want more or less based on your desired coverage. 2. Lightly dry brush brown paint onto the fingertips, knuckles, and other raised areas. I discovered that applying a small amount of paint to your thumb and index finger and rubbing it onto the prop works well.
3. Once the brown paint has dried, repeat the process in step two with black. During this step, be careful not to cover too much of the brown paint.
4. Begin detailing the nails with a coat of dark gray paint then, after that dries, dab light gray onto the nails, building up layers until they look decrepit. To complete the process, smudge black around the tips of the fingers and along their cuticles.
5. Color the stump and the wounds black and, using a brush with splayed bristles, stipple black paint around their edges.
6. Glue the maggots to the hand. For believability, you want to pick one or two of the wounds where they will swarm outward. I decided to do this with the laceration on the wrist, building up a large mass and gradually spreading the insects out. The specific maggots I bought were made of a sticky gel, so I had to use superglue to hold them in place. Although it took several hours to adhere each insect individually, the final product was well worth the effort and time. During this process, ensure that you reserve at least a dozen of the insects for steps eleven and thirteen.
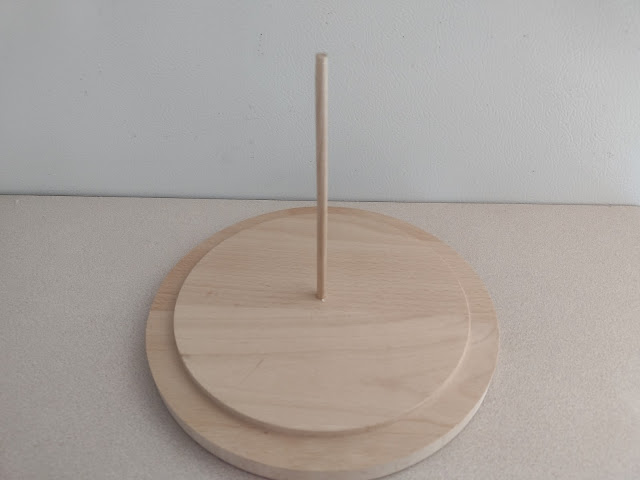
7. Cut the wooden dowel into a six-inch section. Depending on the height of the cloche, you may need to adjust this measurement. Then, determine where you would like the hand to rest below the cloche and, using a 13/64 bit, drill a hole in the base, insert the dowel, and glue it in place.
8. On a newspaper-lined surface in a well-ventilated area, build up layers of black and metallic silver spray paint to give the base and dowel the look of steel. It works best to apply a base coat of black followed by sliver, working in quick bursts to allow parts of the black to remain visible. You can also touch up portions with additional blasts of black if the silver becomes too heavy.
9. Once the spray paint dries, create a wash of brown paint and use it to add a level of grime to the prop, allowing the liquid to settle in the crevices.
10. With a 13/64 bit, drill a hole into the stump of the hand and slide it onto the dowel, gluing it in place. To guarantee the prop fits under the cloche, you may need to play with its positioning a few times before permanently attaching it to the dowel.
11. Using some of the maggots reserved from step six, glue them to the dowel and base. You want to make it look like some have crawled from the hand onto the stand to help bridge the gap between both items and make the prop appear more cohesive.
12. On a newspaper-lined surface in a well-ventilated area, paint the cloche with the wood stain. I discovered that applying a thin coat and patting it with paper towels produces a hazed appearance. Likewise, brushing the rim with a swift downward motion creates the illusion of grime buildup.
13. For added creepiness, glue the remaining maggots crawling up the side of the cloche once the wood stain has dried. I elected to do this in just one spot to make the effect subtle; however, you can do this in multiple areas for more visual impact.
14. Reattach the cloche to its base. If you plan for a more permanent display, you can glue the item down. Likewise, you can add extra embellishments, such as a specimen tag or biohazard label, to cater the prop to your theme.
*You will not use the entire bottle’s content for this project.


