Friday, August 18, 2023

Sickle Ornament

$15 - $20 (based on 2016 prices)
Makes one ornament

This prop was meant to be an alternate head for the scarecrow, since I did not care for the version I made; however, during the haunt, I decided to use a lighted steer skull for the scarecrow’s head, which meant this prop found a new home hanging from the side of the house. Although it was relegated to a spot not widely seen by visitors, it was (and continues to be) my favorite build, which is why it is the profile picture for Haunted Hill’s Instagram and the title card for the YouTube videos.
  • One human-size plastic skull
  • One five-pound flour sack
  • At least four tablespoons of dark roasted coffee grounds
  • One pan large enough to soak the flour sack
  • One 2 oz. bag of spider webbing
  • One 4 oz. bottle of all-purpose tacky glue
  • One 10 oz. cans of interior/exterior, fast-drying spray paint in flat brown
  • One 10 oz. cans of interior/exterior, fast-drying spray paint in metallic silver 
  • Two plastic sickles
  • One 2 oz. bottle of acrylic paint in flat black*
  • One 2 oz. bottle of acrylic paint in flat brown*
  • One 2 oz. bottle of acrylic paint in flat red*
  • One 2 oz. bottle of acrylic paint in flat white*
  • One 0.44 oz. bottle of clear nail polish*
  • One newspaper
  • One 4 oz. bottle of wood glue
  • Once yard of brown twine
  • One foot of steel wire
1. Boil enough water to completely submerge the flour sack and pour it into the pan. Add the coffee. The longer you allow the coffee to brew, the darker the stain will become. Likewise, greater amounts of coffee will produce a richer stain. Submerge the sack in the coffee mixture and soak it until it reaches the color you desire. I soaked mine for three days and scattered the coffee grounds over the top of the fabric to add spots. Remove the sack from the water and allow it to dry.
2. Once the sack has dried, use a seam ripper to open one side of the sack. This will create a larger opening for the skull and make the process in step five much easier.
3. Remove the mandible from the skull and hot glue it agape to create a screaming face. To aid the process, use a sturdy object – a glass jar or tin can – to support the skull as the glue dries. You may need to apply multiple coats to ensure a firm hold.
4. Use the spider webbing (or cotton padding) to stuff the corner of the sack and give it extra girth. This will prevent the corner from folding over after the skull has been inserted and add to the prop’s overall visual appeal.
5. Starting at the front of the skull, glue the sack to the prop. I found that this step works best if you move in stages: apply a layer of glue to one section, hold the fabric down until it sticks, and then repeat the process. You may need to apply ample amounts of glue in the eye sockets and nasal cavities to get the fabric to hold their forms.
6. Once the glue has fully dried, give the burlap a light dusting of brown spray paint to simulate dirt. To achieve this, hold the can roughly twelve inches away from the surface and make quick flicking motions.
7. Use red paint to give the illusion of blood seeping from the eyes and nose. It works best to fill in the deepest recesses first and then spread the paint outward, following the course that the flow would naturally take as it drips downward.
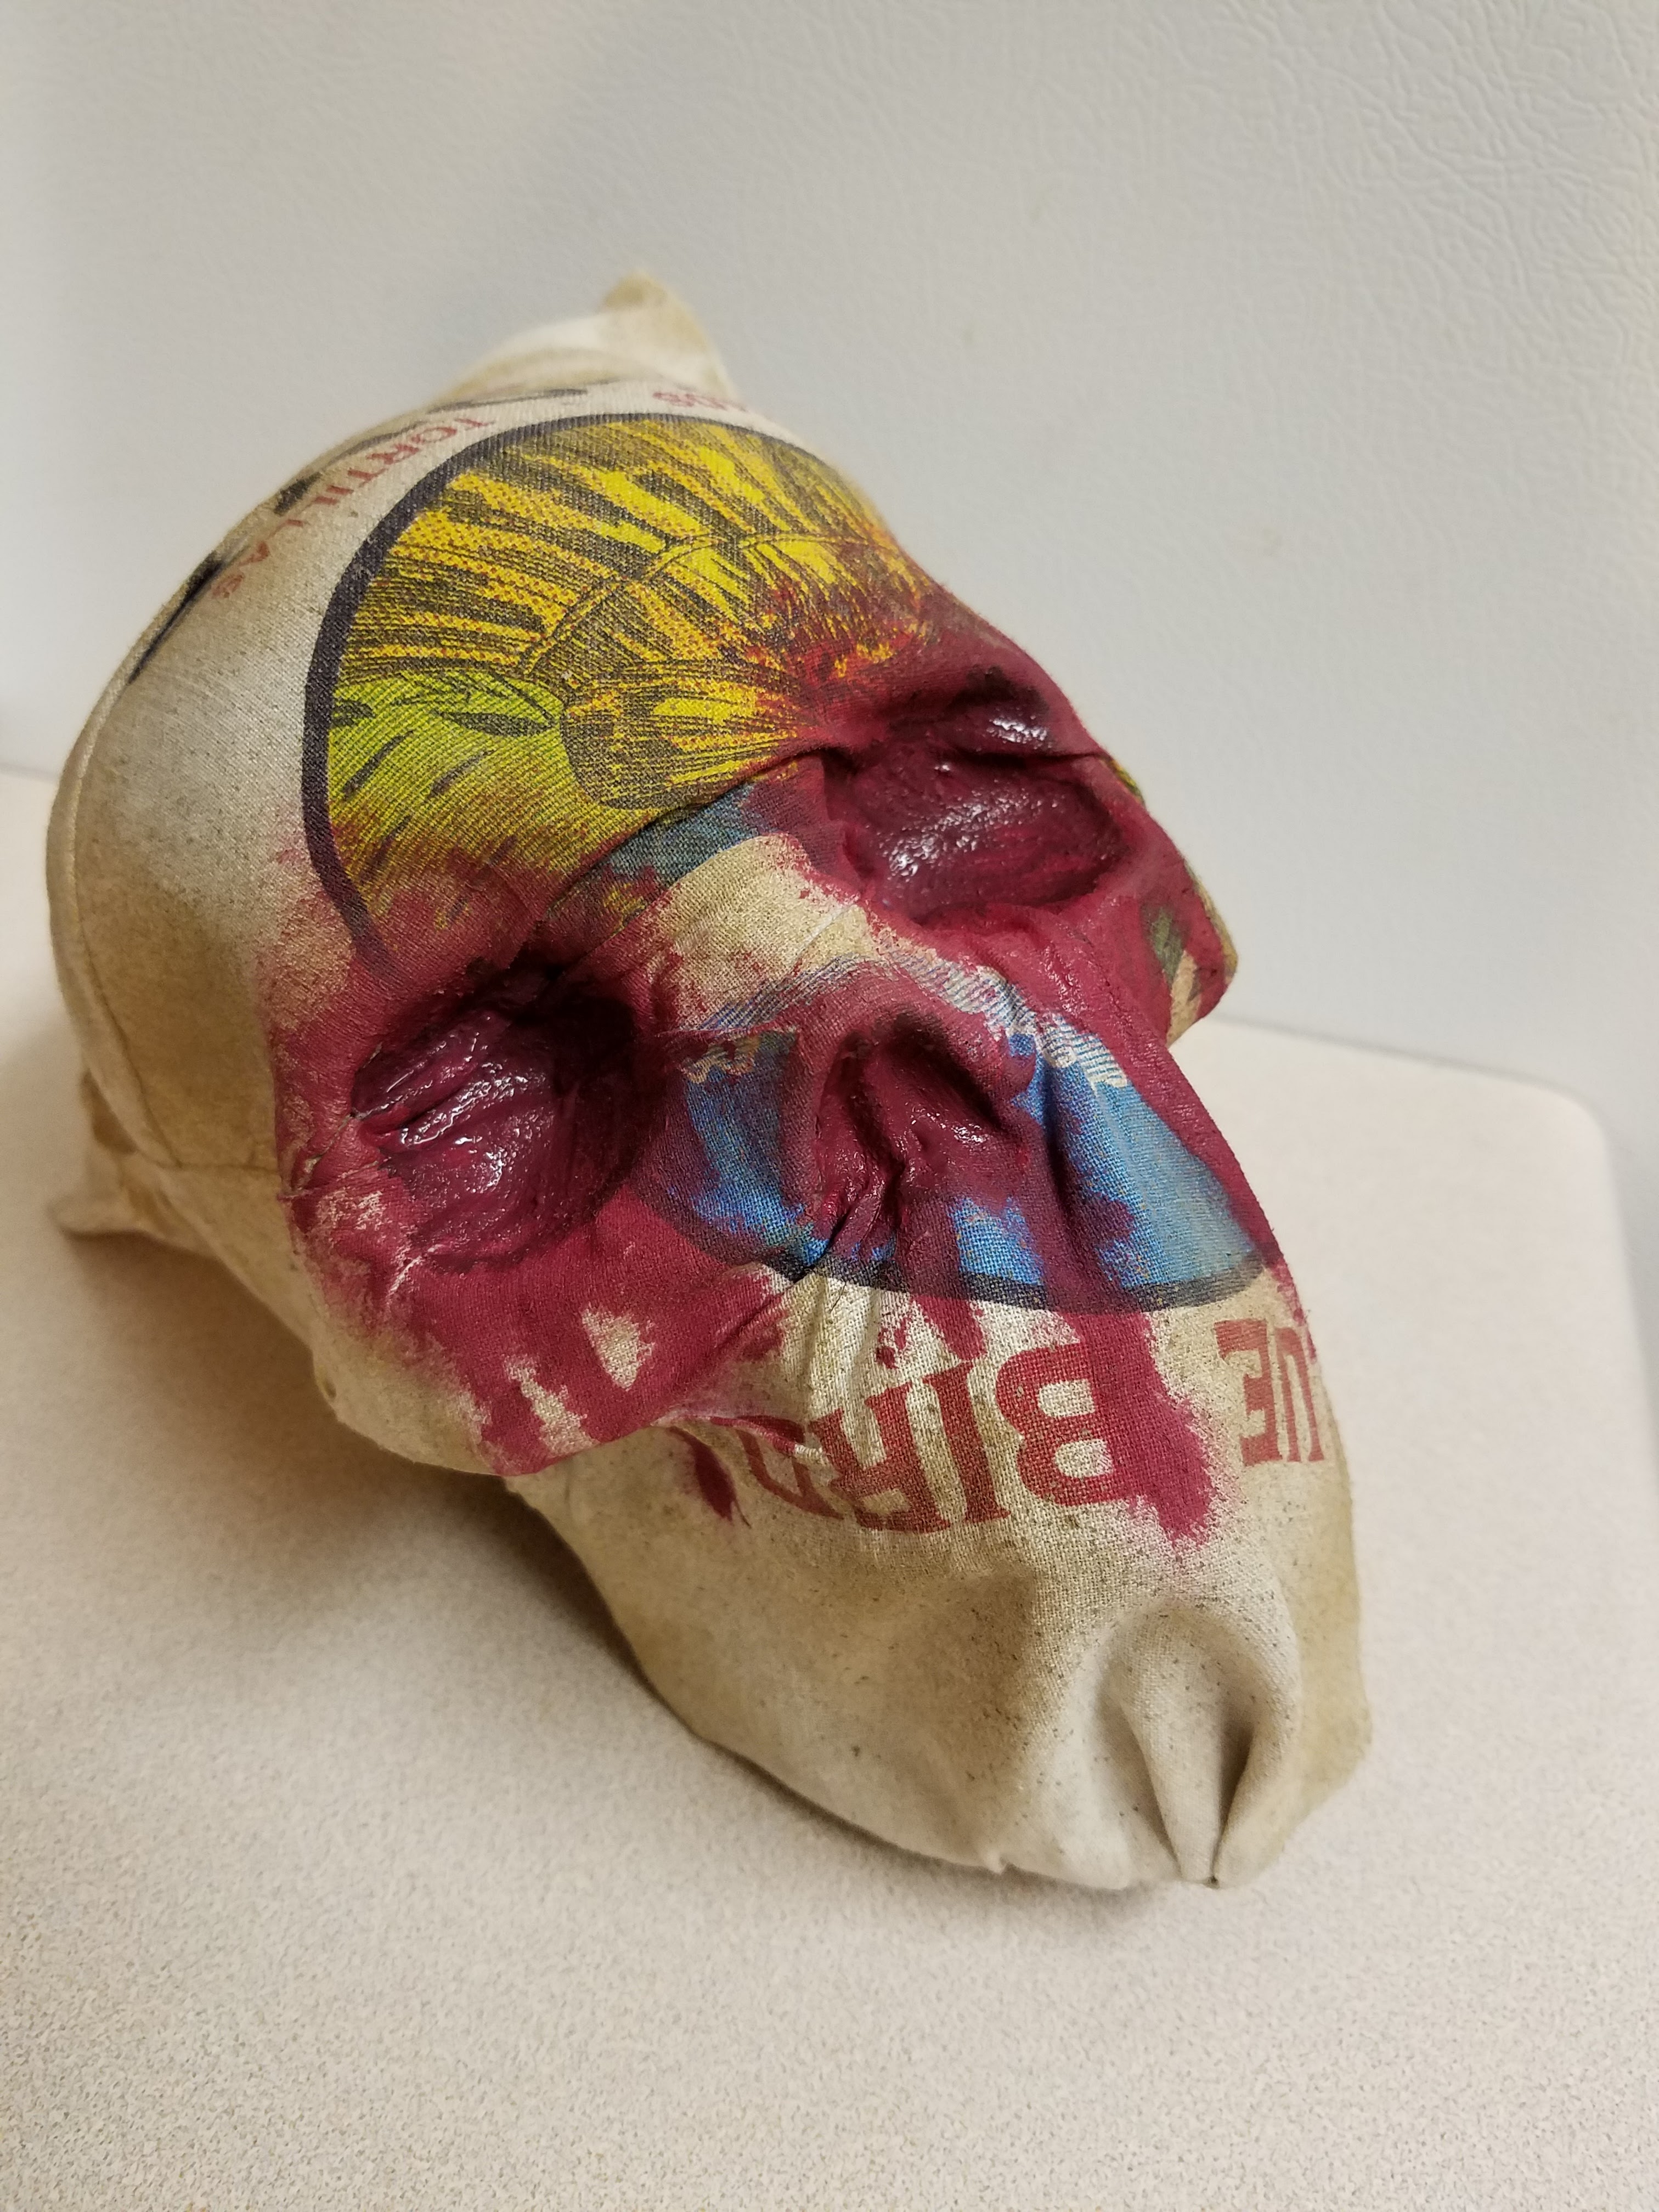
8. After the paint has dried, give it a coat or two of clear nail polish to make it appear wet. Akin to step seven, start with the depressions made by the eyes and nose and move outward.
9. On a newspaper-lined surface in a well-ventilated area, give the sickles a few even coats of metallic spray paint. I used two, but you may apply more or less. To achieve a nice coverage, select a paint which adheres to plastic.
10. After the metallic paint has dried, give the blades a rusted patina. Begin by dabbing red paint onto their surfaces. As you do so, concentrate your application on areas where rust would naturally form, particularly along the edges of the blades. Once the red has dried, repeat the process with brown paint. During this application, be careful not to cover too much of the red paint. Lastly, apply a slight flecking of black paint. You can do this by either quickly flicking a paintbrush or using an old toothbrush and strumming your finger across the bristles. Since this process flings paint everywhere, it’s best to perform it outside.
11. Make the papier mache paste by mixing ½ cup of glue and ½ cup of water in a bowl. Try to use a sealable container. This gives you the ability to store the mixture for a day or two between applications. Also, to give the paste added support, use a combination of all-purpose glue and wood glue (stay away from school glue because it is washable and will dissolve in the water).
12. Cut the newspaper into strips, soak them in the paste, and apply them to the handles. To make the process more manageable, keep the strips at a reasonable size (mine were roughly six inches long and two inches wide). Similarly, only apply a few layers at a time and allow each layer to completely dry before adding more (I did two layers during each application and let them dry for twenty-four hours).
13. Give the handles a few even coats of white paint. This covers the newspaper’s print and gives the prop a blank canvas for the painting process. You could bypass this step by using white copy paper rather than newspaper for the papier mache.
14. To give the handles a grimy appearance, water down brown paint and brush it over their surfaces, ensuring the liquid settles into all the cracks and fissures (you can also use a spray bottle for the application). Allow the mixture to sit for a few minutes and then wipe it clean. Once you have achieved the look you desire, repeat this process with black paint to add further detail. You may want to experiment with the consistency prior to doing all of this: the more water you add, the fainter/lighter the wash; the less water you add, the deeper/darker the wash. For additional detail, wrap twine around the handles and glue it in place.
15. Position the sickles so their handles form an X and their blades face opposite each other. Then, glue them together. Although I used hot glue, you might consider superglue, especially if you plan to display the prop outdoors in windy conditions.
16. Use the steel wire to create a hanging loop on the back of the sickles. For a more rustic look, you can use the same twine wrapped around the sickles’ handles.
17. Rest the skull in the juncture between the two handles and glue it in place, as with step fifteen, use superglue for a sturdier hold, particularly if the prop will be exposed to the elements.
18. The prop can be embellished with additional details to cater it to your haunt’s theme, such as cockroaches crawling across its surface or a few severed ears and fingers dangling from the blades.
*You will not use the entire bottle’s content for this project.

Friday, August 11, 2023

"The Fairy Well of Lagnanay" (A Poem)

Originally meant to be a companion piece for “The Fairy Thorn,” “The Fairy Well of Lagnanay” was published in the April 1833 issue of Blackwood’s Edinburgh Magazine as “The Fairy Well.” Along with the title change, the poem was riddled with spelling mistakes and lacked its companion piece. Understandably, all of these factors thoroughly upset author Samuel Ferguson, who later had it republished in 1846 under the correct title in Denis Florence McCarthy’s anthology Book of Irish Ballads.[1] In this tale, a heartbroken woman begs her sister to accompany her to the fairy well of Langnanay, where she longs to end her suffering and join Anna Grace (who disappears in The Fairy Thorn) among the fairies.
 
Mournfully, sing mournfully –
“O listen, Ellen, sister dear:
Is there no help at all for me,
But only ceaseless sigh and tear?
Why did not he who left me here,
With stolen hope steal memory?
O listen, Ellen, sister dear,
(Mournfully, sing mournfully) –
I’ll go away to Sleamish hill,
I’ll pluck the fairy hawthorn-tree,
And let the spirits work their will;
I care not if for good or ill,
So they but lay the memory
Which all my heart is haunting still!
(Mournfully, sing mournfully) –
The Fairies are a silent race,
And pale as lily flowers to see;
I care not for a blanched face,
For wandering in a dreaming place,
So I but banish memory: –
I wish I were with Anna Grace!
Mournfully, sing mournfully!
 
Hearken to my tale of woe –
‘Twas thus to weeping Ellen Con,
Her sister said in accents low,
Her only sister, Una bawn:
‘Twas in their bed before the dawn,
And Ellen answered sad and slow, –
“Oh Una, Una, be not drawn
(Hearken to my tale of woe) –
To this unholy grief I pray,
Which makes me sick at heart to know,
And I will help you if I may:
– The Fairy Well of Lagnanay –
Lie nearer me, I tremble so, –
Una, I’ve heard wise women say
(Hearken to my tale of woe) –
That if before the dews arise,
True maiden in its icy flow
With pure hand bathe her bosom thrice,
Three lady-brackens pluck likewise,
And three times round the fountain go,
She straight forgets her tears and sighs.”
Hearken to my tale of woe!
 
All, alas! and well-away!
“Oh, sister Ellen, sister sweet,
Come with me to the hill I pray,
And I will prove that blessed freet!”
They rose with soft and silent feet,
They left their mother where she lay,
Their mother and her care discreet,
(All, alas and well-away!)
And soon they reached the Fairy Well,
The mountain’s eye, clear, cold and grey,
Wide open in the dreary fell:
How long they stood ‘twere vain to tell,
At last upon the point of day,
Bawn Una bares her bosom’s swell,
(All, alas and well-away!)
Thrice o’er her shrinking breasts she laves
The gliding glance that will not stay
Of subtly-streaming fairy waves: –
And now the charm three brackens craves,
She plucks them in their fring’d array: –
Now round the well her fate she braves,
All, alas! and well-away!
 
Save us all from Fairy thrall!
Ellen sees her face the rim
Twice and thrice, and that is all--
Fount and hill and maiden swim
All together melting dim!
“Una! Una!” thou may’st call,
Sister sad! but lith or limb
(Save us all from Fairy thrall! )
Never again of Una bawn,
Where now she walks in dreamy hall,
Shall eye of mortal look upon!
Oh! can it be the guard was gone,
The better guard than shield or wall?
Who knows on earth save Jurlagh Daune?
(Save us all from Fairy thrall! )
Behold the banks are green and bare,
No pit is here wherein to fall:
Aye – at the fount you well may stare,
But nought save pebbles smooth is there,
And small straws twirling one and all.
Hie thee home, and be thy pray’r,
Save us all from Fairy thrall.[2]
 
Works Referenced
 
Campbell, Matthew. Irish Poetry Under the Union, 1801-1924. New York: Cambridge University Press, 2014.
 
Ferguson, Samuel. “The Fairy Well of Lagnanay.” The Poets and Poetry of Ireland with Historical and Critical Essays and Notes. Ed. Alfred Williams. Boston, MA: James Osgood and Company, 1881. 396-399.
____________________
[1] Campbell, 221.
[2] Ferguson, 396-399.

Friday, August 4, 2023

Laboratory Specimens

$35 - $40 (based on 2020 prices)
Makes five jars 
 
The laboratory for 2020’s haunt required dozens of jarred specimens, so I created a variety of props to provide the doctor with a vast assortment of subjects. For this version, I repurposed a collection of plastic body parts and purchased a series of cheap containers from the secondhand store to reduce the overall cost. To maintain a sense of cohesion within the haunt, I employed several of the same techniques utilized while building the aquatic specimens, particularly the wood-stained glass and yellow formalin solution.
  • Five glass jars of varying sizes (you can decrease or increase this number)
  • One 8 oz. can of oil-based interior wood stain in Jacobean*
  • One piece of 8” x 11.5” paper with specimen labels printed on it
  • At least four tablespoons of black tea (e.g. Darjeeling, Earl Gary, English Breakfast, etc.)
  • One pan large enough to soak the paper
  • One 4 oz. bottle of all-purpose tacky glue*
  • Five various body parts and/or severed limbs
  • One 0.3 fluid ounce bottle of red food coloring*
  • One 0.3 fluid ounce bottle of yellow food coloring*
1. Thoroughly wash and dry the jars and then, on a newspaper-lined surface in a well-ventilated area, paint their surfaces with the wood stain. I found applying a thin coat and patting it with paper towels produces a hazed appearance. Also, brushing the rims and bases with a swift downward motion creates the illusion of grime buildup.
2. Boil enough water to completely submerge the copy paper and pour it into the pan. Add the tea. The longer you allow the tea to brew, the darker the stain will become. Likewise, greater amounts of tea will produce a richer stain. I discovered that a combination of English and Irish Breakfast brewed for over ten minutes produces a nice, deep brown. Submerge the paper into the tea mixture and soak it until it reaches the color you desire. I soaked mine for eight hours and scattered the loose-leaf tea over the top of the paper to add spots. Remove the paper from the water and allow it to dry.
3. After the paper has dried, cut out the labels, leaving a small border around their edges, and give your specimens names. To roughen the labels’ appearance, use sandpaper to fray their sides and create holes. You can also crumple the paper to produce creases.
4. Once you have achieved your desired level of distress, glue the labels to the sides of the jars. You can use olive or vegetable oil to add further stains (apply a small amount of oil to your index finger and pat it on the paper).
5. Add the body parts and severed limbs to their corresponding jar. Since they will be submerged in water for an extended period of time, it is best to use items made from plastic or vinyl. Additionally, because the food coloring may stain, select items you won’t mind ruining.
6. Fill a large pitcher with enough water for all five jars and add a few drops of yellow food coloring and a tint of red to make it appear like a formalin solution. Since you still want the specimens to be visible through the liquid, gradually add the coloring until it reaches the hue you desire.
7. Pour the liquid into the jars, filling them enough to fully submerge the specimens. If you have an issue with the body parts and severed limbs floating, you can reduce their buoyancy by cutting small holes into unnoticeable areas and using the openings to fill them with water.
8. Repeat the process in step one with the jars’ lids, dirtying their surfaces with the wood stain. For the time-pressed haunter, it may be helpful to stain all of the items at once. For an alternate look, you could spray paint the lids with silver and use brown and red paint to create a rusted patina.
9. Reattach the lids to the jars. For permanency, you can seal the jars with hot glue or superglue if you plan to keep them for several years. Likewise, the props can be enhanced further with subtle details, like biohazard or poisonous labels, to cater them to the specific theme of your haunt. 
*You will not use the entire bottle’s content for this project.

Friday, July 28, 2023

Human Sacrifices of the Moche: A Mini-Essay

     As Jan Bremmer explains, the minimization of emotional and financial burdens is a primary focus for the civilizations that practice human sacrifices, with the society striving to reduce the number of victims whose deaths would cause extended periods of grief and negatively impact daily functions. Hence, most civilizations, Bremmer claims, tackle this concern in one of two ways: victims from the community are either extremely old or gathered from the outside in the forms or war captives or slaves.[1] A prime example of this is the warrior society of the Moche who thrived along the Peruvian coast between 200 C.E. and 750 C.E. and became known for their complex sacrifices of conquered soldiers.[2] During the practice, captives were stripped and brought before a panel of priests wearing anthropozoomorphic masks who slit the victim's throat, poured their blood into a cup, and distributed the container among attendants to drink (some depictions on Moche pottery also show the victim being dismembered).[3] In fact, some portrayals of the event show women, sporting long braided tresses, participated in the practice by carrying the goblet that housed the victim's blood.[4] As Steve Bourget contends, though, much of our modern understanding of the Moche's human sacrifices are limited to interpretations of archeological evidence, which means the full story has been lost with time and what is known is an educated guess cobbled together by archeological discoveries.[5]
 
Works Referenced
 
Benson, Elizabeth. "Iconography Meets Archaeology." The Art and Archaeology of the Moche: An Ancient Andean Society of the Peruvian North Coast. Eds. Steve Bourget and Kimberly Jones. Austin, TX: University of Texas Press, 2008. 1-22. 
 
Bourget, Steve. Sacrifice, Violence, and Ideology Among the Moche: The Rise of Social Complexity in Ancient Peru. Austin, TX: University of Texas Press, 2016.
 
Bremmer, Jan. "Human Sacrifice: A Brief Introduction." The Strange World of Human Sacrifice. Ed. Jan Bremmer. Paris: Peeters, 2007. 1-8.
 
Bruhns, Karen Olsen, and Karen Stothert. Women in Ancient America. Norman, OK: University of Oklahoma Press, 1999.
 
MacGregor, Neil. A History of the World in 100 Objects. New York: Viking, 2011. 
____________________
[1] Bremmer, 3-4.
[2] MacGregor, 307-312.
[3] Benson, 11.
[4] Bruhns and Stothert, 183.
[5] Bourget, 6.

Friday, July 21, 2023

Framed Torso

$40 - $50 (based on 2020 prices)
Makes one frame 
 
To accompany props like the skinned lab monster, I built this framed torso to hang in the laboratory and add to the mad scientist’s bevy of maniacal experiments. Since the latex chest plate proved rather expensive, I reduced the prop’s costs by purchasing the frame from a secondhand store, salvaging an old shipping box, and using two large scraps of white fabric leftover from previous builds. 
  • One 16” x 20” picture frame
  • One 10 oz. can of interior/exterior, fast-drying spray paint in flat black*
  • One 10 oz. can of interior/exterior, fast-drying spray paint in flat brown*
  • One 10 oz. can of interior/exterior, fast-drying spray paint in metallic silver*
  • One 2 oz. bottle of acrylic paint in flat black*
  • One 2 oz. bottle of acrylic paint in flat brown*
  • Two to three yards of white fabric
  • At least four tablespoons of dark roasted coffee grounds
  • One pan large enough to soak the cloth
  • One 4 oz. bottle of all-purpose tacky glue*
  • One cardboard box (roughly 7” x 5” x 3”)
  • One latex chest plate
  • Three to four yards of twine
  • One 0.3 fluid ounce bottle of red food coloring*
  • One 4 oz. bottle of clear, all-purpose tacky glue gel*
1. Remove the backing and any glass from the frame and, on a newspaper-lined surface in a well-ventilated area, apply two even coats of silver spray paint. Although I used two coats, you may want more or less depending on your desired coverage.
2. To give the frame a filthy appearance, water down brown paint and brush it over the surface, ensuring the liquid settles into all the fissures (you can also use a spray bottle for the application). Allow the mixture to sit for a few minutes and then wipe it clean. You may want to experiment with the consistency prior to doing this: the more water you add, the fainter/lighter the wash; the less water you add, the deeper/darker the wash. Once you have achieved the look you desire, apply a slight flecking of black paint. You can do this by either quickly flicking a paintbrush or using an old toothbrush and strumming your finger across the bristles. Since this process flings paint everywhere, it’s best to perform it outside.
3. Boil enough water to completely submerge the cloth and pour it into the pan. Add the coffee. The longer you allow the coffee to brew, the darker the stain will become. Likewise, greater amounts of coffee will produce a richer stain. Submerge the fabric in the coffee mixture and soak it until it reaches the color you desire. I soaked mine for eight hours (long enough to give it a slight tint) and scattered the coffee grounds over the top to add spots. Remove the cloth from the water and allow it to dry.
4. Trim the fabric to 18” x 22”, stretch it across the frame’s backing, and glue it in place. I found it works best to glue one side to serve as an anchor and then work the fabric from there, ensuring the surface is as smooth as possible. Although I gave myself a one-inch border to work with, you may want to leave additional fabric to give you more leeway.
5. To add a uniform level of age and distress, dust the fabric with a light coat of black and brown spray paint. You can also apply a flecking of black paint and smears of brown to enhance the weathered appearance.
6. Determine where you want the chest to sit on the backing and position the box where the sternum will be. Then, glue it in that spot. This will serve as support for the chest plate to prevent it from drooping.
7. Remove the elastic band from the chest plate, position it over the box so its sternum rests along the center, and glue it in place. For visual appeal, you can create jagged edges along the plate to make it appear as though it was haphazardly cut from the body.
8. Thread the twine through the chest. You want to give the illusion that it is lashed to the backing with the strands. Do not overthink your process (a chaotic web of strings will only enhance the creepiness). I found a darning needle works best, since the latex is too thick for a regular needle.
9. Reattach the frame to the backing and, for added support, glue it down. Depending on the chest’s position, you may need to trim portions of it to allow the frame to sit securely on the backing.
10. In a plastic container (because the food coloring will stain, use something disposable or that you won’t mind dying), pour in your desired amount of clear glue gel and slowly add red food coloring to the solution until it achieves the sanguine hue you desire. To give the blood further density, add blue food coloring and mix well.
11. Apply the blood glue to the prop. You can use an old spoon or plastic utensil to strategically dribble the liquid along chosen areas (around the edges of chest) or pour it haphazardly for a gory mess.
12. If the frame did not come with a hanging hook, you can attach a store-bought version or fashion your own with steel wire. Also, the prop can be enhanced with additional details, like swarms of maggots or a specimen tag, to cater it to your haunt’s theme.
*You will not use the entire bottle’s content for this project.

Friday, July 14, 2023

"Betrayed" (A Poem)

In “The Death Potion,” Lizette Woodworth Reese explores the role of the jilted lover, telling a tale where the narrator creates a potion to take the life of the woman who stole her beloved. In “Betrayed,” the author continues the theme, calling upon Death to console her broken heart. 
 
She is false, O Death, she is fair!
Let me hide my head on thy knee;
Blind mine eyes, dull mine ears, O Death!
She hath broken my heart for me!
 
Give me a perfect dream;
Find me a rare, dim place;
But let not her voice come nigh,
And keep out her face – her face![1] 
 
Works Referenced 
 
Reese, Lizette Woodworth. “Betrayed.” A Handful of Lavender. Boston, MA: Houghton, Mufflin, and Company, 1891. 11
____________________
[1] Reese, 11.

Friday, July 7, 2023

Heart Tray

$15 - $20 (based on 2020 prices)
Makes one tray 
 
I wanted to litter the laboratory of 2020’s haunt with trays of fresh medical experiments, so I made three versions: one with a brain, another with a face, and a third with a heart. This variation – the one with the heart – incorporated the old pill bottles and bloody syringes used for many of the haunt’s props to create a unified theme.
  • One 9” x 13” metal baking sheet
  • One 10 oz. can of interior/exterior, fast-drying spray paint in metallic silver*
  • One plastic syringe
  • One plastic prescription bottle
  • One 8 oz. can of oil-based interior wood stain in Jacobean*
  • One 8 oz. can of oil-based interior wood stain in red chestnut*
  • One plastic heart
  • One pair of metal scissors
  • One pair of silver tweezers
  • Two crochet hooks
  • One 0.3 fluid ounce bottle of red food coloring*
  • One 4 oz. bottle of clear, all-purpose tacky glue gel*
  • Six cotton swabs
  • Two 1.5-inch T-pins
1. Thoroughly wash and dry the tray. If there is any sticker residue, use rubbing alcohol to remove it (soak a paper towel in the solution, let it sit over the area for a few minutes, and wipe away the remaining glue). After cleaning the tray, roughen its surfaces with coarse sandpaper to help the paint adhere and then give the tray one or two even coats of metallic silver spray paint. This step is entirely optional; however, if the tray has a non-stick coating, you want to cover it so the blood has something to firmly adhere to (otherwise, it will peel off after drying).
2. On a newspaper-lined surface in a well-ventilated area, paint the syringe and prescription bottle with the Jacobean wood stain. I discovered that applying a thin coat and patting it with paper towels produces a hazed appearance. Then, dab their surfaces with the red chestnut wood stain to create spots of dried blood.
3. Position the heart, prescription bottle, scissors, syringe, and tweezers on the tray and glue them in place. You can arrange the items however you like and can substitute the scissors or tweezers for other types of medical-looking instruments. For the best hold, I highly recommend using superglue for all of these elements.
4. Cut two holes into the top of the heart and insert the crochet hooks into the openings, gluing them in place. Akin to step three, you can replace these items with other surgical tools like forceps or scalpels to cater the prop to your haunt’s needs.
5. In a plastic container (because the food coloring will stain, use something disposable or that you won’t mind dying), pour in your desired amount of clear glue gel and slowly add red food coloring to the solution until it achieves the sanguine hue you desire. To give the blood further density, add blue food coloring and mix well.
6. Apply the blood glue to the prop and allow it to fully dry. You can use an old spoon or plastic utensil to strategically dribble the liquid along chosen areas or pour it haphazardly for a gory mess. During this step, add cotton swabs and T-pins to the sanguine pool for extra detail.
7. Depending on your haunt’s theme, you can embellish the prop further with swarms of maggots crawling across the heart’s surface or attach a specimen tag to the tray’s side.
*You will not use the entire bottle’s content for this project.