Friday, July 26, 2024

Death and Funerals in the Antebellum South: A Mini-Essay

     Like everything in the antebellum South, death and mourning was governed by a strict series of rituals that supported class, gender, and race relations. At the onset of death, the extended family, from aunts and uncles to cousins and siblings, were summoned to the deathbed.[1] Along with tending to the ailing, women  mainly the dying’s mother or wife  were responsible for attending to the needs of visiting family and relating via written correspondences the final moments for those who were unable to travel due to distance or delay.[2] Following death, the funeral became a reflection of the deceased individual’s social class and wealth, with everything from the coffin to those in attendance at the ceremony attesting to the dead’s socioeconomic status.[3] Funerals, too, reinforced gender roles as women were forced to remain in the background during burials (in Louisiana, they were barred from attending the entire funeral), tasked with entertaining mourners at the reception and in the weeks following, and reorganizing family affairs during the months-long grieving period.[4]
 
Works Referenced 

Clinton, Catherine. The Plantation Mistress: Woman’s World in the Old South. New York: Pantheon Books, 1982.
____________________
[1] Clinton, 158-159.
[2] Clinton, 158-159.
[3] Clinton,159.
[4] Clinton,159.

Friday, July 19, 2024

Skeleton Hand Cloche

$25 - $30 (based on 2020 prices)
Makes one display

Like many of the props built for 2020’s haunt, this skeleton hand cloche was meant to nestle among the towers of laboratory equipment and reinforce the mad scientist theme. Although I used an anatomical hand bought from a medical supply store, the budget-conscious haunter can use a cheaper skeletal hand purchased at a big-box Halloween store to achieve the same effect.
  • One plastic cloche with detachable base (roughly twelve inches tall)
  • One medical skeleton hand small enough to fit within the cloche
  • One 10 oz. can of interior/exterior, fast-drying spray paint in flat black*
  • One 10 oz. can of interior/exterior, fast-drying spray paint in metallic silver*
  • One 8 oz. can of oil-based interior wood stain in Jacobean*
  • One 2 oz. bottle of acrylic paint in flat black*
  • One 2 oz. bottle of acrylic paint in flat brown*
  • One 2 oz. bottle of acrylic paint in flat red*
  • One 3/16” wooden dowel
  • Three to four feet of steel wire
1. On a newspaper-lined surface in a well-ventilated area, stain the hand. First, begin by giving it a light, even coat with a foam brush. Then, apply heavy amounts of stain and pat away the excess with paper towels. You want the color to build up in the cracks and fissures. Although you may use whatever color of stain you desire, I chose Jacobean because it gives the bone an aged appearance.
2. Cut the wooden dowel into two sections which are 1.75” in length. Depending on the height of the cloche, you may need to adjust this measurement. Following this, use a 7/32 bit to drill two holes into the base of the hand and glue the dowels in the openings.
3. Determine where you would like the hand to rest below the cloche and, using a 7/32 bit, make two holes in the base, inserting the dowels and gluing them in place. As the glue dries, prop the hand up with a sturdy object like a can.
4. Cover the hand in plastic and, on a newspaper-lined surface in a well-ventilated area, build up layers of black and metallic silver spray paint to give the base and dowels the look of steel. It works best to apply a base coat of black followed by sliver, working in quick bursts to allow parts of the black to remain visible. You can also touch up portions with additional blasts of black if the silver becomes too heavy.
5. Once the spray paint dries, create a wash of brown paint and use it to add a level of grime to the prop, allowing the liquid to settle in the crevices.
6. Remove the plastic wrapping from the hand and, with a fine-tipped brush, darken the joints and the spaces between the wrist bones with black paint, smudging it slightly for a hazed look which adds to the aged appearance.
7. Beginning with the thumb, run steel wire between the joints to make it look like the hand is held together by the connections. Although this step is entirely optional, it gives the prop an additional level of detail and visual interest.  
8. Give the wire a rusted patina by building up layers of brown and red paint. Begin with a light coat of red paint and, once that dries, apply a layer of brown, being careful not to cover too much of the red paint.
9. On a newspaper-lined surface in a well-ventilated area, paint the cloche with the wood stain. I discovered that applying a thin coat and patting it with paper towels produces a hazed appearance. Likewise, brushing the rim with a swift downward motion creates the illusion of grime buildup.
10. Reattach the cloche to its base. If you plan for a more permanent display, you can glue the item down. Likewise, you can add extra embellishments, such as a specimen tag or biohazard label, to cater the prop to your theme.
*You will not use the entire bottle’s content for this project.

Friday, July 12, 2024

“A Child’s Nightmare" (A Poem)

Slightly reminiscent of Edgar Allan Poe’s “The Raven,” Robert Graves’ “A Child’s Nightmare” involves the narrator being visited by a symbol of death in the form of an animal that utters the same monotone word. While Poe’s poem explores loss and mourning, Graves’ examines the horrors of war and the impending death faced by soldiers. Written in 1917, the poem grapples with the horrors of World War I which, by this point, had made themselves evident to the entire globe: the mud and blood of the trenches, the perniciousness of weaponized machinery, and the disillusionment of the youth sent into battle.[1] In fact, Graves’ poem was just one of many literary works which commented on the conflict’s trauma, with Rebecca West’s Return of the Solider (1918) being among the first to explore the shell shock of returning servicemen.[2] Unlike the poem’s narrator, though, Graves survived the war, despite being accidentally reported dead in 1916.[3]

Through long nursery nights he stood
By my bed unwearying,
Loomed gigantic, formless, queer,
Purring in my haunted ear
That same hideous nightmare thing,
Talking, as he lapped my blood,
In a voice cruel and flat,
Saying for ever, “Cat!… Cat!… Cat!…”

That one word was all he said,
That one word through all my sleep,
In monotonous mock despair.
Nonsense may be light as air,
But there’s Nonsense that can keep
Horror bristling round the head,
When a voice cruel and flat
Says for ever, “Cat!… Cat!… Cat!…”

He had faded, he was gone
Years ago with Nursery Land,
When he leapt on me again
From the clank of a night train,
Overpowered me foot and head,
Lapped my blood, while on and on
The old voice cruel and flat
Says for ever, “Cat!… Cat!… Cat!…”

Morphia drowsed, again I lay
In a crater by High Wood:
He was there with straddling legs,
Staring eyes as big as eggs,
Purring as he lapped my blood,
His black bulk darkening the day,
With a voice cruel and flat,
“Cat!… Cat!… Cat!… Cat!…” he said, “Cat!… Cat!…”

When I’m shot through heart and head,
And there’s no choice but to die,
The last word I’ll hear, no doubt,
Won’t be “Charge!” or “Bomb them out!”
Nor the stretcher-bearer’s cry,
“Let that body be, he’s dead!”
But a voice cruel and flat
Saying for ever, “Cat!… Cat!… Cat!”[4]

Works Referenced

Beiriger, Eugene Edward. World War I: A Historical Exploration of Literature. Santa Barbara, CA: Greenwood, 2018.

Graves, Robert. “A Child’s Nightmare.” Fairies and Fusiliers. London: William Heinemann, 1917. 61-62.

Morpurgo, Michael, ed. Only Remembered: Powerful Words and Pictures about the War That Changed Our World. London: Corgi Books, 2014.

Wilson, Jean Moorcroft. Robert Graves: From Great War Poet to Good-bye to All That (1895-1929). London: Bloomsbury Continuum, 2018.
____________________
[1] Morpurgo, 269.
[2] Beiriger, 185.
[3] Wilson, 4.
[4] Graves, 61-62.

Friday, July 5, 2024

Rotten Leg Tray

$25 - $30 (based on 2020 prices)
Makes one tray

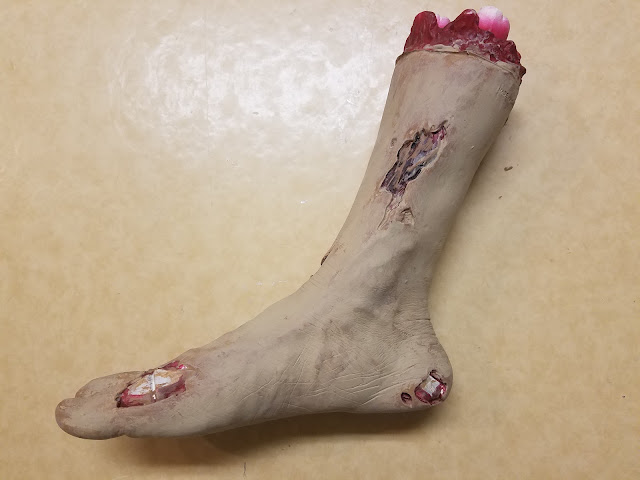
I was impressed with the rotten patina of the decomposing fingers, so I decided to apply the paint job to larger items, specifically severed limbs. To achieve this goal, I created two props: one with a decomposing leg (featured here) and one with a rotting arm. To further enhance their ickiness, I covered the limbs in maggots, just as I did the maggot doll for 2017’s haunt.
  • One vinyl severed leg
  • One 2 oz. bottle of acrylic paint in black*
  • One 2 oz. bottle of acrylic paint in brown*
  • One 2 oz. bottle of acrylic paint in dark gray*
  • One 2 oz. bottle of acrylic paint in light gray*
  • One 2 oz. bottle of acrylic paint in khaki*
  • One 2 oz. bottle of acrylic paint in olive*
  • One bag of maggots (roughly one-hundred insects per bag)
  • One 0.14 oz. bottle of superglue gel
  • One 9” x 13” metal baking sheet
  • Two pairs of plastic tweezers
  • One pair of plastic forceps
  • One small tray
  • One 10 oz. can of interior/exterior, fast-drying spray paint in flat black*
  • One 10 oz. can of interior/exterior, fast-drying spray paint in metallic silver*
1. On a newspaper-lined surface, give the leg three even coats of khaki paint. Although I used three, you may want more or less based on your desired coverage.  
2. Lightly brush brown paint on the fingertips, knuckles, and other raised areas. I discovered that applying a small amount of paint to your thumb and index finger and rubbing it onto the prop works well.
3. Once the brown paint has dried, repeat the process with black. During this step, be careful not to cover too much of the brown paint.
4. Begin detailing the nails with a coat of dark gray paint then, after that dries, dab light gray onto the nails, building up layers until they look decrepit. To complete the process, smudge black around the tips of the toes and along their cuticles.  
5. Color the stump and the wounds black and, using a brush with splayed bristles, stipple black paint around their edges.  
6. Glue the maggots to the leg. For believability, you want to select one or two of the wounds where they will swarm the body. I elected to do this with one of the wounds near the ankle, building up a large mass and gradually spreading the insects outward. Because the specific maggots I used were made of a sticky gel, I had to use superglue to hold them in place. Although it took several hours to adhere each insect individually, the final product was well worth the effort and time.  
7. Thoroughly wash and dry the baking sheet. If there is any sticker residue, use rubbing alcohol to remove it. After cleaning the sheet, roughen its surface with coarse sandpaper to help the paint adhere, especially if it has a non-stick coating. Then, on a newspaper-lined surface in a well-ventilated area, build up layers of black and metallic silver spray paint to give the forceps, sheet, tray, and tweezers the look of steel. It works best to apply a base coat of black followed by sliver, working in quick bursts to allow parts of the black to remain visible. You can also touch up portions with additional blasts of black if the silver becomes too heavy.  
8. Create washes of brown and olive paint and use them to add a level of grime to the prop, allowing the liquids to settle in the crevices. Depending on your chosen aesthetic, this process can be skipped for a cleaner look.
9. Position the forceps, leg, tray, and tweezers on the sheet and glue them in place. You can arrange the items however you like and can substitute the forceps or tweezers for other medical-looking instruments. For the best hold, I highly recommend using superglue for all of these elements.
10. Accent the prop with the remaining maggots. For cohesion, cluster them below the wounds where the insects are pouring out of the leg, making it appear they are spilling onto the sheet.  
11. Depending on your haunt’s theme, you can embellish the prop further with items like a specimen tag tied to one of the toes or biohazard labels adhered to the sheet.
 *You will not use the entire bottle’s content for this project.