Friday, August 4, 2017

Severed Ears

$10 - $12 (based on 2016 prices)
Makes three ears

Since my little brother and I began yard haunting in the early 2000s, we have watched the quality of Halloween props gradually diminish (I miss the days of Don Post and Mario Chiodo). It has been rather bittersweet: I’m saddened by the growing mediocrity, yet happy that this has forced me to create more of my own items. One area where I have seen the worst degeneration is in the believability of severed body parts. Over the past few years, I’ve been working on repainting store-bought parts with a more realistic patina (see my severed fingers here) and the results have been quite enjoyable.
  • Three vinyl ears
  • One 2 oz. bottle of acrylic paint in burgundy*
  • One 2 oz. bottle of acrylic paint in coral*
  • One 2 oz. bottle of acrylic paint in deep maroon*
  • One 2 oz. bottle of acrylic paint in flesh tone*
1. On a newspaper-lined surface, apply three even coats of flesh-tone paint to the ears. Although I used three, you may want more or less based on your desired coverage. 
2. Once the flesh-tone paint has dried, turn the ears over and coat the inside with deep maroon. Akin to step one, I used three layers of this color, but you may alter that number to cater toward your preferences.
3. Give the ears a smudging of coral paint. Focus primarily on the tips of the ears and along the curvatures of the helix and tragus. Use your own skin patterns or those found in a medical textbook for reference. I discovered that applying a small amount of paint to your thumb and index finger and rubbing it onto the prop works well.
4. Using a brush with splayed bristles, apply a smattering of burgundy paint around the wounds and up the sides of the ears.
5. Repeat the process in step four with the inside of the ears and focus your application into the folds and fissures to give depth.
6. For additional detail, you can create random abrasions along the ears by dabbing burgundy paint with a splayed-bristle brush and adding dark red paint to the centers.
*You will not use the entire bottle’s content for this project.

Friday, July 28, 2017

The Incident at Glenburnie: A Mini-Essay

     At dawn on August 4, 1932, the body of sixty-eight-year-old Jennie Merrill – riddled with multiple wounds from a .32 caliber handgun – was found in the woods outside her family’s plantation in Natchez, Mississippi.[1] The murder shocked the county and, over the course of the proceeding weeks, illuminated the bizarre relationship between the victim and her neighbors. 
     In her teenage years, Jennie was part of a privileged foursome (Duncan Minor, Jennie’s beau and heir to one of the largest fortunes in town; Octavia Dockery, a brilliant poetess destined for literary greatness; and Dick Dana, Octavia’s paramour and an accomplished concert pianist) which dominated the glittered cotillions and garden parties of Natchez’s elite society.[2] Together, the two couples became the envy of the social scene until tragedy quickly took hold. In 1883, Ayres Merrill died and the family broke apart, with Jennie moving into the Glenburnie plantation alone.[3] Shortly following this, Duncan’s mother terminated the couple’s engagement and the jilted Jennie became a recluse, entombing herself in the plantation’s confines and seeing only her darling Duncan, who refused to marry another woman and ritualistically visited his beloved every night in her solitary confinement.[4] Fate would deal Dick and Octavia equally devastating blows. 
     Happily married, the two moved into the Glenwood plantation next to their dear friend, where an incident with a window left Dick’s fingers mangled and financial hardships endured. Forced to support the family herself, Octavia ceased writing and abandoned any hopes of a prosperous literary career. As the money dwindled, so did Dick’s sanity. He began wandering the woods between Glenburnie and Glenwood during the day, where Octavia often found him hidden in trees wearing only a potato sack, and sitting at his grand piano at night, where his maimed fingers hammering out discordant melodies.[5] Akin to Dick’s collapsing mind and the deteriorating Glenwood, the relationship between the four rapidly declined, with Jennie perpetually fighting with her former friends over their home’s derelict state and Duncan threatening to purchase the property out from under them.[6] Then, on the night of August 3, the unthinkable occurred when Duncan entered Glenburnie and found the drawing room a gory mess of broken furniture, smudged fingerprints made by a deformed hand, and a discarded bloody overcoat.[7] A search party was immediately assembled, which scoured the woods throughout the night and eventually stumbled upon Jennie’s body. 
     Dick and Octavia were quickly charged and imprisoned. In a search for evidence, police discovered that Glenwood had declined far worse than anyone had expected: furniture lay in broken shambles; moldy stacks of newspapers toward throughout the manor; fleas and mites – along with inches of dust – covered every surface; and chickens, ducks, and goats freely meandered throughout the home and left trails of excrement.[8] The shocking condition of Glenwood gave the plantation the nickname “Goat Castle” and, throughout the nation, the public reveled in the story of the madness surrounding these former-friends-turned-murders. Yet, the case would take an even odder turn when, on the night of Jennie’s funeral, a vagrant was shot and killed over two-hundred miles away in Pine Bluff, Arkansas. The incident seemed of little importance until it was discovered that the drifter possessed a deformed hand and .32 caliber handgun which ballistics testing traced back to Jennie’s murder.[9] Dick and Octavia were exonerated and Jennie’s death was labeled the product of a botched robbery. National coverage of the trial made Dick and Octavia celebrities and crowds flocked to Glenwood to pay fifty cents for a tour of “Goat Castle” and to be serenaded by Dick, whose playing had evolved from lumbered melodies to enthusiastic waltzes. For some, though, the crime’s official verdict seemed erroneous and that’s when the stories began.[10]
     Residents of Natchez claimed they could hear deathly moans – which started shortly after Dick and Octavia returned home from their incarceration – drifting through the woods between Glenburnie and Glenwood at night. They also noticed a change in Dick’s playing. It had become louder and more passionate. Furthermore, it commenced directly before dusk and lingered on throughout the night.[11] For some, it appeared as though he was attempting to drown the bewitching wails from Jennie, which only fueled whispered rumors that he had killed his former friend and, haunted by the ghost of her restless soul, manically played his piano each night to wash out her accusatory chants from his guilty mind. 

Works Referenced 

Anderson, Jean. The Haunting of America: Ghost Stories from Our Past. Boston: Houghton Mifflin Company, 1973. 

Matrana, Marc. Lost Plantations of the South. Jackson, MS: University Press of Mississippi, 2009. 

Miller, Mary Carol. Lost Mansions of Mississippi. Vol. 2. Jackson, MS: University of Mississippi Press, 2010.
____________________

[1] Miller, 45.
[2] Miller, 42-44.
[3] Miller, 45.
[4] Matrana, 145-146.
[5] Anderson, 80-81.
[6] Miller, 45.
[7] Anderson, 82.
[8] Miller, 46.
[9] Miller, 46.
[10] Anderson, 82-83.
[11] Anderson, 84.

Friday, July 21, 2017

Sprucing-Up Old Spider Webbing

$10 - $12 (based on 2016 prices)
Makes one web

Sometimes those tried-and-true props need a facelift after years of repeated use. In the case of my massive spider web, I wanted to give it added interest by weaving the bones of victims into it. Since I intended for this to be a temporary adjustment (I plan to give the prop an entirely different look for 2017’s haunt), I chose to attach the bones with yarn. For more permanency, you could hot glue them into place.
  • One large fabric spider web (roughly 12’ in diameter)
  • One bag of cheap, plastic bones (roughly one dozen bones per bag)
  • Eight to nine yards of black yarn
1. Find an area on your wall large enough to accommodate your web, clear it of any decorations and pictures, and hang it with its attached strings.
2. Cut the yarn into two-foot strips. Although you can cut them shorter, I found that this size gives you ample length to work with and compensates for any mistakes made during steps three and four.
3. Determine where you want your bones and thread the yarn through the webbing. Try to select areas near the webbing’s seams for added support.
4. Wrap the yarn around the bones at least three times, knot the ends, and trim the excess. You could arrange the bones in random patterns or create designs (e.g. a pentagram, a large skull, or a menacing spider).

Friday, July 14, 2017

"The King's Ring" (A Poem)

A newspaper editor, poet, and abolitionist, Theodore Tilton is best known for using his writing to raise support for abolitionism and the Union Army during the American Civil War. Although his poetic works have been overshadowed by his journalism, a few of his poems still maintain a hint of popularity, particularly “The King’s Ring” and its famous line. Derived from the Latin saying sic transit gloria mundi (which, beginning with Pope Alexander V, has been used in the papal coronation ceremonies since 1409)[1] the line has been quoted extensively following the poem's first publication, including a reference by Abraham Lincoln in his address to the Wisconsin State Agricultural Society on September 30, 1859.[2]

Once in Persia reigned a King,
Who upon his signet-ring
Graved a maxim true and wise,
Which, if held before his eyes,
Gave him counsel, at a glance,
Fit for every change or chance;
Solemn words, and these are they:
“Even this shall pass away.”


Trains of camels through the sand
Brought him gems from Samarcand;
Fleets of galleys through the seas
Brought him pearls to rival these.
But he counted little gain
Treasures of the mine or main.
“What is wealth?” the King would say;
“Even this shall pass away.”
 

In the revels of his court,
At the zenith of the sport,
When the palms of all his guests
Burned with clapping at his jests,
He, amid his figs and wine,
Cried, “O loving friends of mine!
Pleasures come, but do not stay:

Even this shall pass away.”

Lady fairest ever seen
Was the bride he crowned the queen.
Pillowed on his marriage-bed,
Whispering to his soul, he said,
“Though no bridegroom never pressed
Dearer bosom to his breast,
Mortal flesh must come to clay:
Even this shall pass away.”

Fighting on a furious field,
Once a javelin pierced his shield.
Soldiers with a loud lament
Bore him bleeding to his tent.
Groaning from his tortured side,
“Pain is hard to bear,” he cried,
“But with patience day by day,
Even this shall pass away.”

Towering in the public square
Twenty cubits in the air,
Rose his statue carved in stone.
Then the King, disguised, unknown,

Gazing at his sculptured name,
Asked himself, “And what is fame?
Fame is but a slow decay:
Even this shall pass away.”

Struck with palsy, sere and old,
Waiting at the Gates of Gold,
Spake he with his dying breath,
“Life is done, but what is Death?”
Then, in answer to the King,
Fell a sunbeam on his ring,

Showing by a heavenly ray -
“Even this shall pass away.”[3]

Works Referenced

Knowles, Elizabeth, ed. The Oxford Dictionary of Phrase and Fable. 2nd ed. Oxford: Oxford University Press, 2006.

Lincoln, Abraham. "Address to the Wisconsin State Agricultural Society." The Essential Lincoln: Speeches and Correspondence. Ed. Orville Vernon Burton. New York: Hill and Wang, 2009. 65-72.

Tilton, Theodore. "The King's Ring." The Sexton's Tale and Other Poems. New York: Sheldon and Company, 1867. 45-48.

[1] Knowles. 
[2] Lincoln, 72.
[3] Tilton, 45-48.

Friday, July 7, 2017

Skull Bird’s Nest

$25 - $30 (based on 2016 prices)
Makes one nest

This idea emerged when a friend visited in September to witness the haunt’s progress. She made a passing comment about a bird’s nest fashioned from a skull and the creative spark immediately ignited. Over the course of one weekend, I transformed her idea into a reality. Although the prop looks complicated, it is rather easy to assemble.
  • One cheap, plastic skull
  • One newspaper
  • One to two yards of burlap
  • One 4 oz. bottle of all-purpose tacky glue*
  • One to two yards of dark-brown twine
  • One 10 oz. can of interior/exterior, fast-drying spray paint in black*
  • One small, plastic skeleton bird
  • One 8 oz. can of oil-based interior wood stain in Jacobean*
  • Four or five dried sticks
  • One 1.75 oz. bundle of tan raffia
  • One ½ oz. bag of feathers
  • One 2 oz. bottle of acrylic paint in flat black*
1. Cut the top off of the skull. For visual interest, create jagged edges. To make this process easier, purchase a skull made from thin plastic. If it helps, trace the outline of your cut with a marker first.
2. Densely pack the inside of the skull with newspaper. Since this will be the base for your nest, you want it as firm and level as possible.
3. Cut the burlap into a square large enough to amply cover the skull. For my version, I used a medium-sized skull and cut the fabric into a 2’ x 2’ square, which gave me extra fabric for mistakes.
4. Starting at the back of the skull, glue burlap to the prop. I found that this step works best if you move in stages: apply a layer of glue to one section, hold the fabric down until it sticks, and then repeat the process.
5. Before you glue the fabric to the face, thread twine along the areas which will cover the eyes and mouth to give the illusion that these have been sewn shut (trust me: it is easier to do this while the fabric is still loose as opposed to once it has been glued down).
6. Glue down the remaining burlap and fold it into the cavity at the top of the skull. You may have to trim the edges if you are left with too much fabric.
7. On a newspaper-lined surface in a well-ventilated area, paint the inside of the cavity black. For added detail, smudge the edges with black paint.
8. On a newspaper-lined surface in a well-ventilated area, stain the bird. I began by giving it a light, even coat with a foam brush. After that, I applied heavy amounts of stain and patted away the excess with paper towels. You want the color to build up in the cracks and fissures. Although you may use whatever color of stain you desire, I chose Jacobean because it gives the bird a brown, rotten appearance. Once you have achieved your intended look, allow the bird to completely dry. I let mine sit outside in the sun for three days.
9. Once the bird has dried, glue it into the center of the cavity. I used hot glue, but you could always use superglue for a sturdier hold.
10. Fill the nest with sticks, raffia, and feathers. I used hot glue to adhere all of these objects, but, as with the bird, you could use superglue. You could also add fake eggs, a feast of crawling insects, or some severed fingers.
11. Brush black paint around the skull’s features to add depth. Focus your attention along the edges of the mandible and maxilla, along the curve of the zygomatic arch, and within the nasal and orbital sockets.
12. For added interest, cut a hole in one of the eyes and glue raffia into the socket.
13. I intended for this prop to sit on a crate in the haunt’s display (add a little weight to the base to prevent it from being top heavy). If you want to hang it, you could punch a few holes along the top of the skull and use the twine to dangle it from a tree limb.


*You will not use the entire bottle’s content for this project.

Friday, June 30, 2017

The Mystery of Roanoke: A Mini-Essay

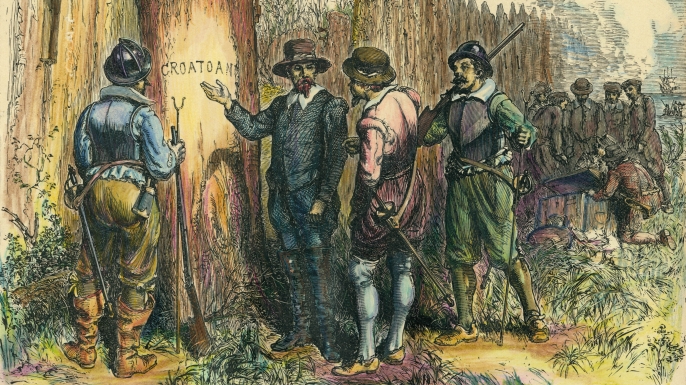
     On August 27, 1587, over one-hundred individuals watched as the three ships which had brought them to an abandoned English fort disappeared into the horizon. For weeks, these men, women, and children – the first English colonists in America – had repaired the fort’s derelict buildings and constructed new cottages out of brick and tile. During the construction, Elizabeth and Ananias Dare welcomed the arrival a baby girl and, a few days later, Dyonis and Margery Harvie delivered a boy.[1] Their celebrations were cut short as their governor, John White (Elizabeth Dare’s father), and the three ships were summoned back to England. As he parted ways with his daughter and new-born granddaughter, White promised to return with needed supplies within a few months. The promise went unkept and, when White finally returned in August of 1590, the fort was abandoned and only a cryptic CROATOAN etched into the entrance posts hinted at the colonists’ fate.[2] For centuries, what occurred during White’s three-year absence has been – and continues to be – the fodder for legends and fiction. From alien abductions and cannibal tribes to ancient curses and bloodthirsty monsters, theories abound regarding the destiny of those deserted settlers. Although extraterrestrials and curses make for great storytelling, serious scholarship reveals that Roanoke’s tale was far more tragic than supernatural.
     The colony began in 1585 when Sir Walter Ralegh, one of Queen Elizabeth’s pets, sent about one-hundred men to settle a small island on the North Carolina coast.[3] As summer gave way to winter, the colonists quickly strained their relationship with the Algonquian tribe, which had benevolently supported the men with their own surplus of food. When Sir Ralph Lane killed their chief in retaliation, the fort was quickly abandoned.[4] Irked, Ralegh attempted to settle the area again with White’s expedition and, again, misfortune ensued, this time involving the mysterious disappearance of several families. So, aliens and monsters aside, what really happened? Although historians degree slightly, they have proposed several credible scenarios.
     In North Carolina, local legend maintains that the colonists intermarried with the Lumbee tribe of Robeson County and their descendants still exist today. Historian Karen Ordahl Kupperman argues that this may be the most plausible explanation, with the settlers melting into the native populations akin to the three men abandoned by Lane and the fifteen men deserted by Sir Richard Grenville’s expedition in 1586.[5] Alan Taylor agrees with the fable to an extent. Drawing upon documentation from a group of English colonists who encountered a native tribe at Chesapeake Bay in 1607, the scholar contends that the refugees joined a local village and, shortly following this, the village’s members provoked the powerful Powhatan chieftain and were viciously killed.[6] Anthropologist Lee Miller takes a more intriguing stance and asserts that political deceit in Queen Elizabeth’s court – with Sir Francis Walsingham at the helm – purposefully intervened in Raleigh’s expedition in an effort to dismantle his credibility and remove him from the queen’s favor.[7] The plan, Miller contends, worked too well, with Raleigh condemned to the Tower of London and his colonists abandoned as hapless victims in a political game of jealously.[8] In desperation, the neglected settlers moved west into the interior of North Carolina and stumble upon a conflict between native nations, where they were either slaughtered in battle or taken as slaves.[9] Another possible outcome involves the Dare Stones housed at Brenau University. The first, found by a tourist along the Chowan River in 1937, held a bleak inscription: “Ananias and Virginia Dare went hence unto Heaven 1591.”[10] Between 1937 and 1940, over forty stones were found detailing the tragic tale of the settlers’ sad, death-riddled venture into the interior of North Carolina. Although most have been proven counterfeit, the original stone has maintained some semblance of credibility, with the spelling conforming to Elizabethan orthography and the inscription etched with tools likely possessed by the colonists.[11]

Works Referenced

Coleman, R.V. The First Frontier. 1948. Edison, NJ: Castle Books, 2005.

Kupperman, Karen Ordahl. Roanoke: The Abandoned Colony. Lanaham, MD: Rowman and Littlefield Publishers, Inc., 1984.

Miller, Lee. Roanoke: Solving the Mystery of the Lost Colony. New York: Arcade Publishing, 2000.

Taylor, Alan. American Colonies. New York: Viking Press, 2001.

[1] Miller, 3. 
[2] Miller, 14. 
[3] Taylor, 123. 
[4] Taylor, 124. 
[5] Kupperman, 141. 
[6] Alan, 124. 
[7] Miller, 190-191. 
[8] Miller, 203-204. 
[9] Miller, 234-236. 
[10] Coleman, 61. 
[11] Coleman, 60-61.

Friday, June 23, 2017

Rusted Sickles

$10 - $15 (based on 2016 prices)
Makes three sickles

No haunted farm is complete without a collection of rusty tools. While many of these items came from my grandmother’s shed (you cannot argue with free and there is no competing with Nature’s process for weathering steel and wood), I elected to give the few props that came in contact with either myself or others a rusted patina. For this, I simply re-purposed cheap weapons bought at a party store with some paint and papier mache handles.
  • Three plastic sickles
  • One 10 oz. cans of interior/exterior, fast-drying spray paint in metallic silver
  • One 2 oz. bottle of acrylic paint in flat black*
  • One 2 oz. bottle of acrylic paint in flat brown*
  • One 2 oz. bottle of acrylic paint in flat maroon*
  • One 2 oz. bottle of acrylic paint in flat white*
  • One newspaper
  • One 4 oz. bottle of all-purpose tacky glue
  • One 4 oz. bottle of wood glue
  • Once yard of dark-brown twine
1. On a newspaper-lined surface in a well-ventilated area, give the sickles a few even coats of metallic spray paint. I used two, but you may apply more or less. To achieve a nice coverage, select a paint which adheres to plastic.
2. After the metallic paint has dried, dab maroon paint onto the sickles. I used an old paintbrush with splayed bristles; however, a sponge or paper towels will work well. Concentrate your application on areas where rust would naturally form, particularly along the edges of the blades.
3. Once the maroon paint has dried, repeat the process with brown paint. During this application, be careful not to cover too much of the maroon paint.
4. Apply a slight flecking of black paint. You can do this by either quickly flicking a paintbrush or using an old toothbrush and strumming your finger across the bristles. Since this process flings paint everywhere, it’s best to perform it outside.
5. Make the papier mache paste by mixing ½ cup of glue and ½ cup of water in a bowl. Try to use a sealable container. This gives you the ability to store the mixture for a day or two between applications. Also, to give the paste added support, use a combination of all-purpose glue and wood glue (stray away from school glue because it is washable and will dissolve in the water).
6. Cut the newspaper into strips, soak them in the paste, and apply them to the handles. To make the process more manageable, keep the strips at a reasonable size (mine were roughly six inches long and two inches wide). Similarly, only apply a few layers at a time and allow each layer to completely dry before adding more (I did two layers during each application and let them dry for twenty-four hours). If you plan to use these props as weapons, you want the handles as sturdy as possible; therefore, more layers are best.
7. Give the handles a few even coats of white paint. This covers the newspaper’s print and gives the prop a blank canvas for the painting process. You could bypass this step by using white copy paper rather than newspaper for the papier mache
8. To give the handles a grimy appearance, water down brown paint and brush it over their surfaces, ensuring the liquid settles into all the cracks and fissures (you can also use a spray bottle for the application). Allow the mixture to sit for a few minutes and then wipe it clean. Once you have achieved the look you desire, repeat this process with black paint to add further detail. You may want to experiment with the consistency prior to doing all of this: the more water you add, the fainter/lighter the wash; the less water you add, the deeper/darker the wash.
9. For additional detail, wrap twine around the handles and glue it into place. You could also add bones or feathers to cater the prop to your haunt’s specific theme.

*You will not use the entire bottle’s content for this project.